Data submission procedure using CSV Upload
1. Preparing the csv file
- The CSV file should contain following fields “filename;recordname;genetic_sequence”
- Description of the values for the fields "filename" and "recordname" are :
Filename: This field is used as the first key for linkage between the data sent through HD4DP1 (patient & sample data) and SFTP (nucleotide sequences data). This field must contain the same value for both uploaded records to allow the 1 to many link. Please use this convention: ARL_yyyymmddHHMMSS (name of ARL and date-time stamp of the file, e.g. HSP_20240827092014). The name of the csv file with nucleotide sequences sent through SFTP must have this value in order to be linked with the record transferred via the HD4DP1 (patient & sample data).
Recordname: This field is used as the second key for linkage between the data sent through HD4DP1 (patient & sample data) and SFTP (nucleotide sequences data). This field must contain the same unique value for both uploaded records to allow the 1 to 1 link. Please use this convention: ARL_yyyymmddHHMMSS_xxxxx (name of ARL, date-time stamp of the file and a unique 5-digit number, e.g. HSP_20240827092014_00001). as described
- The values of the field “genetic_sequence” contain the nucleotide sequences of the HIV genes.
Example of the CSV file for sequence :
Disclaimer: The example files above are only provided as a guideline and do not contain real life data.
2. Uploading the CSV file
Step 1: Open the sftp tool like WinSCP
Step 2: Get the credentials (Host name, Port number, User name and Password) from the IT department of the Data Provider, to log on to the sftp server located on the Data Provider side. In case the credentials are unavailable we advise you to request your credentials through our service portal at the Jira Service management (JSM) Portal via the Request something tab and subsequently the Request for Information box.
Step 3: Fill in the credentials into the Login screen and click on Login to be able to access the different upload folders:
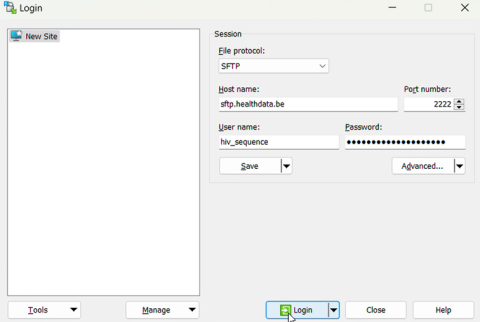
Note: a warning might be given, just click on Update

Below documentation contains generic example screens with the sole purpose to demonstrate how the process looks like. In the subsequent screens the desired HIV_sequence register needs to be selected.
Step 4: Select the desired HIV_sequence folder and open the upload folder by double-clicking on it:

Step 5: Now go to the folder on the left-hand side panel where the csv file to be uploaded is located:

Step 6: Drag the csv file to be uploaded from the left-hand side panel into the folder on the right-hand side panel:

Step 7: Refresh the right hand pane. The ownership of the file has been transfered from the ‘hiv_sequence’ user (1092) to our technical user (1001), thereby preventing the data providers from further accessing the uploaded files in any way.

The files are deleted by the load process when it picks them up once daily.
3. Validate csv upload
No validation of the files occurs