Access Manager actions using CSV Upload
Table of contents
How to create EAM Users using CSV Upload?
How to create EAM accounts and add grants using CSV Upload?
How to export EAM Users in batch using CSV?
How to export EAM Accounts in batch using CSV?
This documentation is being updated regularly. We try to provide as correct, complete and clear as possible information on these pages. Nevertheless, if you see anything in the documentation that is not correct, does not match your experience or requires further clarification, please create a support ticket via our portal Jira Service Management or send us an e-mail via support.hd@hda.fgov.be to report this documentation issue. Please do not forget to mention the URL of the page. We will then adjust the documentation as soon as possible. Thank you!How to create EAM Users using CSV Upload? (own orgs)
Video available here
Full tutorial available here
End-to-end process:
Navigating to the HD EAM Portal and Access Manager profile
Go here to learn how to login via the Federal Authentication Service (FAS) with eID or itsme.
Creating EAM Users via bulk upload
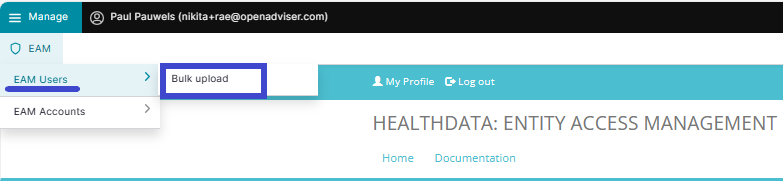
Click on Manage on the top left of the screen in order to reveal the EAM menu. Click on EAM Users and then Bulk upload.
On the Users Batch Creation page, select a valid .csv file on your system to upload.
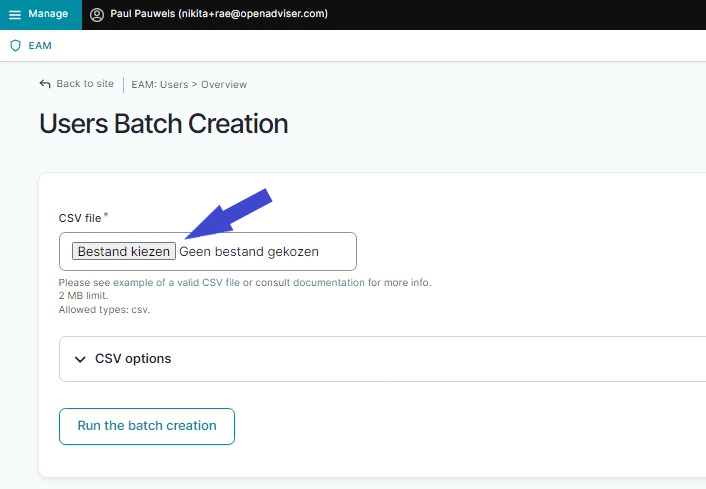
If you don't have a valid file available, use the following example file:
Use the schema file to validate the csv example file:
ATTENTION:
User roles and corresponding values
To complete the value for the field “role”, 2 different variables are possible:
- access_manager
- default
Additional tips:
- If the user already exists, the line will be skipped.
- Avoid using Excel as this can lead to unwanted formatting.
- First_name and Last_name need to be capitalized.
- Make sure that you have placed the quotation marks correctly. If the values have no comma, you can also leave out quotes.
Abbreviations used in csv bulk upload files
- ssin: Social Security Identification Number - Numéro d’identification de la sécurité sociale (NISS) - IdentificatieNummer Sociale Zekerheid (INSZ)
- org_nihdi: National Institute for Health and Disability Insurance number of your organization (RIZIV/INAMI number)
- nihdi: your personal National Institute for Health and Disability Insurance number (RIZIV/INAMI number)
- app: application such as HD4DP, Healthstat
- project_code: code of the healthdata.be Business Project, e.g. HDBP0001 for Belgian Cystic Fibrosis Registry (BCFR)
Now, run the batch creation by clicking on the corresponding button.
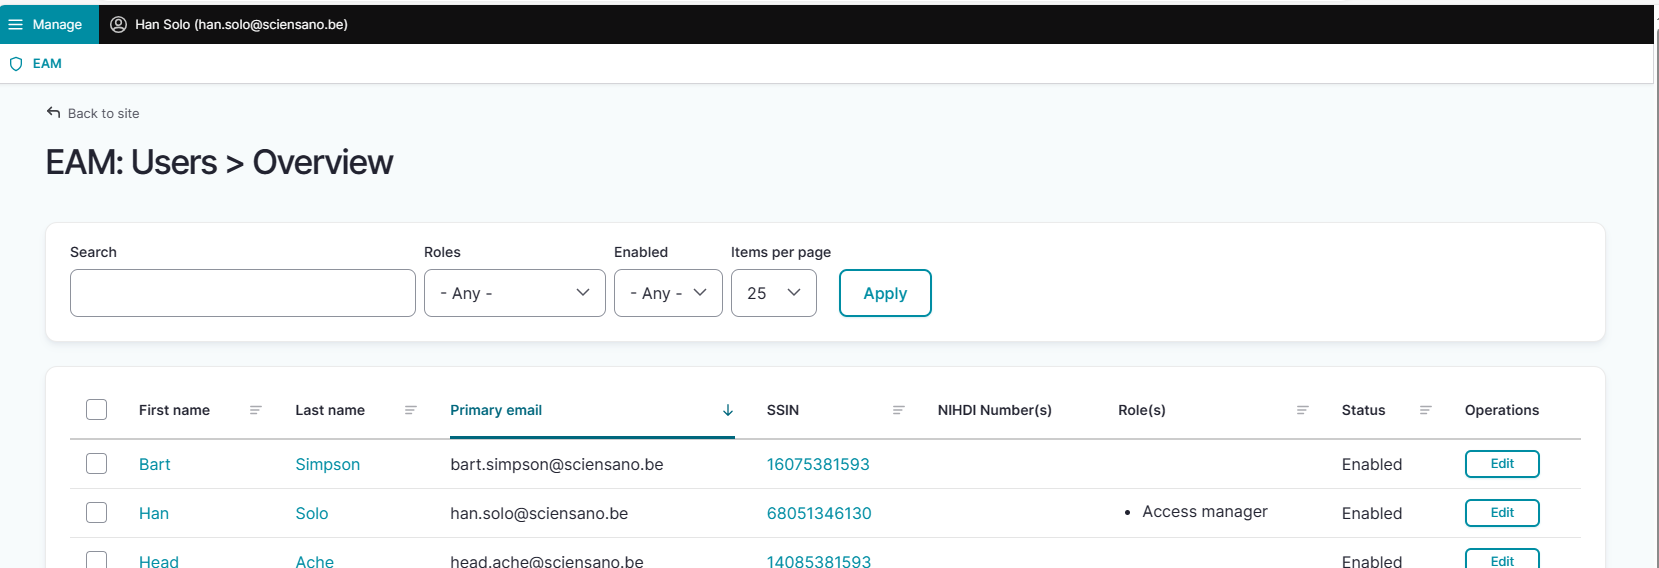
Return to the EAM users overview page to verify the bulk uploaded user list.
Attention:
Sometimes users that are uploaded in bulk are being skipped. Investigation of the relevant error message reveals that "the user already exists". The Access Manager can now choose to add these existing users manually.
Click here for the description of this process.
How to create EAM accounts and add grants in batch using CSV Upload?
Full tutorial available here
End-to-end process:
Navigating to the HD EAM Portal and Access Manager profile
Go here to learn how to login via the Federal Authentication Service (FAS) with eID or itsme.
Creating EAM accounts via bulk upload
Click on Manage on the top left of the screen in order to reveal the EAM menu. Click on EAM Accounts and then Bulk upload.

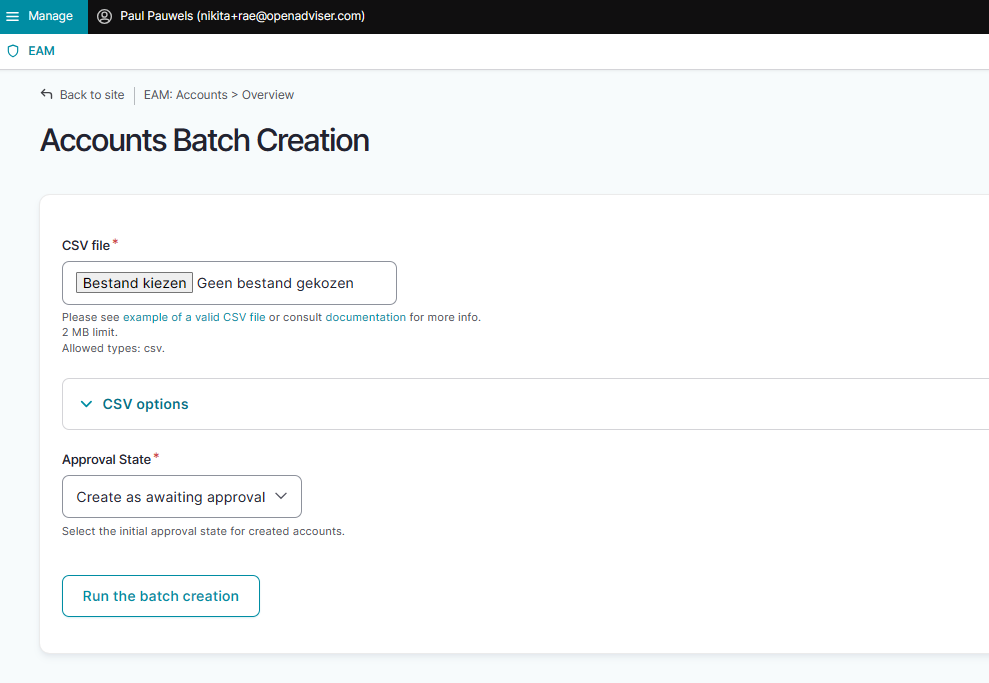
On the Accounts Batch Creation page, select a valid .csv file on your system to upload.
If you don't have a valid file available, use the following example file:
Use the schema file to validate the csv:
ATTENTION:
User roles and corresponding values
To complete the value for the “role” field for HD4DP2, 3 different variables are possible:
- "1" = Local Study Lead
- "2" = Local Study Associate
- "3" = Local Study Support
Make sure to use "hd4dp2" as value for the "app" field, since roles "1", "2", and "3" are typical roles for the HD4DP2 data collection application.
To complete the value for the “role” field for Healthstat.be, 4 different variables are possible:
- DATA_PROVIDER_HOSPITAL = Data Provider/Hospital
- DATA_PROVIDER_INDIVIDUAL = Data Provider/Individual
- SPONSOR_SPONSOR = Sponsor/Sponsor
- SPONSOR_INDIVIDUAL = Sponsor/Individual
Make sure to use "healthstat" as value for the "app" field, since roles "Data Provider" and "Sponsor" combined with data levels "Hospital" and "Individual" are typical for the Healthstat.be data reporting and visualization application.
Additional csv bulk upload tips
- When the "role" field has value "1" or "2", the "authorgroup" field should be left empty. Pay attention to this when changing "role" field from value "3" to "1" or "2".
- When adding a user to role "3", the author group needs to be defined and needs to exist, or the line will be skipped. To guarantee a successful bulk upload of an extensive csv file, you want to place the accounts with role 3 at the end of the list to be uploaded. The accounts with role "1" and "2" are imported first, and thus prefilling the author group list with First_name and Last_name prior to importing the accounts with role "3".

- First_name and Last_name need to be capitalized.
- When adding more than one project code, use pipes to separate the codes.
- If the user does not exist, the line will be skipped.
- Avoid using Excel as this can lead to unwanted formatting of the csv file.
- Make sure that you have placed the quotes correctly. If the values have no comma, you can also leave out quotes.
Abbreviations used in csv bulk upload files
- ssin: Social Security Identification Number - Numéro d’identification de la sécurité sociale (NISS) - IdentificatieNummer Sociale Zekerheid (INSZ)
- org_nihdi: National Institute for Health and Disability Insurance number of your organization (RIZIV/INAMI number)
- nihdi: your personal National Institute for Health and Disability Insurance number (RIZIV/INAMI number)
- app: application such as HD4DP, Healthstat
- project_code: code of the healthdata.be Business Project, e.g. HDBP0001 for Belgian Cystic Fibrosis Registry (BCFR)
Next, make a selection in the Approval State menu shown below.

- Create as awaiting approval: With this option the accounts will receive the status Approval and will be set ready for the Access Manager to be Approved. Go to next step for approval of the access grants.
- Create as pre-approved: With this option the accounts will receive the status Approved and will be uploaded directly without further input from the Access Manager (e.g. confidence in content quality is very high)
Finally, run the batch creation by clicking on the corresponding button.
How to export EAM Users in batch using CSV?
End-to-end process:
Navigating to the HD EAM Portal and Access Manager profile
Go here to learn how to login via the Federal Authentication Service (FAS) with eID or itsme.
Export EAM users in batch
With the release of EAM version 3.1 you will be able to export the users in the overview by clicking on the CSV Export Users button on the top right of the screen.
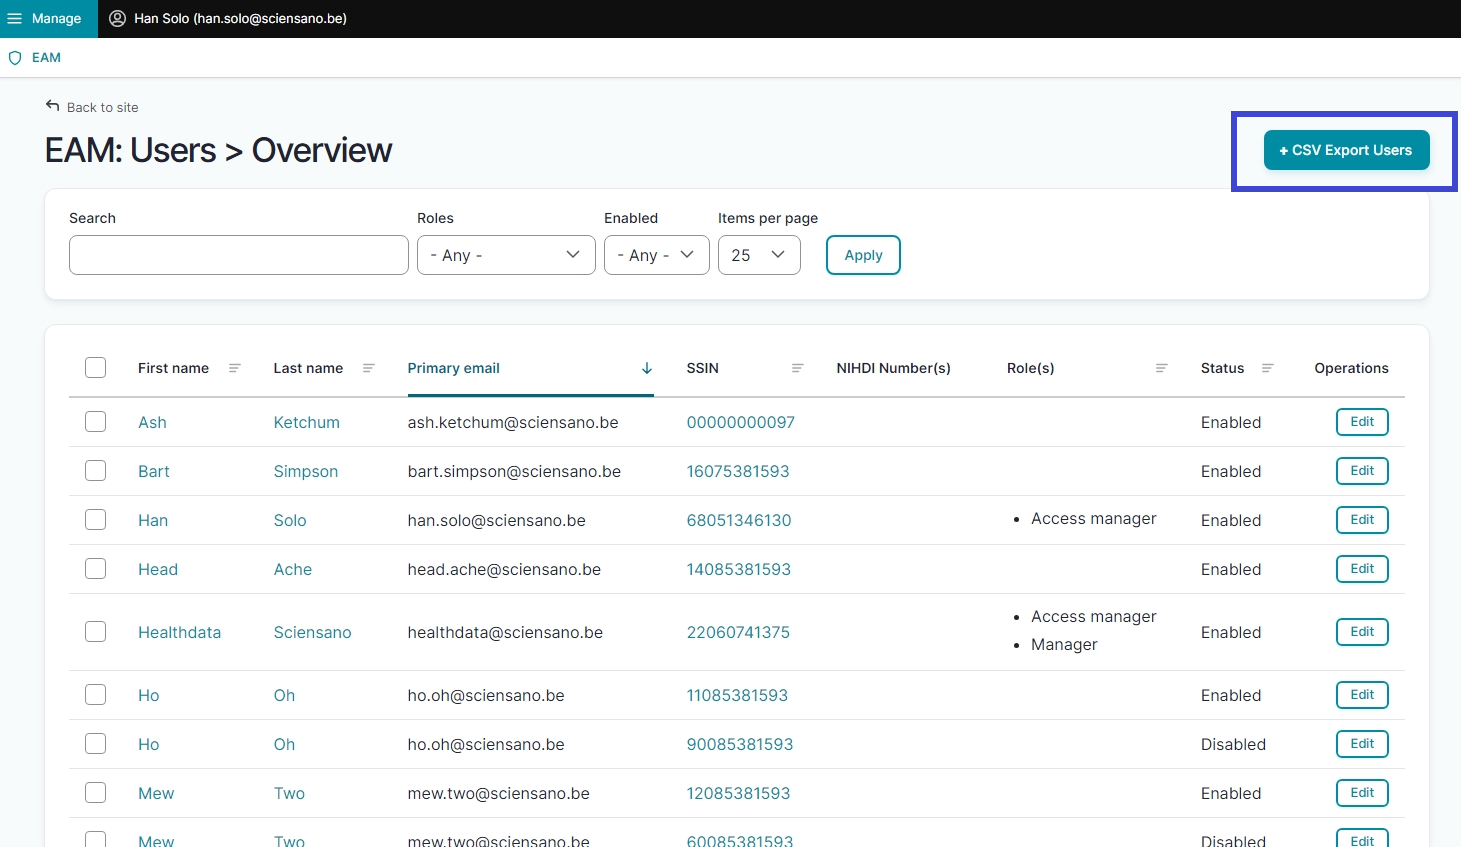
The list will be downloaded in .csv format, including following headers: ssin, email, org_nihdi, app, project_code,role, authorgroup. This format and structure allow for editing of the user information and reupload.
How to export EAM Accounts in batch using CSV?
End-to-end process:
Navigating to the HD EAM Portal and Access Manager profile
Go here to learn how to login via the Federal Authentication Service (FAS) with eID or itsme.
Export EAM users in batch
With the release of EAM version 3.1 you will be able to export the accounts in the overview by clicking on the CSV Export Accounts button on the top right of the screen.
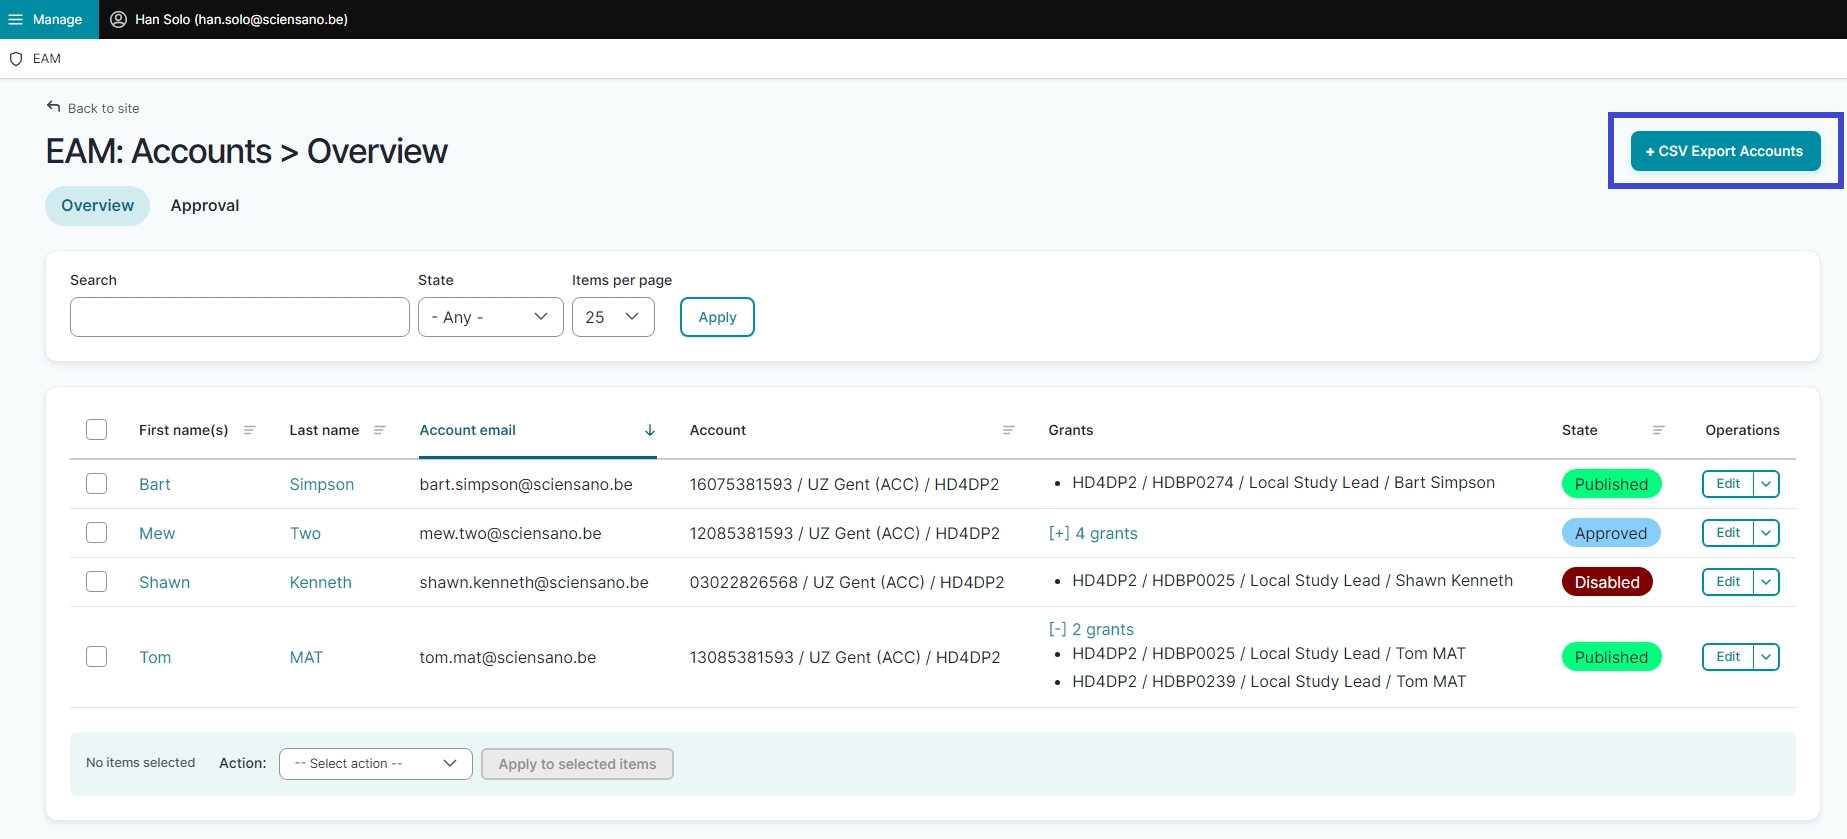
The list will be downloaded in .csv format straight to your selected device, including following headers: ssin, email, org_nihdi, app,project_code, role, authorgroup.
This documentation is being updated regularly. We try to provide as correct, complete and clear as possible information on these pages. Nevertheless, if you see anything in the documentation that is not correct, does not match your experience or requires further clarification, please create a support ticket via our portal Jira Service Management or send us an e-mail via support.hd@hda.fgov.be to report this documentation issue. Please do not forget to mention the URL of the page. We will then adjust the documentation as soon as possible. Thank you!