De GPBARO_DM rapportage en visualisatie van de gegevens
De GPBARO_DM rapportage en visualisatie van de gegevens Bart.Servaes wo, 12/13/2023 - 10:11Healthstat.be
Healthstat.beEen algemene beschrijving van de HD applicatie healthstat.be en de positie ervan in de HD architectuur vindt u hier.
Ontdek hier hoe u inlogt op de HD applicatie healthstat.be.
Het gegevensbeheerproces van de projecten in Barometer for General Practice
Het gegevensbeheerproces van de projecten in Barometer for General PracticeBelow we describe (high level) the GPBARO data management process between the General Practice and the healthstat.be platform of healthdata.be.
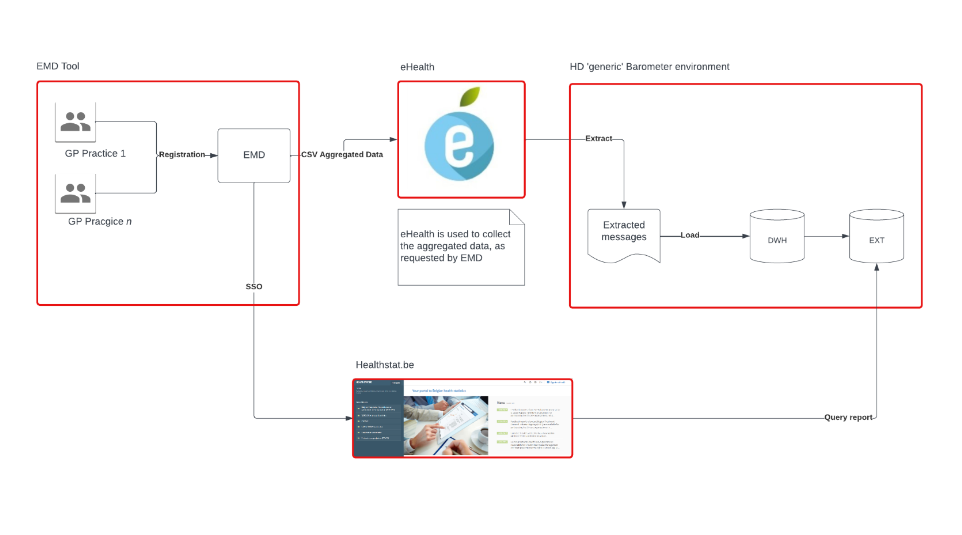
Data management process:
- Data is captured by the GP in their usual care management environment
- The EMD software vendor transmits the relevant data to the eHealthbox environment
- eHealthbox collects the data in a generic format
- The messages are extracted from eHealth and loaded to the HD DWH environment, where treatment of the data through the data layers is done.
- HD extracts the necessary data from the ehealth messages and injects them into the DWH external DB environment for the Diabetes Barometer
- GP’s access the reports of their own practice through a SSO solution integrated in their EMD.
Als huisarts toegang aanvragen tot de Barometers in healthstat.be via HD EAM
Als huisarts toegang aanvragen tot de Barometers in healthstat.be via HD EAMEAM biedt huisartsenpraktijken drie opties om toegang te krijgen tot de Barometers in healthstat.be. Volg de linken onderaan deze pagina om de drie mogelijkheden te ontdekken en kies de optie die het best aansluit op uw wensen of manier van werken.
Hieronder beschrijven we het proces om in te loggen op EAM. Dit is voor de drie opties identiek.
Voer de URL https://eam.healthdata.be in uw browser in om de startpagina van HD EAM (healthdata.be Entity Access Management) te openen.
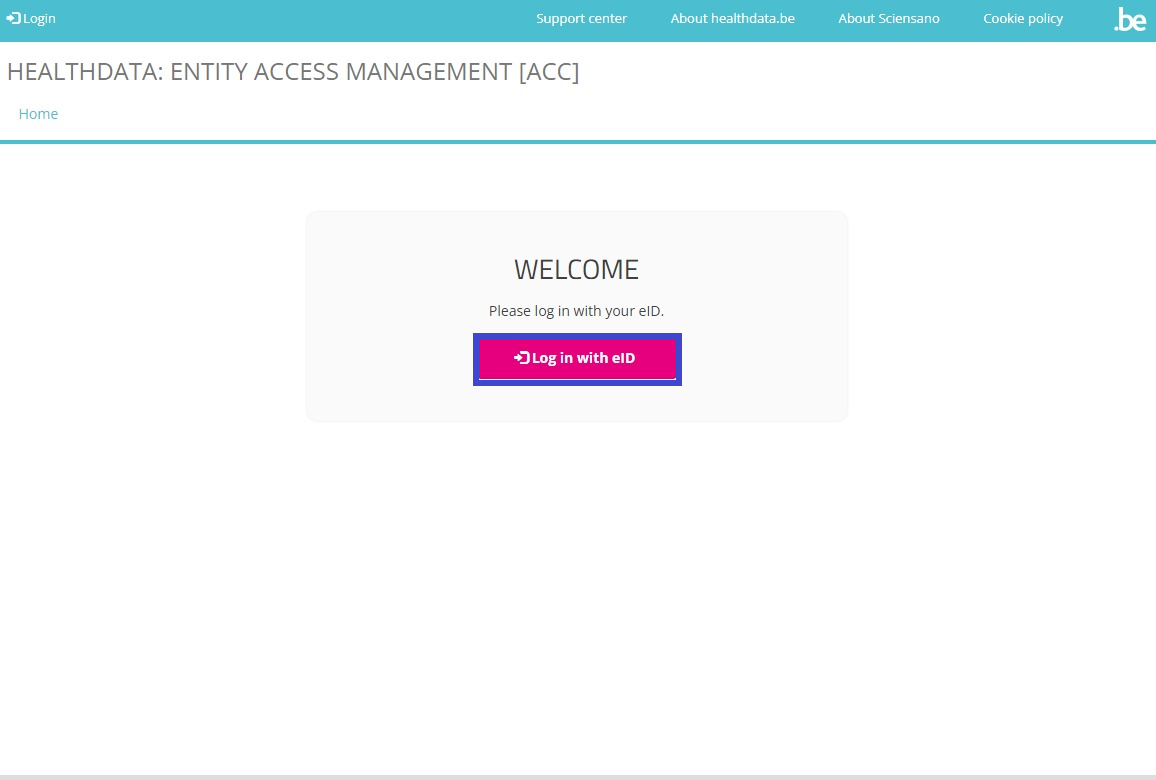
Selecteer Login links boveaan uw scherm en klik op de rode knop Log in with eID.
U wordt doorgestuurd naar de Federal Authentication Service (FAS) van de overheid, waar u kunt inloggen via een van de digitale sleutels zoals eID, itsme ...

Hebt u gekozen om in te loggen via ItsMe, dan voert u uw mobiele telefoonnummer in.
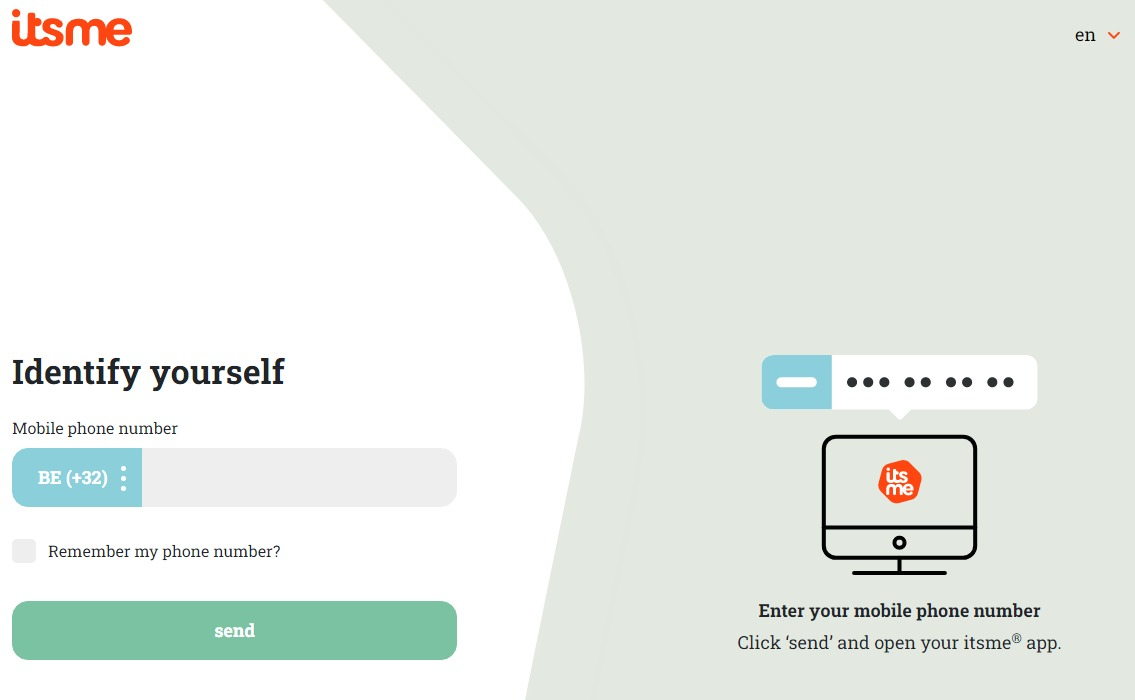
Volg de instructies van de itsme-applicatie op uw mobiele telefoon.

Zodra de inlogprocedure via itsme voltooid is, selecteert u de groene knop "Profiel bevestigen" (zie figuur hieronder) om in het EAM systeem in te loggen.
| NL | FR |
 |  |
U bent nu op de startpagina van het Entity Access Management system (EAM) beland. Hierop zijn de gegevens zichtbaar die u hebt gedeeld via eID, itsme of een andere digitale sleutel. Een voorbeeld:
Selecteer een van de drie opties hieronder om uw aanvraag voor toegang tot projecten in healthstat.be voor te zetten:
Gebruikersrollen in healthstat.be
Gebruikersrollen in healthstat.beElke gezondheidszorgorganisatie heeft ten minste één Access Manager die de toegangsrechten tot de applicaties van de eigen organisatie beheert en deze taak uitvoert in het HD Entity Access Management (EAM) systeem. In dit proces worden legitieme toegangsverzoeken van medewerkers van gezondheidszorgorganisaties geanalyseerd en gevalideerd. Het niveau van de verleende toegang tot healtstat.be vertaalt zich in verschillende combinaties van gebruikersrollen (user role) en gegevensniveaus (data level).
In healthstat.be zijn er twee gebruikersrollen: Data Provider, dit is een gebruiker die gekoppeld is aan een bestaande organisatie, en Sponsor, dit is de sponsor/coördinator van de dataverzameling. Beiden mogen rapporten bekijken op basis van gegevensniveau. Daarnaast zijn er twee gegevensniveaus die bepalen in welke mate de rapporten zichtbaar zijn: Hospital, d.w.z. geraadpleegde rapporten bevatten alle gegevens die door ziekenhuispersoneel zijn geregistreerd, Individual, d.w.z. geraadpleegde rapporten bevatten alleen gegevens die door die gebruiker zelf zijn geregistreerd.
Data Provider / Hospital:
Het profiel Data Provider / Hospital kan:
- rapporten raadplegen van een specifieke datacollectie die gegevens bevat van het betreffende ziekenhuis
Data Provider / Individual:
Het profiel Data Provider / Individual kan:
- rapporten raadplegen van een specifieke datacollectie die enkel gegevens bevat die door een persoon zijn geregistreerd
Sponsor / Sponsor:
Het profiel Sponsor / Sponsor kan:
- alle rapporten consulteren die data bevatten die op het niveau van het ziekenhuis zijn verzameld
Sponsor / Individual:
Het profiel Sponsor / Individual kan:
- alle rapporten consulteren die enkel data bevatten die door een persoon zijn geregistreerd
Opmerkingen:
- Het is aan de Access Manager om rollen te wijzigen van of in Data Provider / Hospital, Data Provider / Individual, Sponsor / Sponsor en Sponsor / Individual. Deze acties moeten in het EAM-systeem worden uitgevoerd.
Optie 1: De huisarts creëert en vervolledigt een EAM account, de Access Manager keurt de aanvraag goed (EN only)
Optie 1: De huisarts creëert en vervolledigt een EAM account, de Access Manager keurt de aanvraag goed (EN only)This option gives the request for access to healthstat.be mainly in the hands of the General Practitioner. The GP first completes the own user profile, then adds an EAM account to it and finally adds the grants, determining the specific registry and the role/data level requested. The General Practitioner then sends the access request for approval to the Access Manager, who fullfils the approving step.
Table of contents
The General Practitioner actions
Go back here if you want to know how to navigate to the My Profile page.
Completing the user profile and becoming an Authenticated User
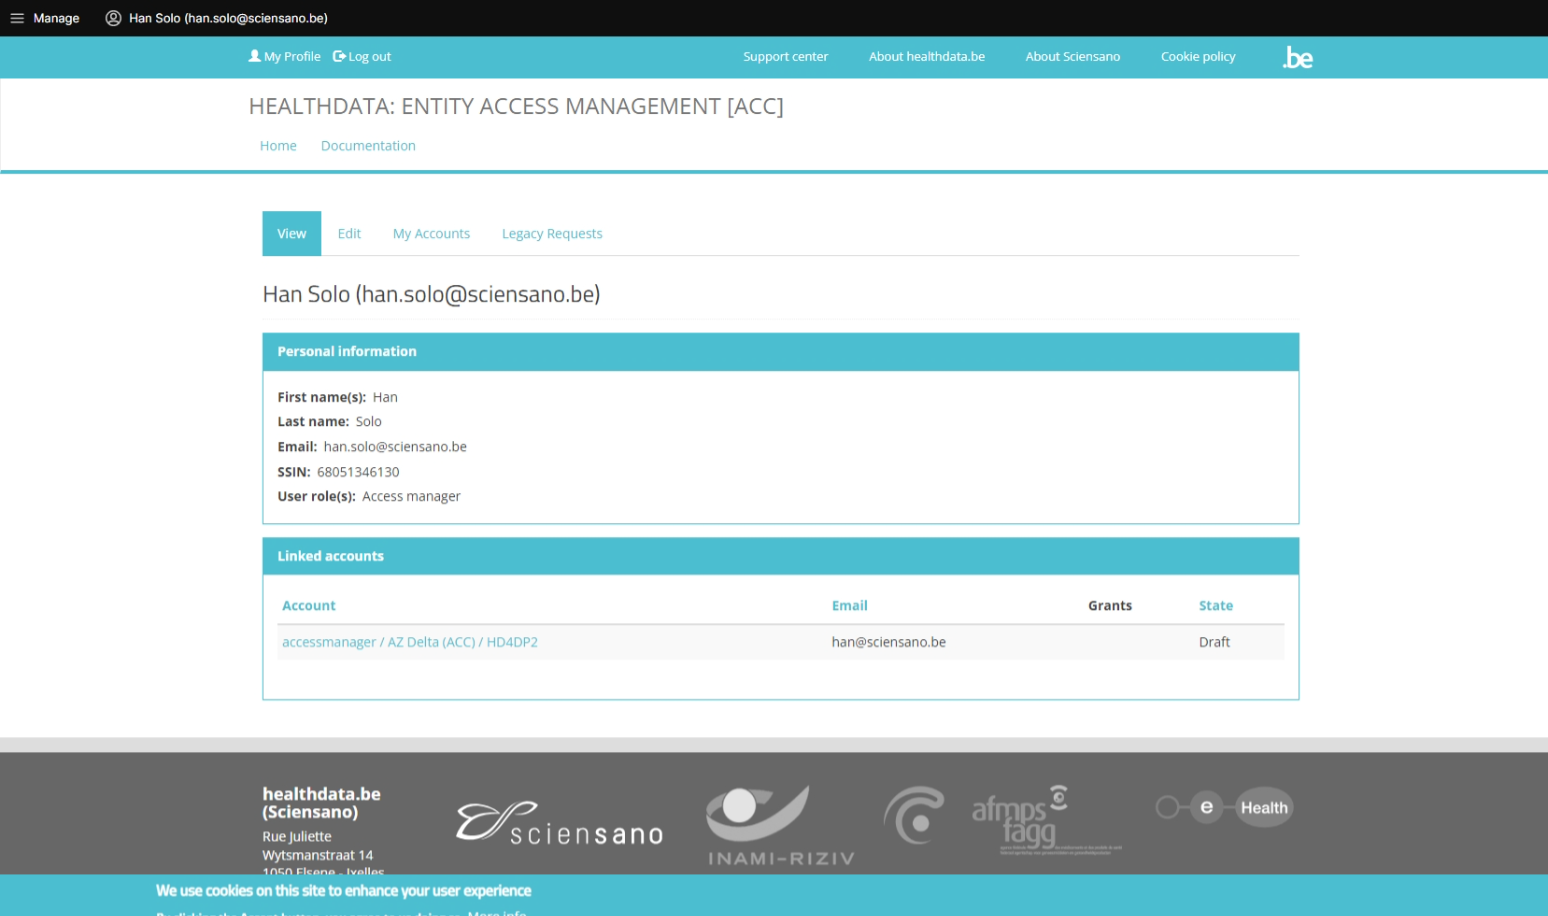
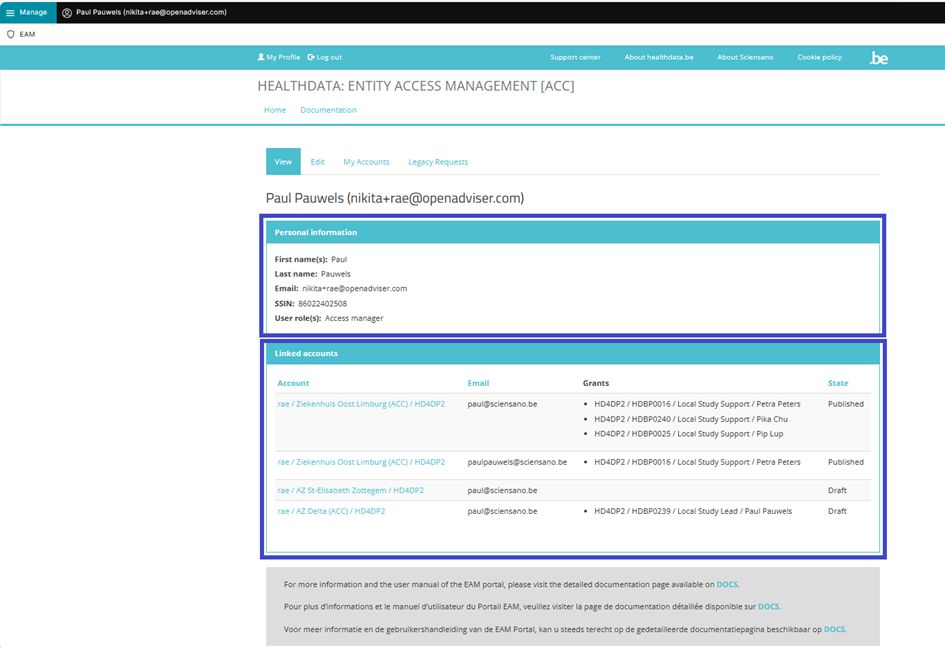
The main My profile page shows the Personal information gathered during the FAS login procedure, and the list of accounts linked to your profile (Linked accounts section).

Attention: When the General Practitioner logs in for the first time, there will be no NIHDI number and the list with linked accounts will be empty too.
Now, click on your name and e-mail address on the top left of the screen to toggle a toolbar with a series of tabs: View profile, Edit profile, My Accounts and Log out. The View profile tab directs you to the My profile screen, which is the screen you are viewing now.

To complete your profile, select the Edit profile tab. The Edit tab contains two subtabs: User settings and Personal information. The red asterisks indicate required fields.
Select the User settings tab.
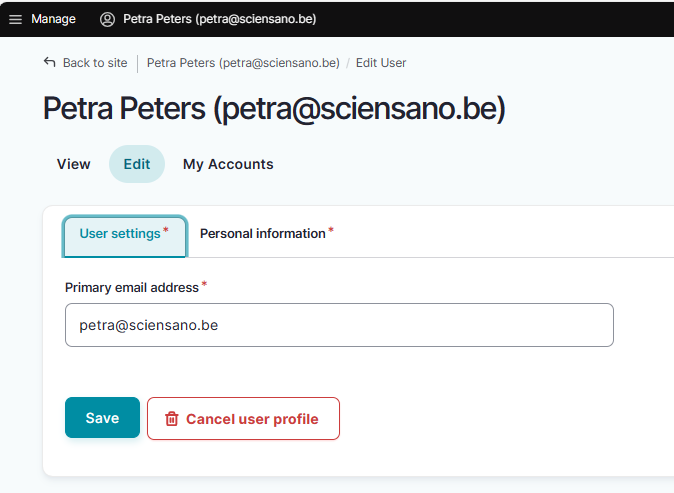
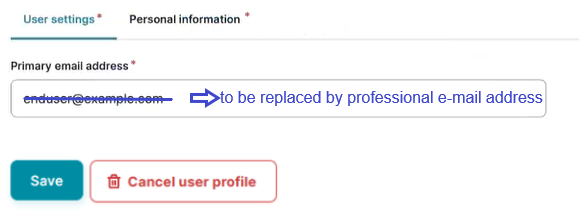
ATTENTION: When logging in for the first time, the User settings tab will feature a primary e-mail address field with a pre-filled default e-mail address, e.g.:

Replace this address with your professional e-mail address. This e-mail address is used to send necessary notifications to you. Preferably avoid the use of public e-mail addresses such as @gmail.com, @hotmail.com, @yahoo.com etc.
Confirm with the Save button.
The Personal information tab contains pre-populated information such as first name, last name and SSIN in greyed out fields. This information can't be changed. Next to this, you can provide a personal NIHDI number, or more than one, if applicable.
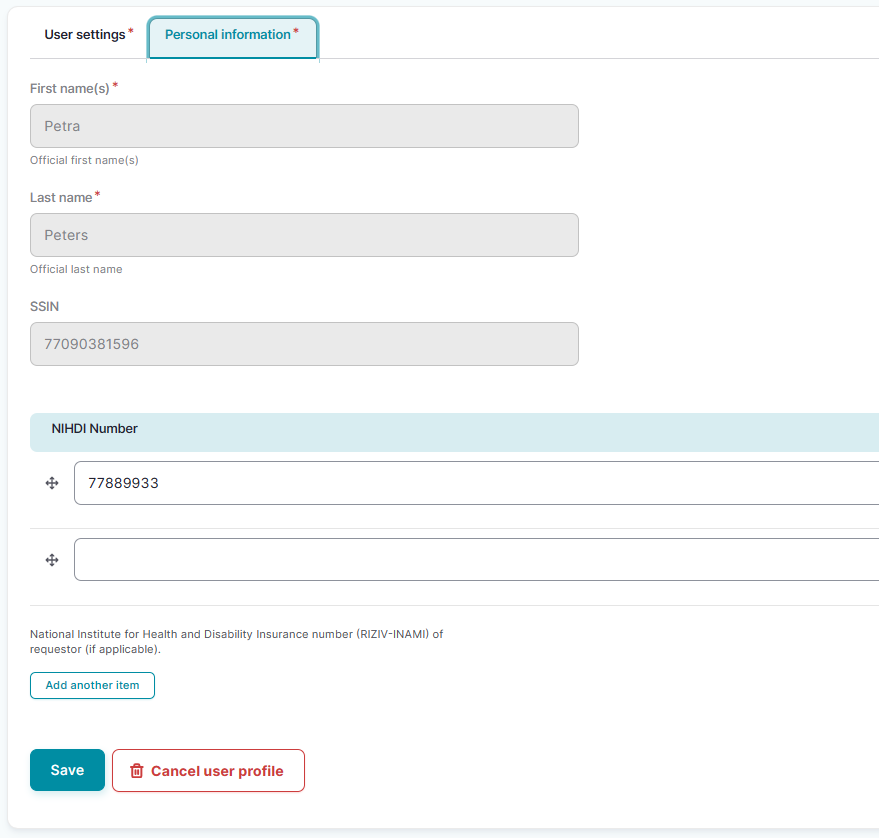
Use the Save button to confirm. You have now completed the fields in both User settings and Personal information tabs, which makes you known to the EAM system as an Authenticated User.
Adding and provisioning an EAM account
Return to the My profile page and select the My accounts tab.

On the My accounts page your personal information is displayed in the blue User details section, followed by a list of accounts you have created.
To add a new account, click on the Add new Account button at the bottom of the page.
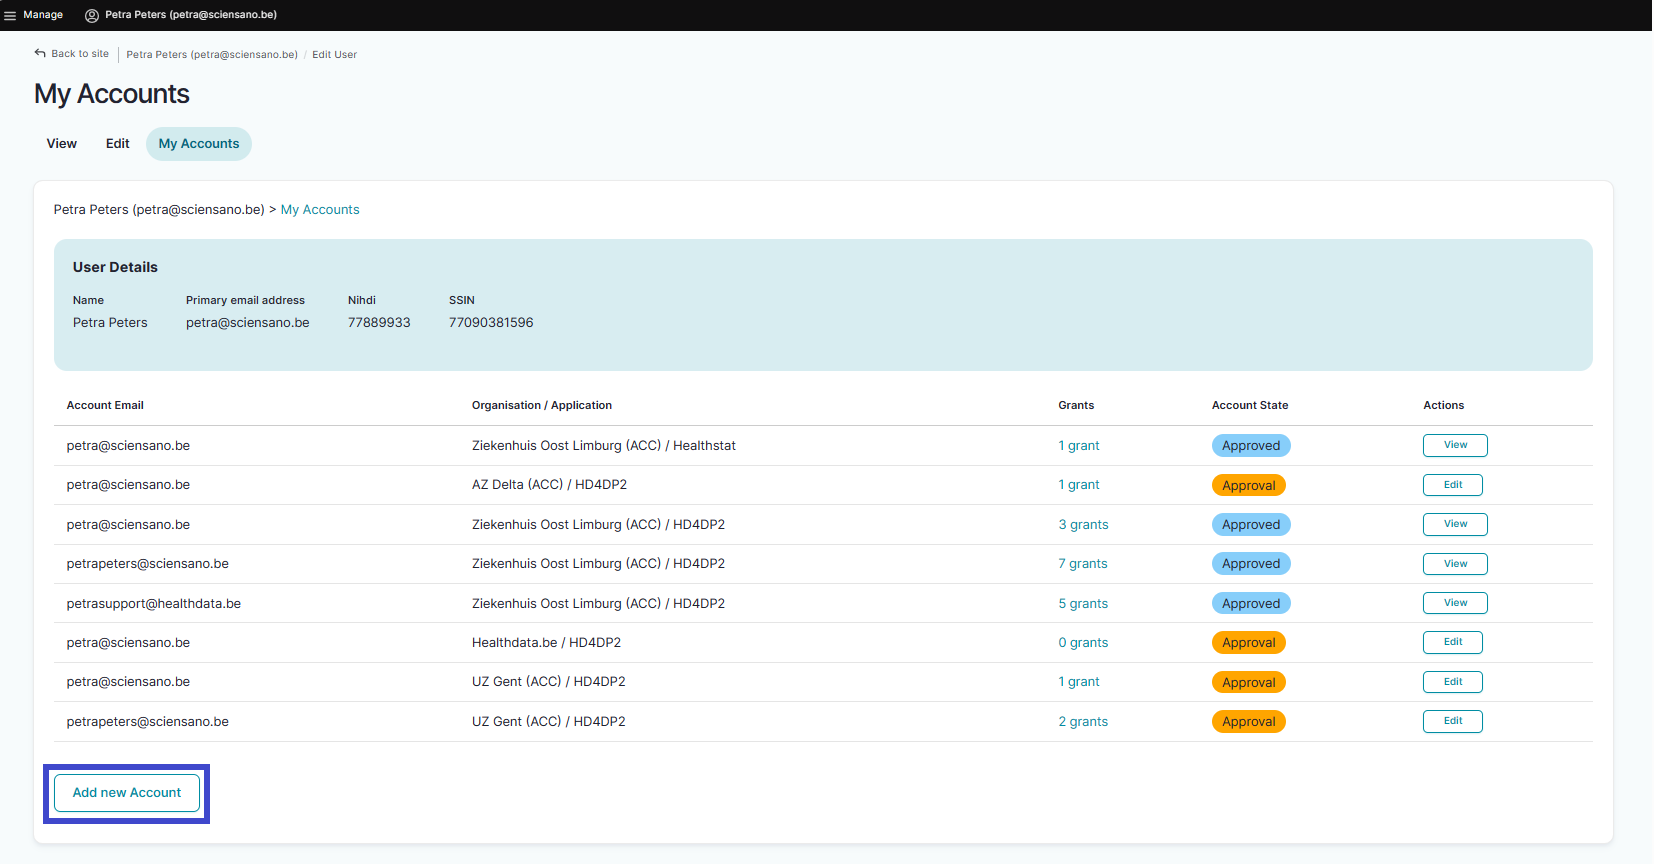
The Add a new account window appears.

Complete the fields in the Add a new account window with the e-mail address you use for your organization. Then select the combination of your organization (General Practitioners) and the application (healthstat.be). This is what we call provisioning of an account.
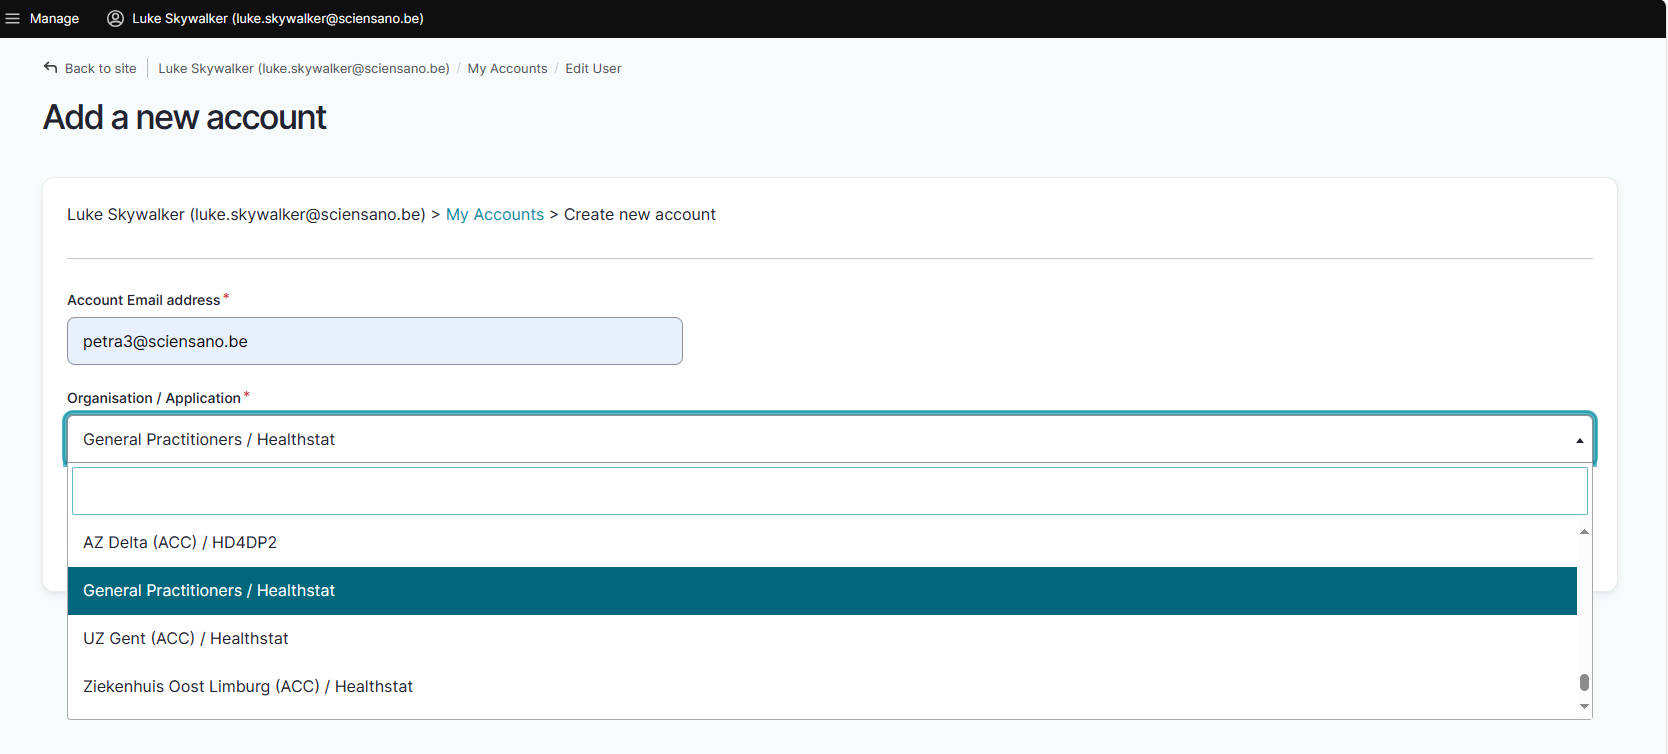
Click on the Save button.
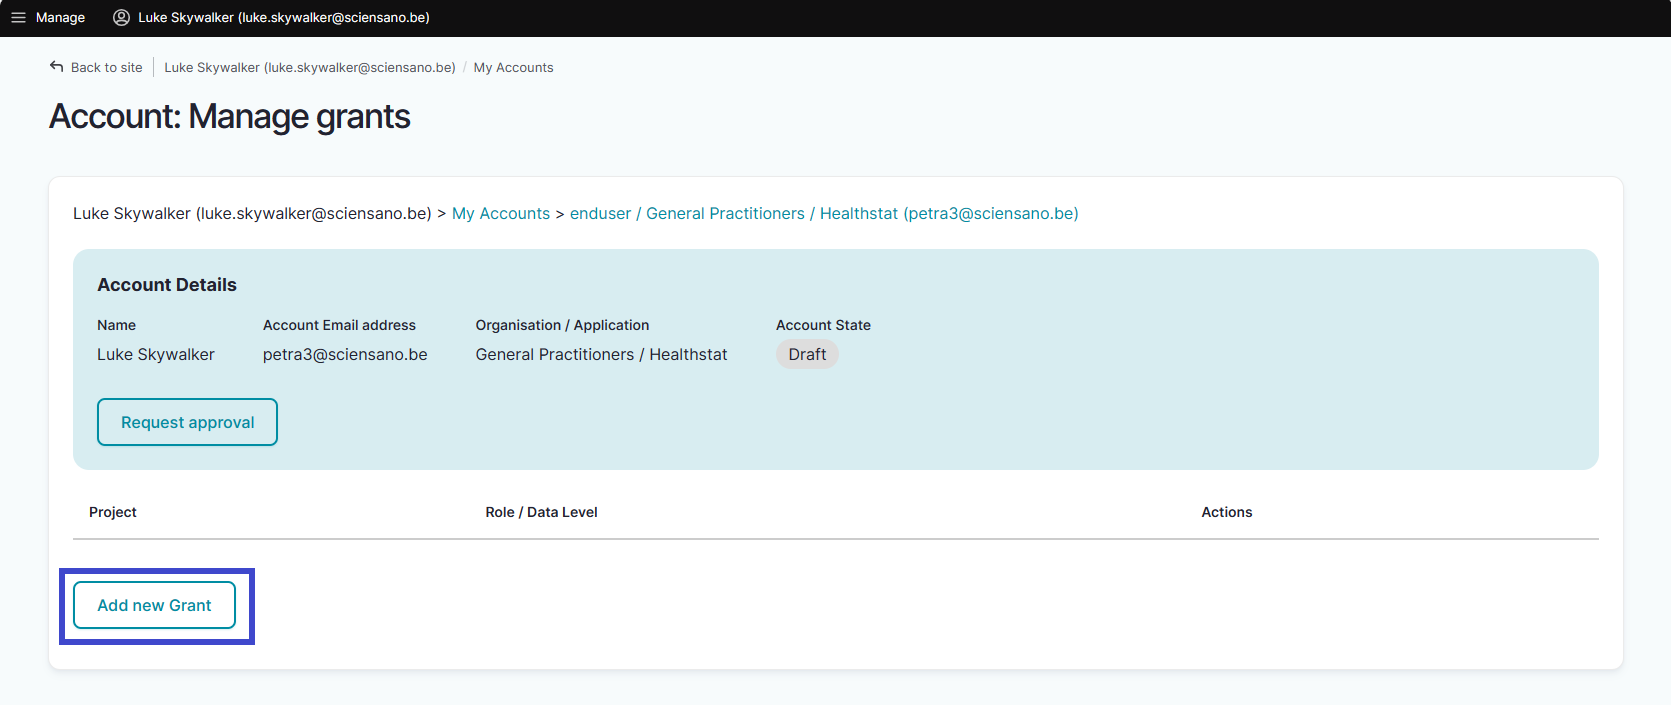
You will be automatically redirected to the My accounts page that has now been updated with your newly created account added at the bottom of the list. The account has received the status "Draft".

Adding grants for a project in healthstat.be
At this point you can start the process of adding grants, i.e. determining roles and data level for a project in Healthstat, adapting the EAM account status and requesting for approval by the Access Manager.
Select "n grants" in the Grants column.

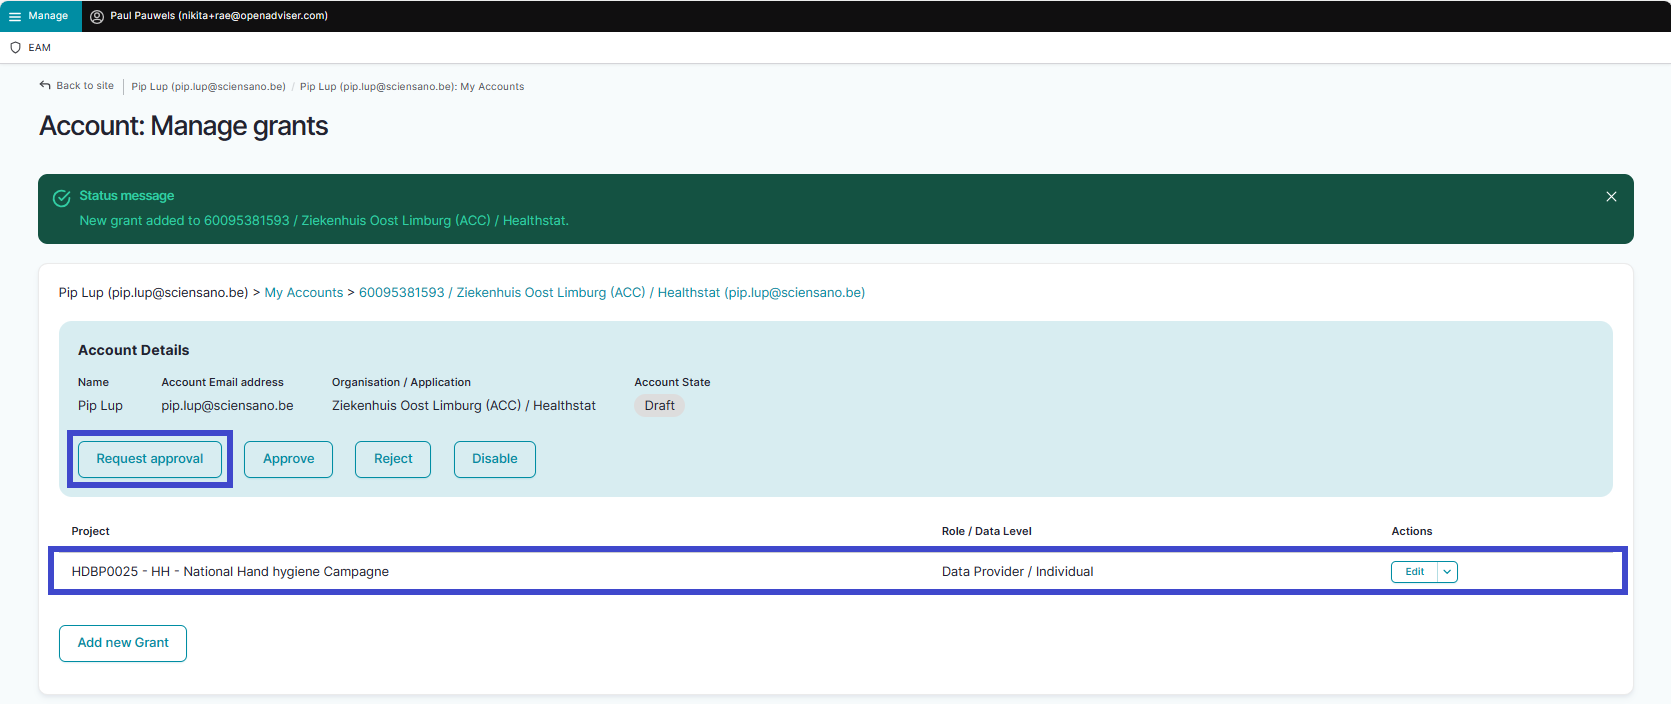
The Account: Manage grants screen appears. To add new grants to an account you need to click on the Add new Grant button.
The Add a new grant window pops up. Select the desired project and the role of Data Provider / Hospital, Data Provider / Individual, Sponsor or Sponsor / Individual.

When you return to the My accounts page, you will see that the accounts list has been updated with the selected grant:

You have now created an account for a project in Healthstat.be with the role of Data Provider / Hospital, Data Provider / Individual, Sponsor / Sponsor or Sponsor / Individual.
Requesting approval of EAM account with access grants for projects in healthstat.be
To request approval of this account you need to click on "n grant(s)" in the Grants column to open the Account: Manage grants page. You either can add a new grant or request for approval. To do so, click on the Request approval button.

The Account state is updated to Approval in the Account details section.
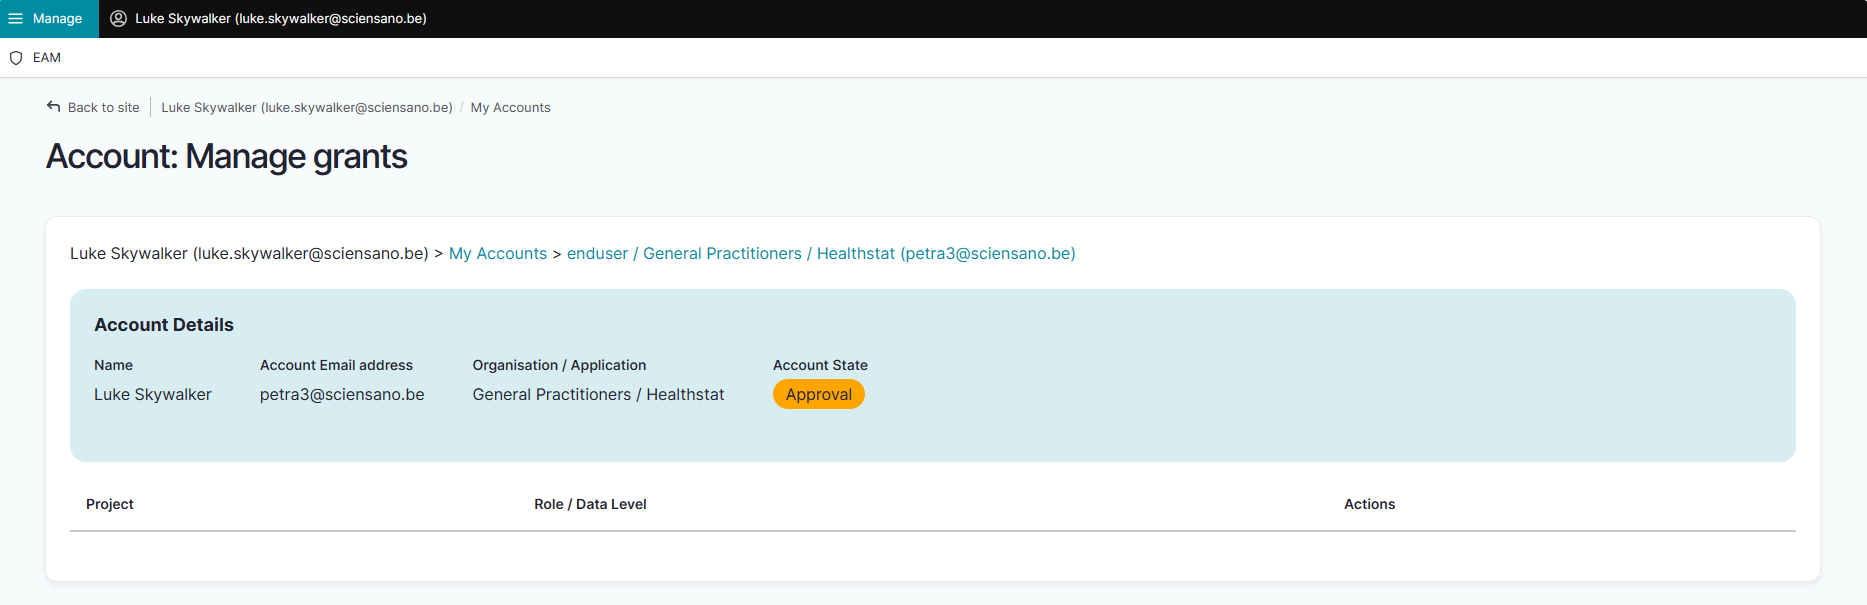
Return to the My accounts page where you notice the changed Account state to Approval.
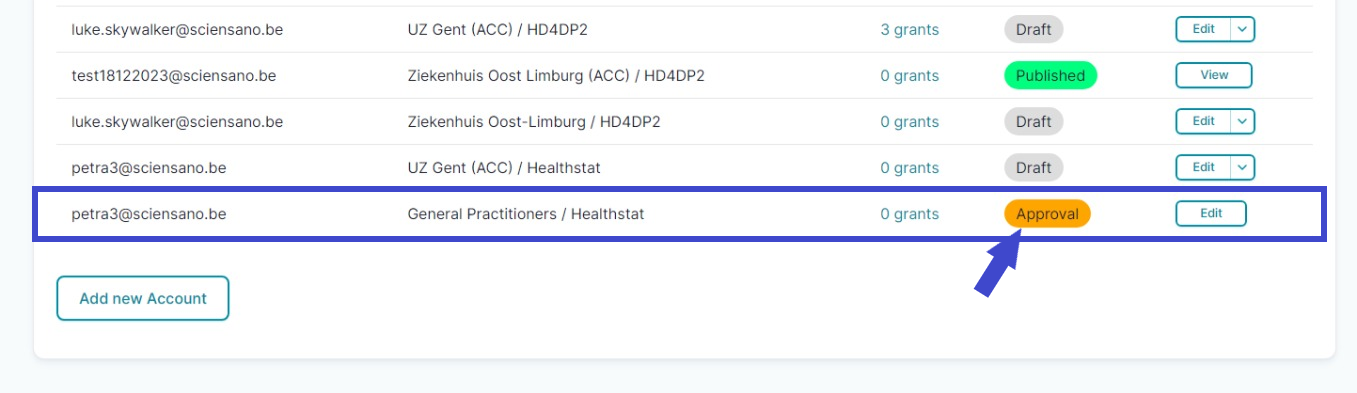
The Access Manager will be notified of your request via e-mail. You will have to wait now for the Access Manager to take action. This can take multiple hours. After approval by the Access Manager (next step), the Account state will change to Approved.
The Access Manager actions
Approving EAM account with access grants for projects in healthstat.be
Click on Manage to the top left of the screen, so that EAM appears. When hovering over this, the items EAM Users and EAM Accounts become visible.
Select EAM Accounts and Approval successively.

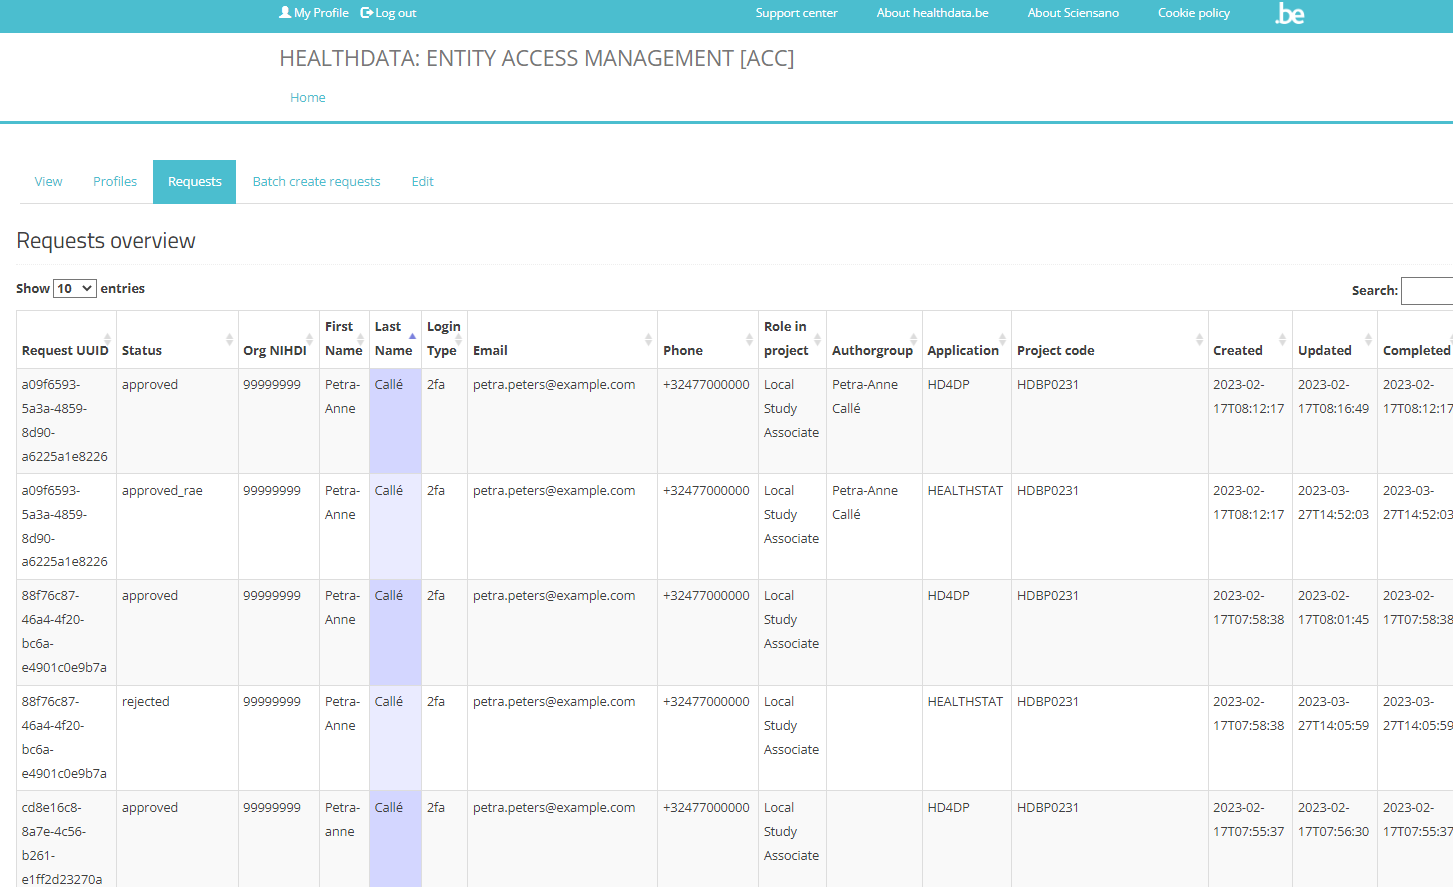
When clicking on Approval you open the page with end-user accounts that are waiting to be approved:
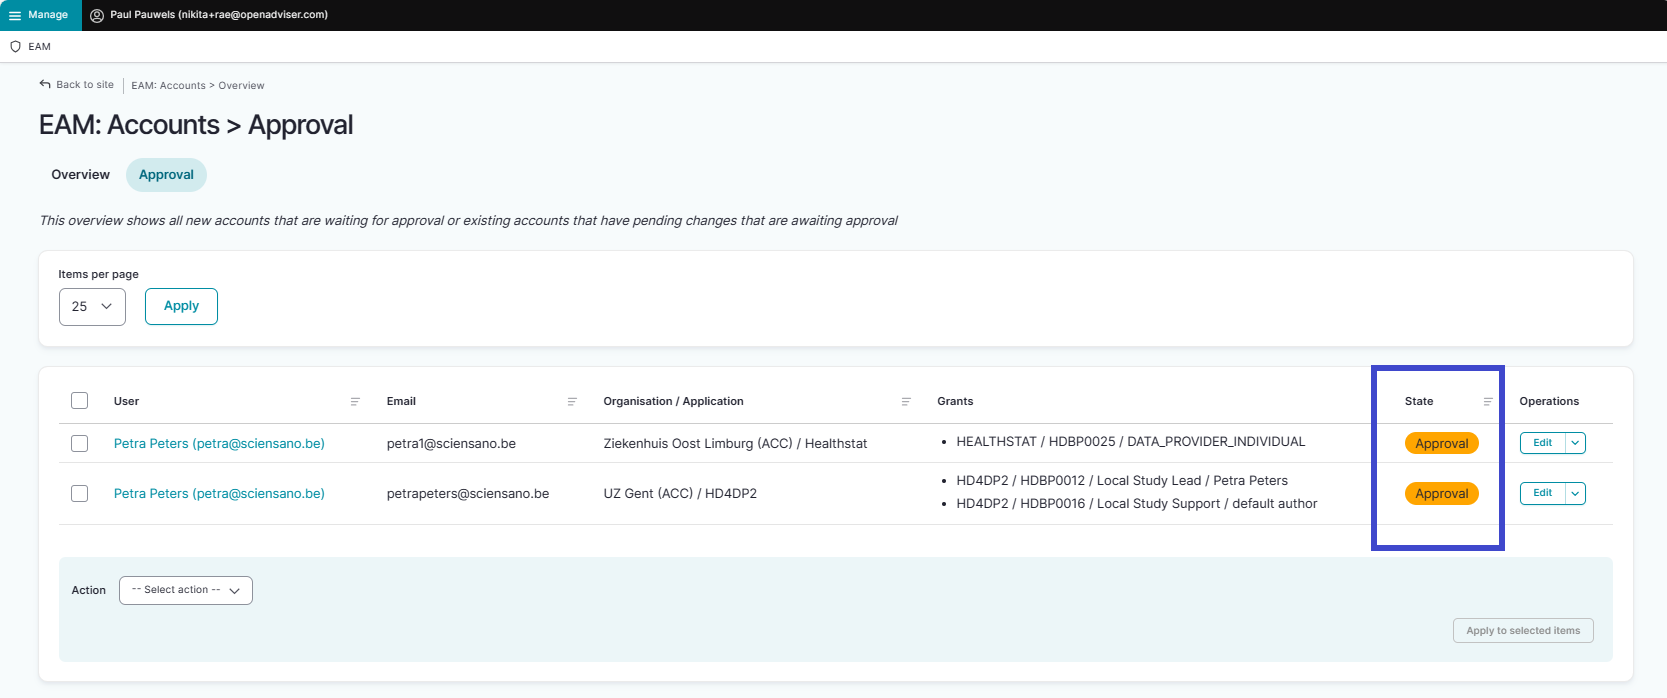
There are two ways to approve these account requests:
- By checking the selection box of the relevant account request and selecting the Approve action. Click on the Apply to selected item button to perform the action.

- By clicking on the Edit button in the Operations column for the relevant account ...

... and subsequently on the Approve button in the Account: Manage grants screen.

The Account state changes to Approved.

After this, a fulfilment process will start to run in the background, finally resulting in an account state change to Published. Credentials are sent to the General Practitioner by e-mail.
Performing a push action
If this change does not take place within a reasonable amount of time - usually between 15 minutes and up to three hours - the account could be updated by means of a "push".
Therefore, return to the accounts overview screen.

First, check the Approved account that needs to be pushed (1). Then, open the Action drop-down menu and select the Update account (push) option (2). Finally, validate this action by clicking on the Apply to selected items button (3).

In case the push action does not trigger the expected result, you need to contact our Support service.
Optie 2: De huisarts creëert een EAM account, de Access Manager vervolledigt het en keurt de aanvraag goed (EN only)
Optie 2: De huisarts creëert een EAM account, de Access Manager vervolledigt het en keurt de aanvraag goed (EN only)With this option the actions performed by the General Practitioner are restricted to the completion of the own user profile and the creation of an EAM account which is an absolute necessity to be retrieved by the Access Manager via the Users Overview. The Access Manager takes it from there and adds the grants to the EAM accounts of the General Practitioners, sends the access request for approval and finally approves this request.
Table of contents
The General Practitioner actions
Go back here if you want to know how to navigate to the My Profile page.
Completing the user profile and becoming an Authenticated User
The main My profile page shows the Personal information gathered during the FAS login procedure, and the list of accounts linked to your profile (Linked accounts section).
Attention: When the General Practitioner logs in for the first time, there will be no NIHDI number and the list with linked accounts will be empty too.
Now, click on your name and e-mail address on the top left of the screen to toggle a toolbar with a series of tabs: View profile, Edit profile, My Accounts and Log out. The View profile tab directs you to the My profile screen, which is the screen you are viewing now.
To complete your profile, select the Edit profile tab. The Edit tab contains two subtabs: User settings and Personal information. The red asterisks indicate required fields.
Select the User settings tab.
ATTENTION: When logging in for the first time, the User settings tab will feature a primary e-mail address field with a pre-filled default e-mail address, e.g.:
Replace this address with your professional e-mail address. This e-mail address is used to send necessary notifications to you.
Confirm with the Save button.
The Personal information tab contains pre-populated information such as first name, last name and SSIN in greyed out fields. This information can't be changed. Next to this, you can provide a personal NIHDI number, or more than one, if applicable.
Use the Save button to confirm. You have now completed the fields in both User settings and Personal information tabs, which makes you known to the EAM system as an Authenticated User.
Adding and provisioning an EAM account
Return to the My profile page and select the My accounts tab.
On the My accounts page your personal information is displayed in the blue User details section, followed by a list of accounts you have created.
To add a new account, click on the Add new Account button at the bottom of the page.
The Add a new account window appears.
Complete the fields in the Add a new account window with the e-mail address you use for your organization. Then select the combination of your organization (General Practitioners) and the application (healthstat.be). This is what we call provisioning of an account.
Click on the Save button.
You will be automatically redirected to the My accounts page that has now been updated with your newly created account added at the bottom of the list. The account has received the status "Draft".
Since the General Practitioner is now connected to an organization, he or she can now be found by the Access Manager via the EAM Users Overview. Underneath is explained how that exactly works.
The Access Manager actions
Retrieving the EAM account of the General Practitioner
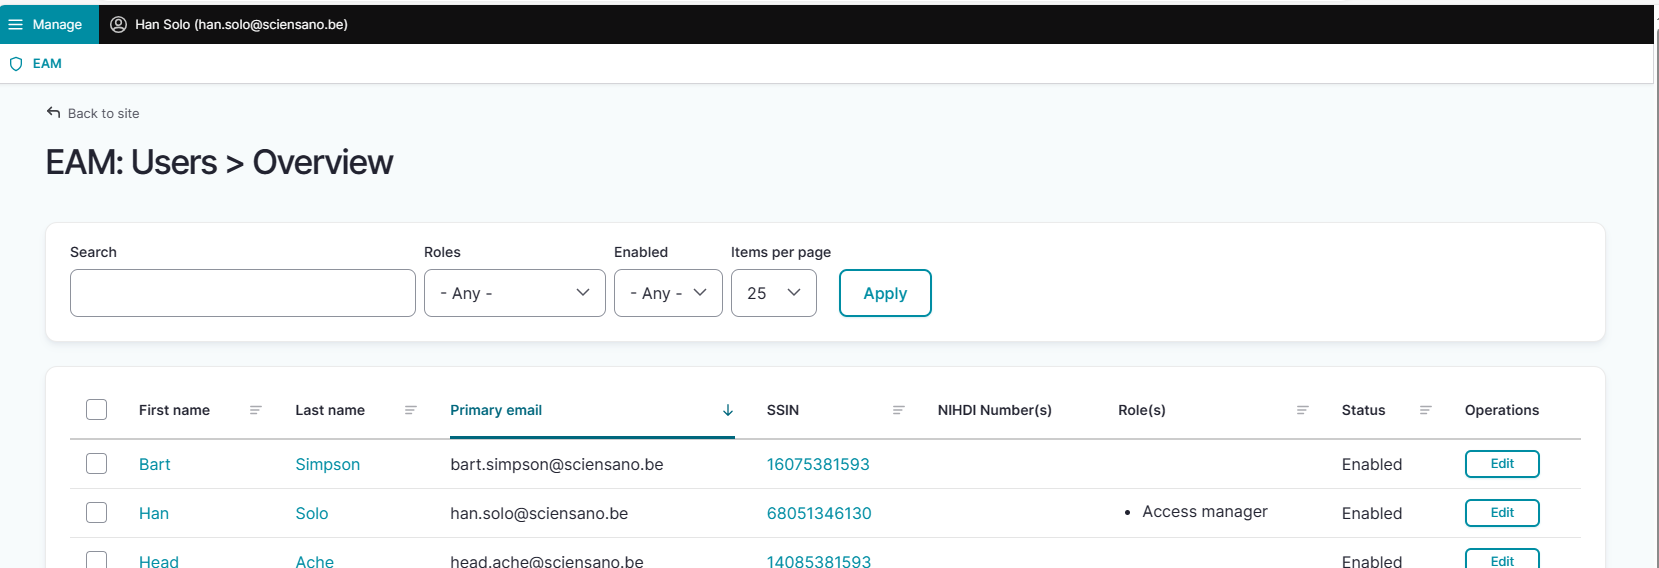
Click on Manage at the top left of the screen, so that the EAM menu appears. When hovering over this, the menu items EAM Users and EAM Accounts become visible. Select EAM Users.

The following page with an overview of the different General Practitioners appears. Select the GP for whom you want to request access to a project in healthstat.be. Click on the corresponding First name, Last name or SSIN.
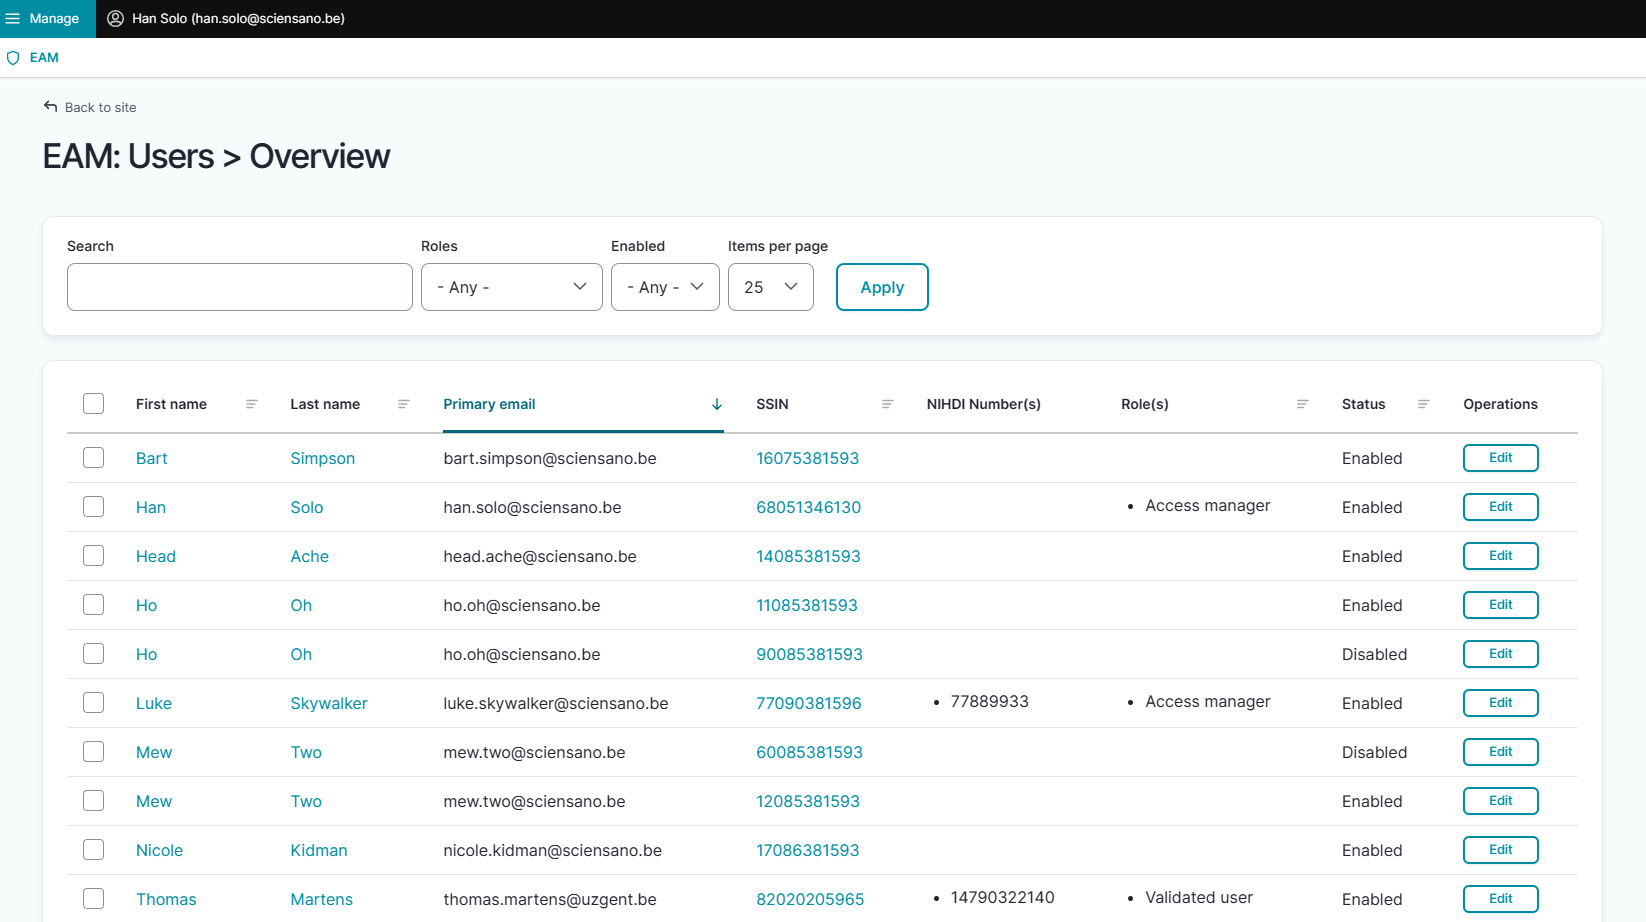
ATTENTION: General Practitioners that not yet appear in the list have either to register via the FAS procedure and create an account (see General Practitioner actions above) or have to be added via Bulk upload (Access Manager action, see Option 3) first.
The account that has been added and provisioned by the General Practitioner will be visible now and has the Draft status. Click on the Edit button at the end of the relevant account line.

Adding grants for a project in healthstat.be
Next, click on the Add new Grant button at the bottom of the Manage grants page.

The Add a new grant window with some required fields pops up. Select the Project you want to have access to from the drop-down list. Next, select the Role and the Data level that apply to your situation. Click on the Save button.

When returning to the Account: Manage grants page you will notice that the grant is added to your account, which is still in the Draft state.
Requesting approval of EAM account with access grants for projects in healthstat.be
Next step is to request approval of the newly added account with grants, thus enabling the General Practitioner to access the specified project(s) in healthstat.be. Therefore, click on the Request approval button.

The status immediately changes to Approval.

Since you are Access Manager, you will be able to follow up swiftly and to change the Account state to Approved.
Approving EAM account with access grants for projects in healthstat.be
Click on Manage to the top left of the screen, so that EAM appears. When hovering over this, the items EAM Users and EAM Accounts become visible.
Select EAM Accounts and Approval successively.
When clicking on Approval you open the page with end-user accounts that are waiting to be approved:
There are two ways to approve these account requests:
- By checking the selection box of the relevant account request and selecting the Approve action. Click on the Apply to selected item button to perform the action.
- By clicking on the Edit button in the Operations column for the relevant account ...
... and subsequently on the Approve button in the Account: Manage grants screen.
The Account state changes to Approved.
After this, a fulfilment process will start to run in the background, finally resulting in an account state change to Published.
Performing a push action
If this change does not take place within a reasonable amount of time - usually between 15 minutes and up to three hours - the account could be updated by means of a "push".
Therefore, return to the accounts overview screen.
First, check the Approved account that needs to be pushed (1). Then, open the Action drop-down menu and select the Update account (push) option (2). Finally, validate this action by clicking on the Apply to selected items button (3).
In case the push action does not trigger the expected result, you need to contact our Support service.
Optie 3: De Access Manager creëert EAM gebruikers en EAM accounts via csv batch upload (EN only)
Optie 3: De Access Manager creëert EAM gebruikers en EAM accounts via csv batch upload (EN only)When chosing this option, all actions are to be carried out by the Access Manager. First, the Access Manager needs to create the EAM Users (i.e. General Practitioners) by means of a bulk upload using a csv file. After succesful import of this list, the same procedure is repeated for the EAM Accounts, including access grants. Based on the required fields in the csv files, the user and account data are linked, and only need to be approved by the Access Manager.
Table of contents
The General Practitioner actions
The Access Manager actions
- Creating EAM Users in batch
- Creating EAM Accounts in batch awaiting approval using CSV upload
- Approving EAM account with access grants for projects in healthstat.be
- Performing a push action
The General Practitioner actions
No actions to be completed by the General Practitioner
The General Practitioner is an Authenticated User who does not have the rights to perform the necessary actions.
The Access Manager actions
Go back here if you want to know how to navigate to the My Profile page.
Creating EAM Users in batch
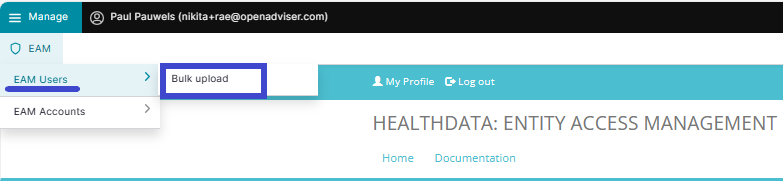
Click on Manage to the top left of the screen, so that EAM appears. When hovering over this, the items EAM Users and EAM Accounts become visible. Click on EAM Users and Bulk upload successively.
The Users Batch Creation page appears.
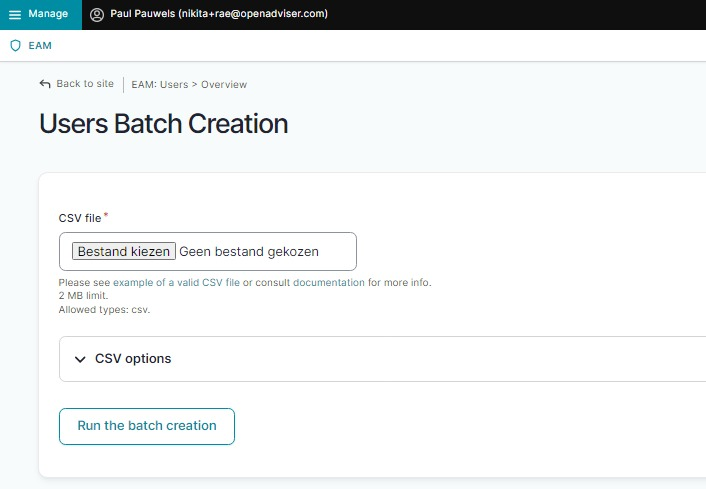
Select a valid .csv file on your system to upload or use the following example file:
Use the schema file to validate the csv example file:
ATTENTION:
Access Managers need to know the personal details of the users they are adding: first_name, last_name, email, ssin.
The NIHDI of the organization (org_nihdi) is: 333333333.
User roles and corresponding values
To complete the value for the field “role”, 2 different variables are possible:
- access_manager
- default
Additional tips:
- If the user already exists, the line will be skipped.
- Avoid using Excel as this can lead to unwanted formatting.
- First_name and Last_name need to be capitalized.
- Make sure that you have placed the quotes correctly. If the values have no comma, you can also leave out quotes.
Abbreviations used in csv bulk upload files
- ssin: Social Security Identification Number - Numéro d’identification de la sécurité sociale (NISS) - IdentificatieNummer Sociale Zekerheid (INSZ)
- org_nihdi: National Institute for Health and Disability Insurance number of your organization (RIZIV/INAMI number)
- nihdi: your personal National Institute for Health and Disability Insurance number (RIZIV/INAMI number)
- app: application such as HD4DP, Healthstat
- project_code: code of the healthdata.be Business Project, e.g. HDBP0001 for Belgian Cystic Fibrosis Registry (BCFR)
Now, run the batch creation by clicking on the corresponding button.
Return to the EAM Users overview page to verify the bulk uploaded list of General Practitioners.
Following this step, the Access Manager needs to link these Users with EAM accounts, having the access grants in them.
Creating EAM accounts in batch awaiting approval using CSV Upload
Click on Manage to the top left of the screen, so that EAM appears. When hovering over this, the items EAM Users and EAM Accounts become visible. Click on EAM Accounts and Bulk upload successively.

The Accounts Batch Creation page appears.
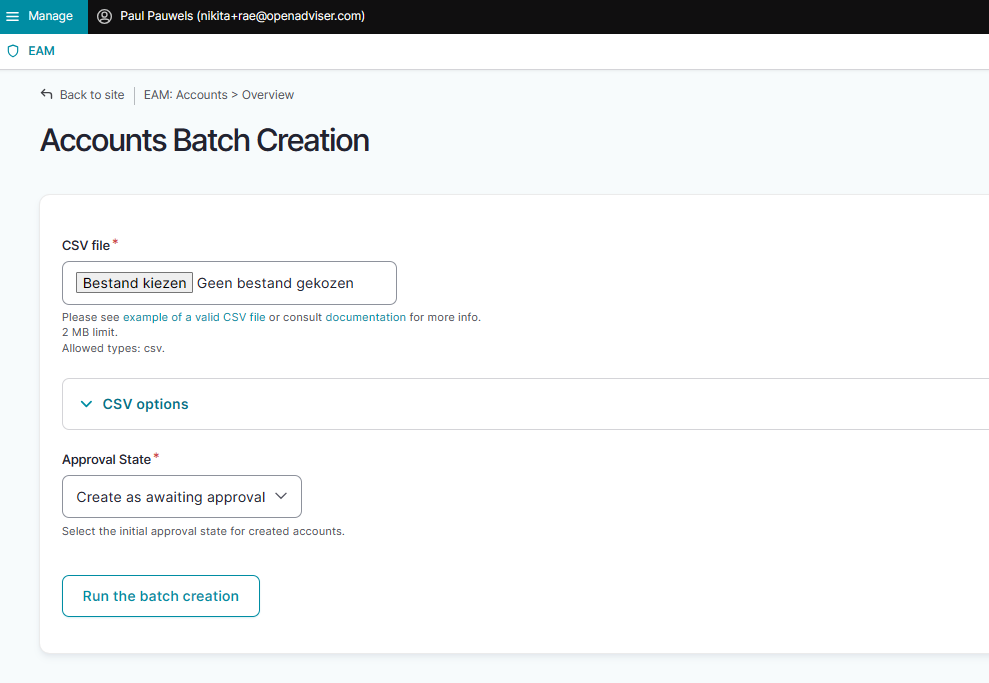
Select a valid .csv file on your system to upload or use the following example file:
Use the schema file to validate the csv:
ATTENTION:
Access Managers need to know the personal details of the users they are adding: first_name, last_name, email, ssin.
User roles and corresponding values
To complete the value for the “role” field for healthstat.be, 4 different variables are possible:
- DATA_PROVIDER_HOSPITAL = Data Provider/Hospital
- DATA_PROVIDER_INDIVIDUAL = Data Provider/Individual
- SPONSOR_SPONSOR = Sponsor/Sponsor
- SPONSOR_INDIVIDUAL = Sponsor/Individual
Make sure to use "healthstat" as value for the "app" field, since roles "Data Provider" and "Sponsor" combined with data levels "Hospital" and "Individual" are typical for the Healthstat.be data reporting and visualization application.
Additional csv bulk upload tips
- When the "role" field has value "1" or "2", the "authorgroup" field should be left empty. Pay attention to this when changing "role" field from value "3" to "1" or "2".
- When adding a user to role "3", the author group needs to be defined and needs to exist, or the line will be skipped. To guarantee a successful bulk upload of an extensive csv file, you want to place the accounts with role 3 at the end of the list to be uploaded. The accounts with role "1" and "2" are imported first, and thus prefilling the author group list with First_name and Last_name prior to importing the accounts with role "3".

- First_name and Last_name need to be capitalized.
- When adding more than one project code, use pipes to separate the codes.
- If the user does not exist, the line will be skipped.
- Avoid using Excel as this can lead to unwanted formatting of the csv file.
- Make sure that you have placed the quotes correctly. If the values have no comma, you can also leave out quotes.
Abbreviations used in csv bulk upload files
- ssin: Social Security Identification Number - Numéro d’identification de la sécurité sociale (NISS) - IdentificatieNummer Sociale Zekerheid (INSZ)
- org_nihdi: National Institute for Health and Disability Insurance number of your organization (RIZIV/INAMI number)
- nihdi: your personal National Institute for Health and Disability Insurance number (RIZIV/INAMI number)
- app: application such as HD4DP, Healthstat
- project_code: code of the healthdata.be Business Project, e.g. HDBP0001 for Belgian Cystic Fibrosis Registry (BCFR)
Then, make a selection in the Approval State menu shown below.

- Create as awaiting approval: With this option the accounts will receive the status Approval and will be set ready for the Access Manager to be Approved.
- Create as pre-approved: With this option the accounts will automatically receive the status Approved and will be uploaded directly without further input from the Access Manager (e.g. confidence in content quality is very high)
Finally, run the batch creation by clicking on the corresponding button.
Approving EAM account with access grants for projects in healthstat.be
When you as Access Manager have chosen to create the EAM accounts as awaiting approval, you need to complete the action with the step described in the following.
Go to the EAM menu as usual.
Select EAM Accounts and then Approval.
When clicking on Approval you open the page with the EAM accounts that are waiting to be approved:
There are two ways to approve these account requests:
- By checking the selection box of the relevant account request and selecting the Approve action. Click on the Apply to selected item button to perform the action.
- By clicking on the Edit button in the Operations column for the relevant account ...
... and subsequently on the Approve button in the Account: Manage grants screen.
The Account state changes to Approved.
After this, a fulfilment process will start to run in the background, finally resulting in an account state change to Published.
Performing a push action
If this change does not take place within a reasonable amount of time - usually between 15 minutes and up to three hours - the account could be updated by means of a "push".
Therefore, return to the accounts overview screen.
First, check the Approved account that needs to be pushed (1). Then, open the Action drop-down menu and select the Update account (push) option (2). Finally, validate this action by clicking on the Apply to selected items button (3).
In case the push action does not trigger the expected result, you need to contact our Support service.
EAM glossarium
EAM glossariumHet nieuwe HD Entity Access Management systeem, kort ''EAM'', is gebouwd op een nieuwe architectuur die speciaal is ontwikkeld om de controle over het beheer van gebruikers terug te geven aan de Access Manager. Zo kan deze de levenscyclus van een gebruiker in het systeem van begin tot eind opvolgen.

De nieuwe architectuur en de bijbehorende processen brengen een aantal nieuwe concepten met zich mee. We hebben ze hieronder voor je op een rijtje gezet, aangevuld met reeds bekende concepten.
Access Manager
Een Access Manager (toegangsbeheerder) is een Authenticated User die bijkomende Access Manager rechten heeft binnen het EAM-systeem. Deze rechten worden door healthdata.be toegekend aan de eerste Access Manager van een bepaalde organisatie. Eventuele extra Access Managers moeten door de data provider worden aangeduid en de rechten door de bestaande Access Manager van de betreffende organisatie worden toegekend.
Een Access Manager valideert en beheert gebruikersaccounts binnen het Entity Access Management-systeem, keurt de toegang van deze EAM-gebruikers tot verschillende applicaties voor alle beschikbare projecten goed en beheert deze en heeft de bevoegdheid om EAM-gebruikers en EAM-accounts aan te maken door middel van csv bulk upload.

Account (EAM account)
Een account in EAM is een combinatie van een e-mailadres en een zogeheten "provision" aangevuld met een reeks rechten (access grants) die toegang geven tot een bepaald register. Een account koppelt de EAM-gebruiker dus aan het gewenste register in een applicatie.
Een gebruiker kan meer dan één account hebben, elk met een ander e-mailadres, bijvoorbeeld wanneer deze in verschillende gezondheidszorgorganisaties (HCO's) werkt, en elk met een andere "provision".
Accountstatus
Het overzicht hieronder toont de verschillende statussen van een EAM account tijdens het proces.
De Label kolom vermeldt de naam van de actieknop die beschikbaar is voor de Authenticated User en/of Access Manager in de respectieve GUI schermen. (Alleen de acties Create New Draft en Request approval zijn beschikbaar voor een Authenticated User).

Admin
De Admin of beheerder is een medewerker binnen het healthdata.be-team die over alle rechten en functionaliteiten binnen het EAM-systeem beschikt. Dit gebruikerstype binnen het EAM-systeem dient slechts occasioneel en enkel voor zeer technische of dringende doeleinden worden gevraagd.
Authenticated User
Een Authenticated User (geauthenticeerde gebruiker) is een persoon die is aangemeld bij het EAM-systeem via itsme of eID en een gebruikersprofiel heeft op basis van Voornaam, Achternaam en NISS-code die gedeeld worden bij het aanmelden via de Federal Authentication Service (FAS). Een Authenticated User heeft toegang tot de EAM-toepassing, kan accounts aanmaken en toegangsrechten aanvragen en heeft toegang tot de eigen accountgegevens voor het geval wijzigingen nodig zijn.
Author group
Een Author Group (auteursgroep) is een groep gebruikers met gelijke bewerkings- en leesrechten voor een registratie in een bepaalde applicatie van de organisatie. Het aanmaken van een Author Group is gebaseerd op Voornaam Achternaam van de gebruiker die om toegang vraagt. De groep wordt vervolgens beheerd in het HD Entity Access Management (EAM) systeem.
Voor de applicatie HD4DP2 wordt het veld Author Group automatisch ingevuld voor gebruikersrollen 1 (Study Lead) en 2 (Study Associate). De Author Group voor rol 3 (Study Support) moet in de bijbehorende vervolgkeuzelijst worden geselecteerd.
FAS
De Federale Authenticatiedienst (FAS) is een systeem dat personen authenticeert om hen toegang te verlenen tot beveiligde online-overheidstoepassingen. Het garandeert de authenticiteit van gebruikers voordat ze gebruik mogen maken van beveiligde overheidsdiensten in België.
Grants (Access grants)
Grants (toegangsrechten) definiëren de toegang van een gebruiker tot een register in een bepaalde applicatie met een specifieke rol. De Grants worden toegevoegd aan een EAM-account en moeten worden goedgekeurd door de Access Manager van de betreffende organisatie. Voorbeeld:

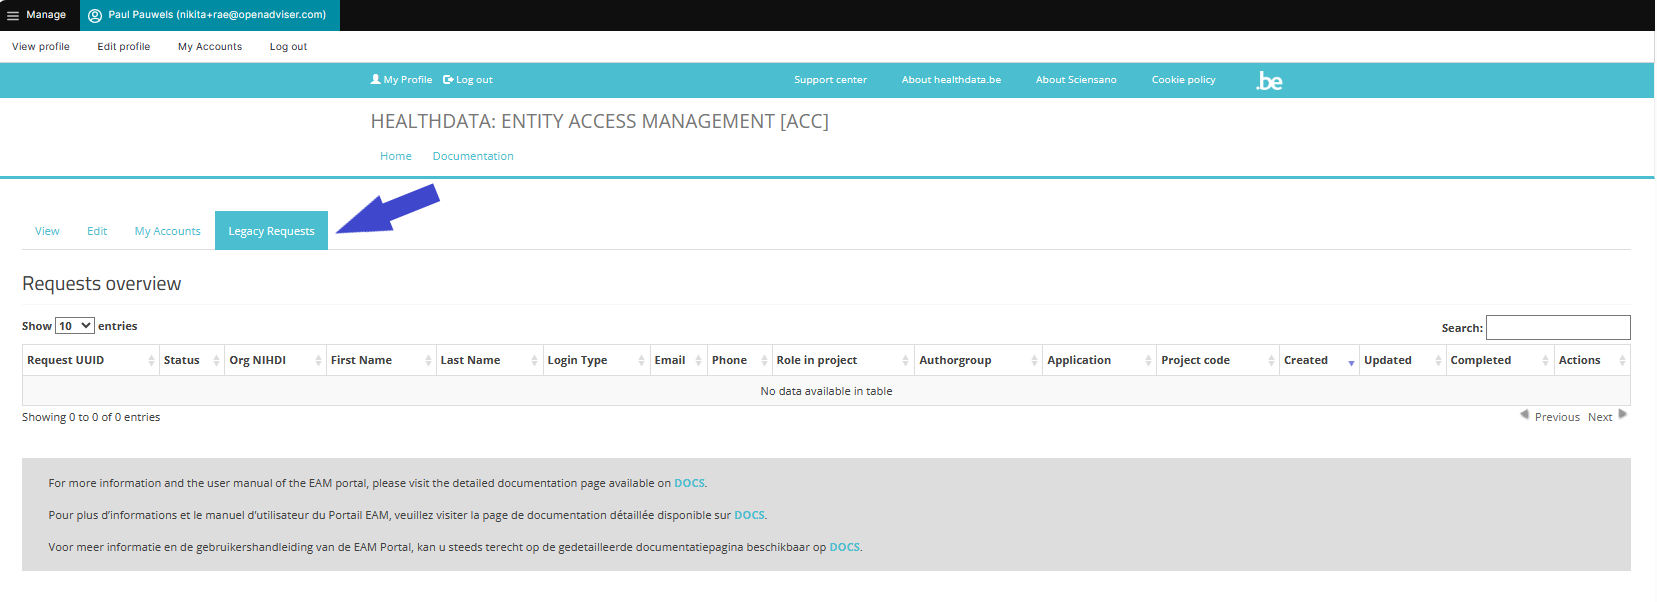
Legacy requests
Het tabblad Legacy requests haalt zijn informatie uit de "Requests overview" tabel van de vorige EAM versie (2.7). Het doel van dit overzicht bestaat erin de onbehandelde aanvragen na migratie naar de huidige EAM op te volgen.
Manager (HD Manager)
De Manager is een medewerker binnen het Support-team van healthdata.be. Het niveau van dit beheerdersprofiel heeft uitgebreidere rechten voor geavanceerde acties dan een Access Manager, zonder de functionaliteiten van een Admin voor noodsituaties.
Messages (log)
Berichten worden aangemaakt, telkens als er acties worden uitgevoerd op EAM-accountniveau, bv. het resetten van een wachtwoord, het aanvragen van de goedkeuring van een account, het goedkeuren van subsidies etc. Een bericht is de neerslag van een opdracht die we verzenden naar of ontvangen van de Servicebus. Ze worden in EAM gelogd voor geschiedenisdoelen.
Organization
Of nog: gezondheidszorgorganisatie. Een lijst van alle organisaties inclusief Naam, RIZIV-nummer en de bijbehorende lijst van Access Managers wordt beheerd door de HD Manager. Een organisatie die niet meer actief is, krijgt de status Disabled, zonder dat ze wordt verwijderd uit het EAM-systeem.
Provision
De Provision is de implementatie van een bepaalde applicatie bij een bepaalde organisatie, samen met eventuele specifieke parameters die extra informatie geven over de implementatie.
Service Bus
De Service Bus Is het communicatievehikel tussen ons EAM-systeem en de installaties bij de Data Provider. Terwijl door het vorige EAM-systeem voornamelijk toegangsverzoeken werden beheerd, richt het nieuwe EAM systeem zich volledig op het beheer van gebruikers, inclusief toegangsverzoeken, het aanmaken van accounts, feedbackloop … met als doel een snellere onboarding van gebruikers, een betere gebruikerservaring en minder handmatige interventies door Support / DevOps.

User (EAM user)
De User (Gebruiker) is de centrale entiteit binnen het EAM-systeem. Zodra het profiel van de gebruiker met basisinformatie zoals gebruikersnaam, primair e-mailadres, voornaam, achternaam, SSIN en professionele RIZIV-code, gevalideerd is, heeft de gebruiker toegang tot EAM, klaar om acties uit te voeren. EAM biedt de mogelijkheid om meer dan één RIZIV-code toe te voegen. Elke gebruiker kan aan meer dan één account gekoppeld worden.
User matrix
Algemeen genomen is een User Matrix (gebruikersmatrix) een manier om informatie over gebruikers en hun mogelijke acties overzichtelijk te presenteren. We hebben de User Matrix gebruikt als uitgangspunt voor onze documentatie van het nieuwe Entity Access Management-systeem: een tabel met de verschillende functionaliteiten van de gebruikerstypes Authenticated User en Access Manager. Met een klik op de betreffende link kan je de exacte informatie bereiken.
User roles
User Roles (Gebruikersrollen) bepalen uw toegangsrechten in applicaties van healthdata.be zoals HD4DP2 of healthstat.be voor een gewenst project. De hiërarchie van de gebruikersrollen hoeft niet noodzakelijkerwijs de personeelsstructuur binnen uw organisatie te weerspiegelen. Meer over gebruikersrollen in HD4DP2 vindt u hier. De gebruikersrollen healhtstat.be worden hier gedocumenteerd.
User types
Bij User types (Gebruikerstypes) gaat het om beheerdersrechten binnen EAM, niet om gebruikersrollen die op het niveau van een applicatie zoals HD4DP2 of healthstat.be gelden. Voorbeelden van gebruikerstypes zijn:
- Authenticated user
- Validated user (zie hieronder)
- Access manager
- (HD) Manager
- Administrator
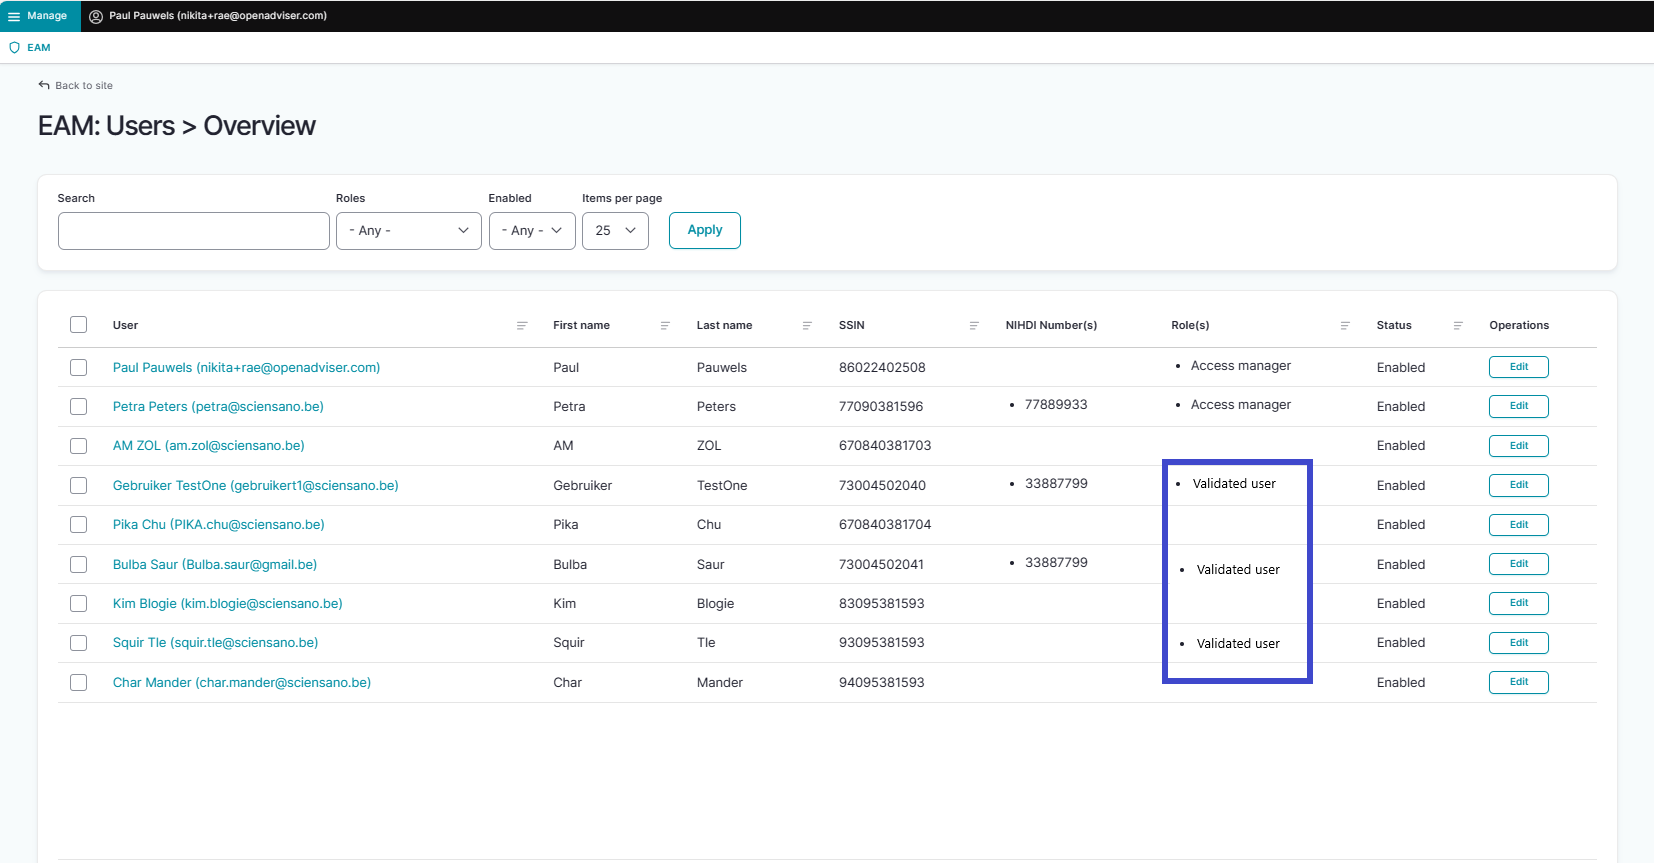
Validated user
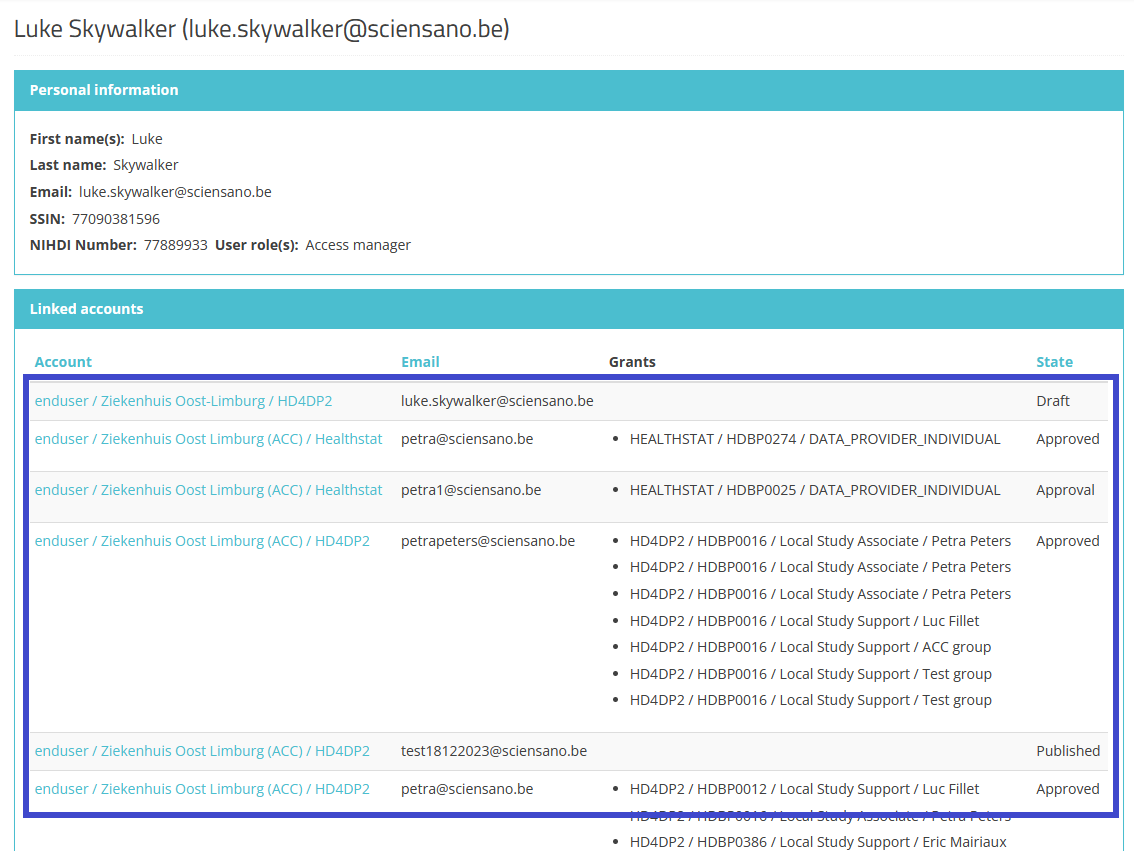
Na de migratie van uw gezondheidszorgorganisatie naar het huidige EAM-systeem is het mogelijk dat het gebruikerstype Validated User (gevalideerde gebruiker) zichtbaar is in de kolom Rol(len) van de EAM Users Overview (zie afbeelding hieronder).
Het gaat om gebruikers uit EAM 2.7 na migratie naar het huidige EAM-systeem, waar "Validated" betekende dat het profiel van een gebruiker ingevuld en gevalideerd was door de Access Manager. Dit gemigreerde gebruikerstype heeft dezelfde toegangsrechten als dit van een Authenticated User in het huidige EAM-systeem en heeft verder geen invloed op de functionaliteiten hiervan.
Deze documentatie wordt regelmatig bijgewerkt. We proberen de informatie zo correct, volledig en zo duidelijk mogelijk weer te geven. Als u desondanks iets in de documentatie ziet dat niet correct is, niet overeenkomt met uw ervaring, of verdere verduidelijking vereist, maak dan een support ticket via ons portaal Jira Service Management of stuur ons een e-mail via support.hd@hda.fgov.be om dit documentatieprobleem te melden. Vergeet niet de URL van de pagina te vermelden. Wij zullen de documentatie dan aanpassen. Bedankt!Aanvullende acties
Aanvullende actiesNu alle huisartsen en hun EAM-accounts met toegangsrechten (access grants) voor een project in healthstat.be zijn goedgekeurd, kan de Access Manager het beheer van EAM-gebruikers en EAM-accounts opvolgen via functionaliteiten die beschikbaar zijn wanneer nodig.
Om deze acties te starten, keert u terug naar de HD EAM homepage:
Op de volgende pagina's vindt u de meest voorkomende aanvullende acties (EN only):
Een EAM account uitschakelen
Een EAM account uitschakelenDisabling an EAM account
Click on Manage on the top left of the screen in order to reveal the EAM menu. Select EAM Accounts.

Scroll down the displayed list of accounts and tick the selection box of the account(s) you want to disable. Go to the bottom of the page and click on the Action toggle button to select Disable account. Then, click on the Apply to selected items button.

Confirm with the Execute action button

This action triggers an email notification for the Authenticated User to inform about the account being disabled. The user is no longer able to login with the credentials at hand, and needs to contact the Access Manager to have the account enabled again.
Een EAM account inschakelen
Een EAM account inschakelenEnabling an EAM account
Click on Manage on the top left of the screen in order to reveal the EAM menu. Select EAM Accounts.

Scroll down the displayed list of accounts and tick the selection box of the account(s) you want to enable. Go to the bottom of the page and click on the Action toggle button to select Enable Account.

To complete the action, you need to click on the Execute action button.

This action triggers an email being submitted to the Authenticated User with new credentials. All previously approved accesses will be restored.
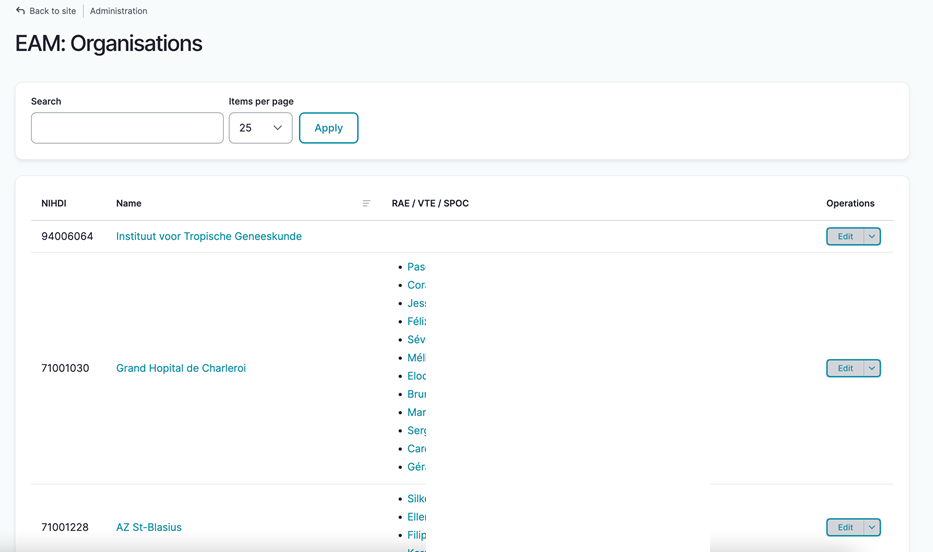
Overzicht van alle huisartsen en hun EAM accounts met grants
Overzicht van alle huisartsen en hun EAM accounts met grantsViewing all users within the organization HDGP3333 for healthstat.be using the EAM interface?
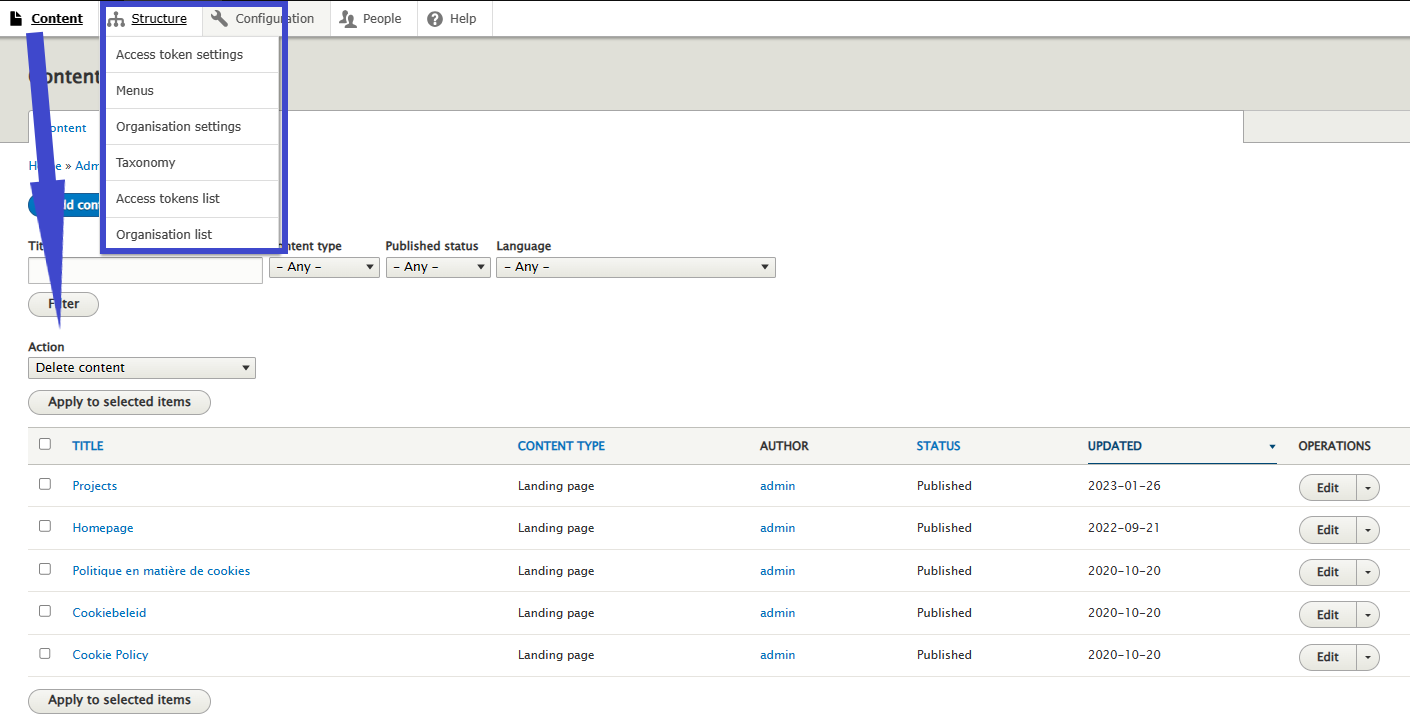
Click on Manage to the top left of the screen, so that EAM appears. When hovering over this menu item, the subitems EAM Users and EAM Accounts become visible. Select EAM Accounts.

The page shown gives an overview of all accounts of all users within the organization(s) for the different applications, including the grants.

Filtering accounts for healthstat.be
Use "CTRL+F" and enter "Healthstat" in order to find the accounts for projects in the application healthstat.be.