Technische handleiding van de applicatie HD4DP v2
Technische handleiding van de applicatie HD4DP v2De inhoud van deze pagina is enkel beschikbaar in het Engels. Selecteer de EN knop in de rechterbovenhoek van het scherm om de pagina te openen.
Technische gebruikersrollen in HD4DP v2
Technische gebruikersrollen in HD4DP v2IT administrator: Een IT administrator heeft het hoogste niveau van alle rollen en machtigingen en kan:
- inloggen met actieve directory;
- toegang verlenen aan een Local Study Lead, een Local Study Associate en een Local Study Support;
- alle projecten selecteren en openen;
- een registratie aanmaken, zoeken, bijwerken, verwijderen, indienen (bij healthdata.be, MyCareNet en andere bestemmingen) en corrigeren met de form.io componenten;
- een registratie aanmaken, bijwerken, indienen en corrigeren met behulp van API data collectie;
- een registratie aanmaken, bijwerken, indien en corrigeren met behulp van CSV upload;
- een MyCareNet-registratie aanmaken en indienen met behulp van MyCareNet XML;
- alle registraties voor alle projecten bekijken;
- alle registraties voor alle projecten uit de Local DWH verzamelen met behulp van de PostgreSQL-database
Installatie van HD4DP v2
Installatie van HD4DP v2De inhoud van deze pagina is enkel beschikbaar in het Engels. Selecteer de EN knop in de rechterbovenhoek van het scherm om de pagina te openen.
Instructies voor HD4DP v2 Infrastructuur
Instructies voor HD4DP v2 InfrastructuurDe inhoud van deze pagina is enkel beschikbaar in het Engels. Selecteer de EN knop in de rechterbovenhoek van het scherm om de pagina te openen.
Informatieblad HD4DP v2 Infrastructuur
Informatieblad HD4DP v2 InfrastructuurDe inhoud van deze pagina is enkel beschikbaar in het Engels. Selecteer de EN knop in de rechterbovenhoek van het scherm om de pagina te openen.
Vereisten voor de installatie van HD4DP
Vereisten voor de installatie van HD4DPDe inhoud van deze pagina is enkel beschikbaar in het Engels. Selecteer de EN knop in de rechterbovenhoek van het scherm om de pagina te openen.
S2S API data submission for Angio registries
S2S API data submission for Angio registriesGeneral description of S2S API
- Go here for a general description of the S2S API data submission service.
Training
- Go here to watch the S2S API training organized by healthdata.be.
API endpoint description
- Go here for an overview of API endpoints and the relevant information.
Data submission procedure in Architecture 2 using S2S API
1. Requirements at Data Provider's side
In order to be able to communicate with the healthdata.be S2S API, the IT services of the healthcare organizations must setup their systems as follows:
- Ensure to have the credentials available for the endpoint/URL for which authorization is necessary. If this is not the case, please contact our service portal: https://sciensano.service-now.com/sp.
- Ensure to have the end-to-end API process in place in order to submit data registrations in a fully automated manner.
- Ensure capability of submitted data retrieval in the local database.
2. Preparing the JSON file
- To send data to healthdata.be by S2S API, the file must be in a .json file format.
- Extract the requested data from the electronic patient files and/or other local databases.
- Map the data according to the fields and formats as described in the DCD specifications of this section and the general code lists.
- Go here for additional information on the codes and the formats used for the Author group, SSIN code, Status, "Date" - "Date:Time", Repeatable fields and Multiple choice.
Note: The example files below are only provided as a guideline and do not contain real life data.
Angio - Hospitalisation
- Example Architecture 2.5
Angio - Hospitalisation with PCI
- Example Architecture 2.5
Angio - Hospitalisation with FFR
- Example Architecture 2.5
Angio - Hospitalisation with FFR and PCI
- Example Architecture 2.5
Angio - Follow-up after PCI
- Example Architecture 2.5
Note: Below documentation contains generic example screens with the sole purpose to demonstrate how the process looks like regardless of the registry.
3. Uploading the JSON file
- The IT department of the Data Provider implements a data transmission system (e.g. Postman) to send the API queries by means of a json file. The correct endpoints for uploading of the json file can be found here.
- The URL that needs to be entered after POST (selected method for uploading) should have a syntax similar to the one below:
POST {{baseURL}}/api/dcd/payload/submit?organization-id={organizationId}&dcd-id={dcdId}&dcd-version-id={dcdVersionId}&data-src-type={dataSrcType}
- Whereby:
- {organizationId} needs to be replaced by the id of your organization; go here for more information
- {dcdId} needs to be replaced by a register-specific numerical value; go here for more information
- <optional> {dcdVersionId} needs to be replaced by the intended version number; if not provided, the latest version of the dcd specifications is assumed; go here for more information
- <optional> {dataSrcType} needs to be replaced by the data source type. Permitted values are API or CSV; go here for more information
- a GET method URL should not contain /submit/ in the endpoint or path
- multiple query parameters need to be connected by an ampersand (&) (see example above)
- In the Authorization tab, select “Basic Auth” in the “Auth Type” drop-down list. Subsequently, fill out the API credentials in the username and password fields.

- In Body tab, select the “raw” option from the top line and paste the content of the JSON file in the box.
- Once the request settings are completed, press the Send button to submit the records.
- After succesful submission of the data, the “Status: 202 Accepted” code will appear below the box where the data was pasted. The bottom box should return a message about the records uploaded or an error message if any.
- A 401 Unauthorized message instead indicates missing or incorrect credentials. Request the correct credentials as described above in the Requirements at Data Provider's side.

- A 400 Bad request might refer to incorrect syntax of the API query. Check the query parameters and ensure to connect multiple parameters with the ampersand (&) character.

4. Validating the JSON Upload
4.1 Validation of the S2S API Upload via the response:
Verify in the same way the request was sent, that the returned response is containing a valid Business key.
If a valid Business key has been provided, the registration upload via System 2 System API was succesful.
4.2 Validation of the S2S API via HD4DP 2.0:
Step 1: Open the HD4DP 2.0 application.
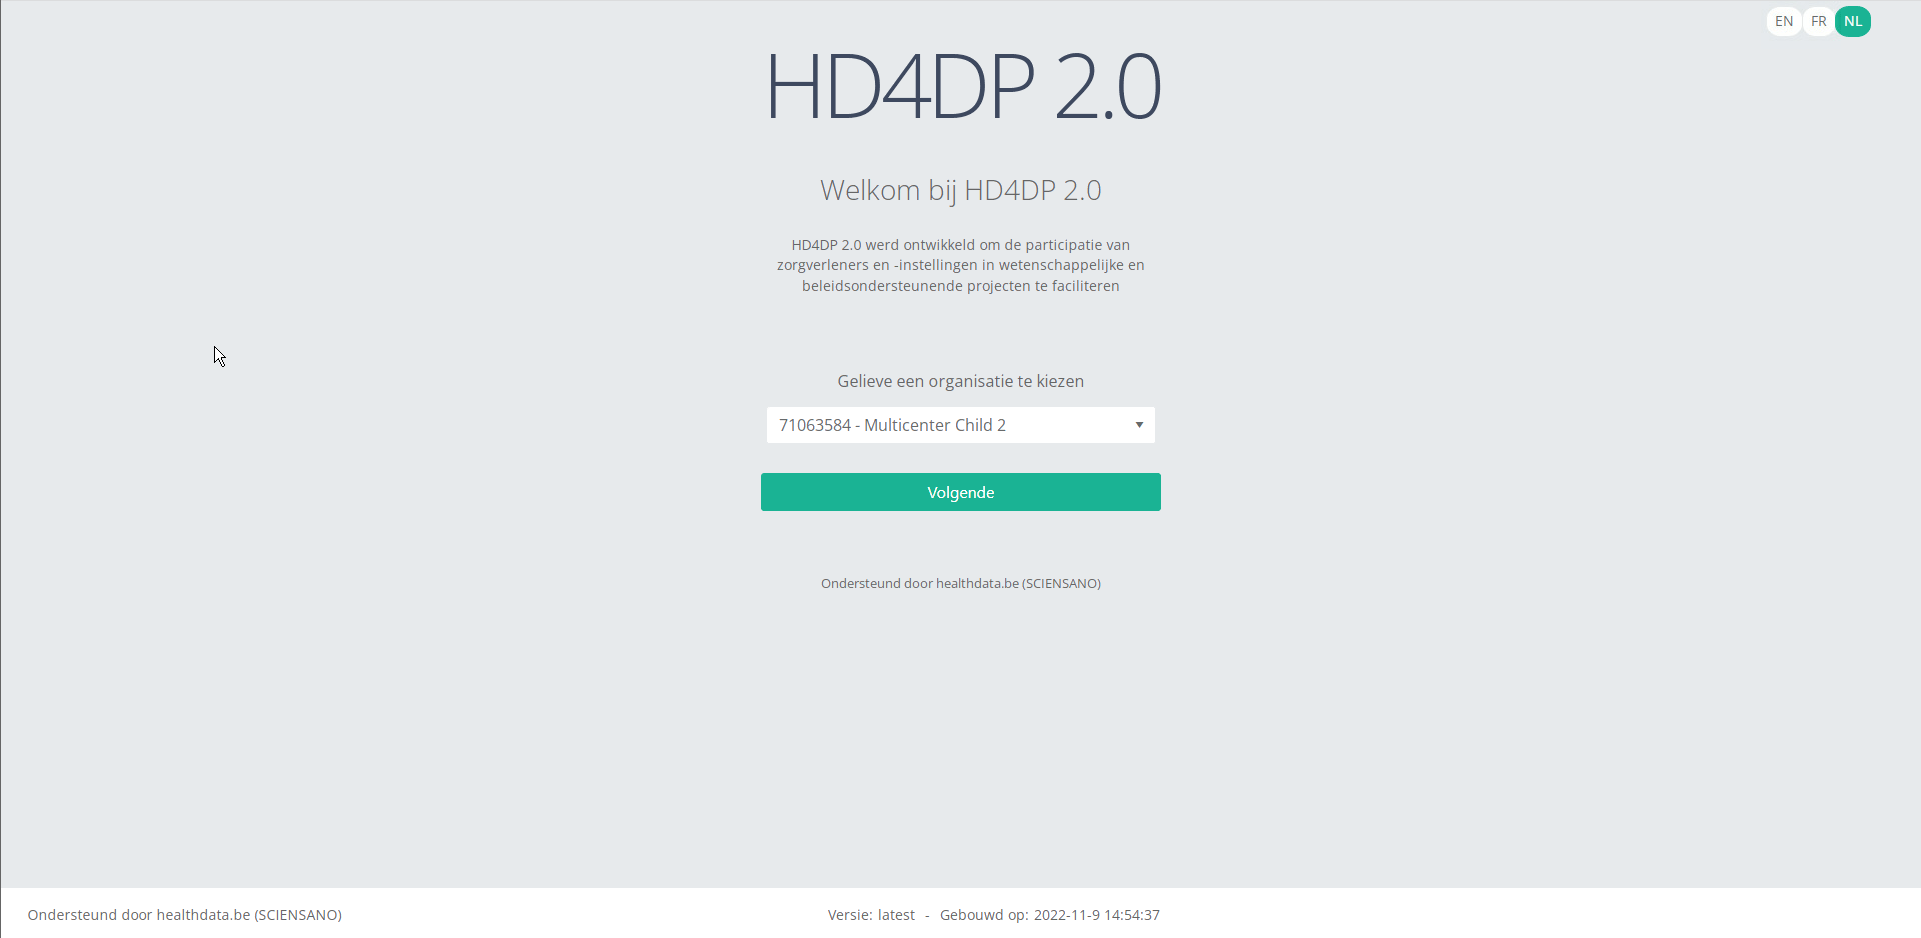
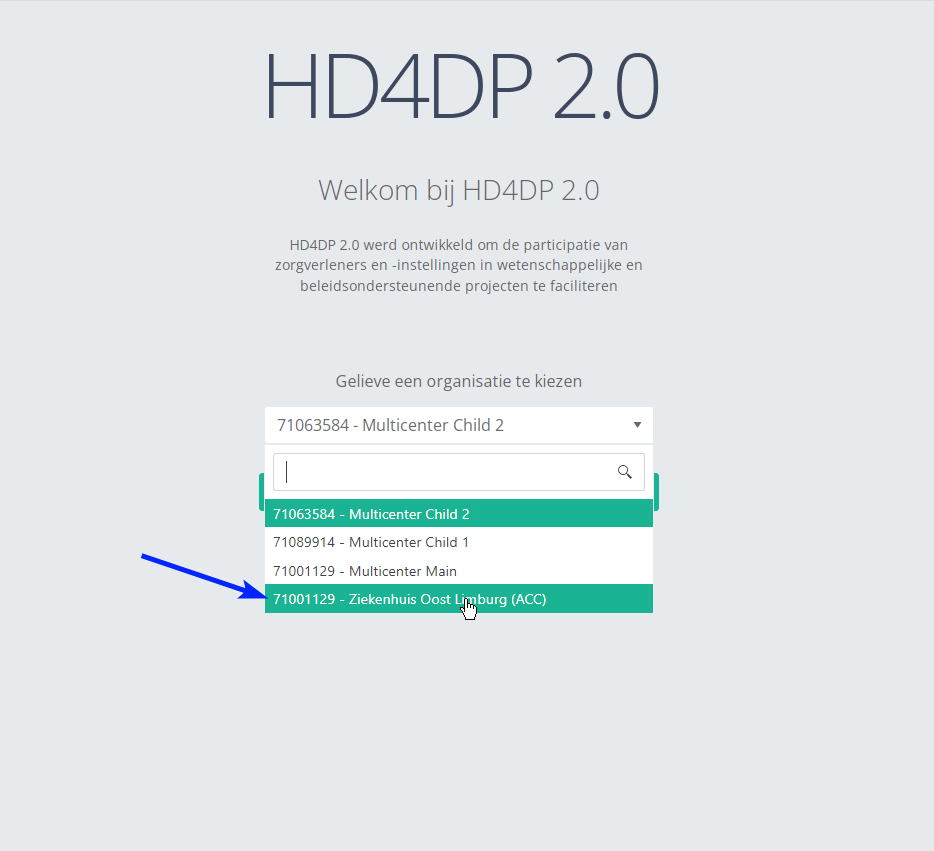
Step 2: Select the organization in the dropdown list and click on Volgende (Next).
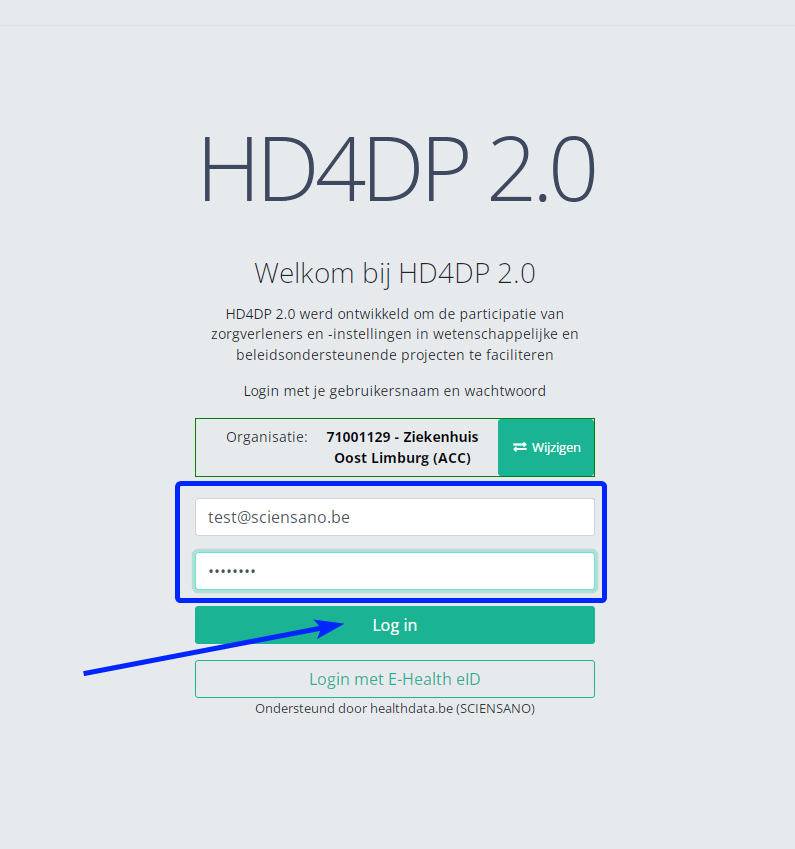
Step 3: Fill in the username and password, that has been provided by your IT Department or Healthdata team, and click on Log in to access the HD4DP v2.0 application.
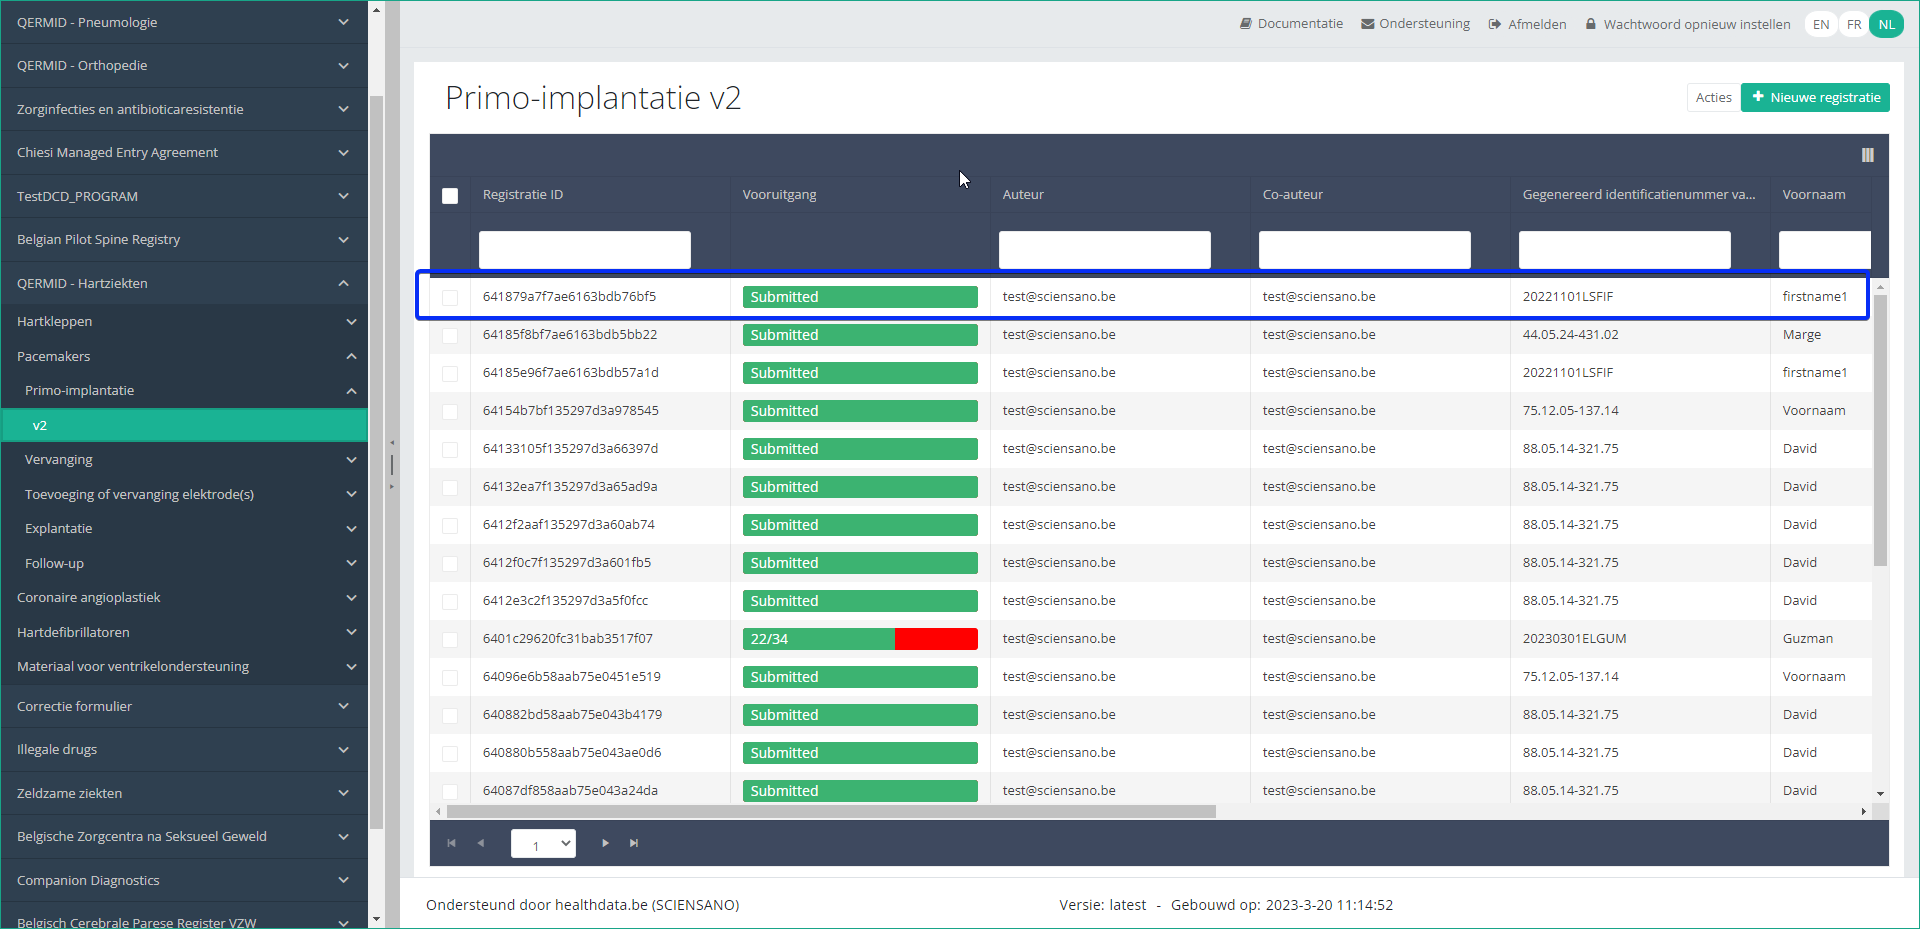
Step 4: Navigate in the menu on the left-hand side panel to the desired study program:

Step 5: Check that the uploaded registration(s) is/are displayed in the overview table:
This documentation is being updated regularly. We try to provide as correct, complete and clear as possible information on these pages. Nevertheless, if you see anything in the documentation that is not correct, does not match your experience or requires further clarification, please create support ticket via our portal (https://healthdatabe.atlassian.net/servicedesk/customer/portals) or send us an e-mail via support.healthdata@sciensano.be to report this documentation issue. Please, do not forget to mention the URL or web address of the page with the documentation issue. We will then adjust the documentation as soon as possible. Thank you!CSV Upload data submission for Angio registries
CSV Upload data submission for Angio registriesGeneral description of CSV Upload
- Go here for a general description of the data submission service via CSV Upload.
Training
- Go here to watch the CSV Upload training organized by healthdata.be.
Data submission procedure in Architecture 2 using CSV Upload
1. Preparing the csv file
- Extract the requested data from the electronic patient files and/or other local databases.
- Map the data according to the fields and formats as described in the DCD specifications of this section and the general code lists.
- Go here for additional information on the codes and the formats used for the Author group, NISS code, Status, "Date" - "Date:Time", Repeatable fields and Multiple choice.
- Make sure the name of the csv test file(s) has the correct format as follows:
HD_DCD_submcsv_HDBPnumber_HDBPabbreviation_versionnumber_versionreleasedate
- An alternative method for migrated projects would be to export the csv file from Architecture 1 and to manually add the additional fields that are required in Architecture 2. (see Additional fields below, if applicable)
Angio - Hospitalisation
Angio - Hospitalisation with PCI
- Examples
Angio - Hospitalisation with FFR
- Examples
Angio - Hospitalisation with FFR and PCI
- Examples
Angio - Follow-up after PCI
- Examples
- -
Disclaimer: The example files above are only provided as a guideline and do not contain real life data.
2. Uploading the csv file
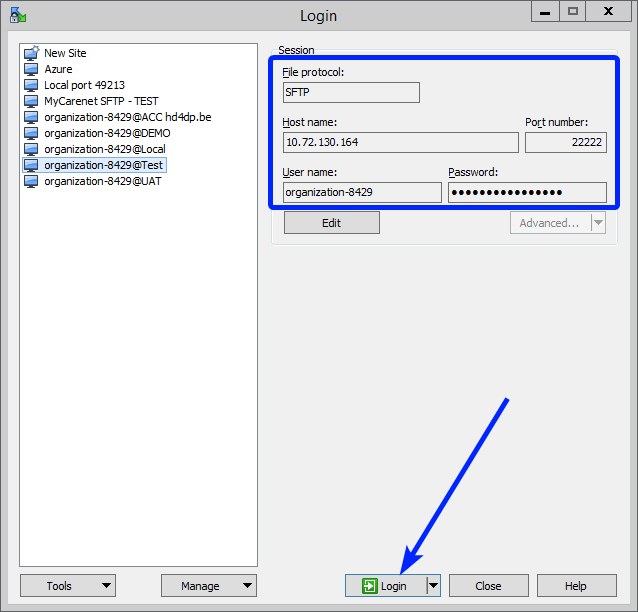
Step 1: Open the sftp tool like WinSCP

Step 2: Get the credentials (Host name, Port number, User name and Password) from the IT department of the Data Provider, to log on to the sftp server located on the Data Provider side. In case the credenials are unavailable we advise you to request your credentials through our service portal at https://sciensano.service-now.com/sp via the Request something tab and subsequently the Request for Information box.
Step 3: Fill in the credentials into the Login screen and click on Login to be able to access the different upload folders:
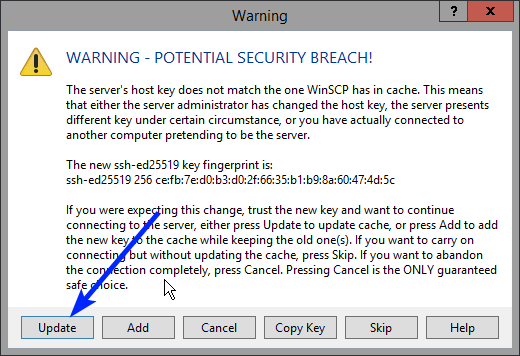
Note: a warning might be given, just click on Update
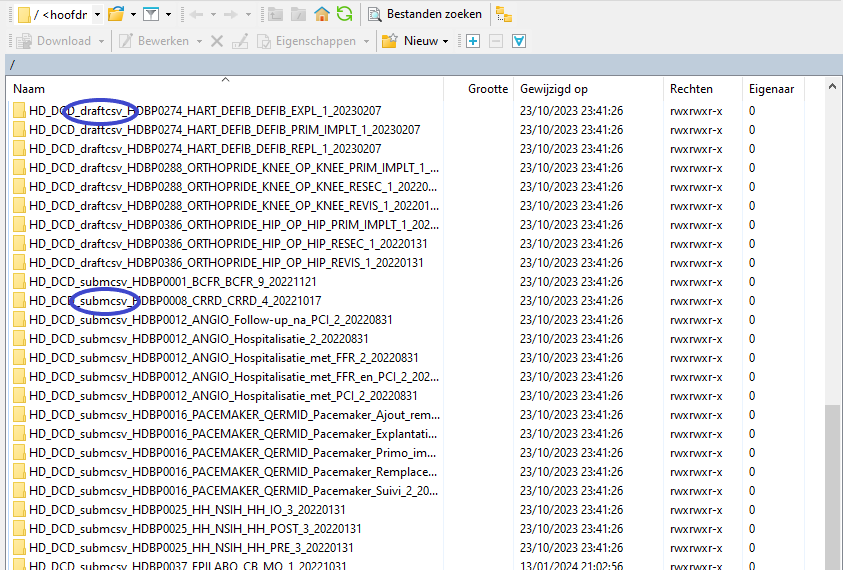
In the CSV Upload folder structure that is displayed on the right-hand side panel, you will notice draftcsv folders and submcsv folders for the diverse HD business projects.
Historically, a directly submitted csv file would end up in the submitted folder (submcsv), whereas a csv file featuring ‘draft’ in the status field would have ended up in the draft folder (draftcsv). At this stage there is no real distinction between both folders, so you can save the csv file in either of them.
Attention: If you wish to create a draft to work on at a later stage, don’t forget to add ‘draft’ in the status column of the csv file.
Below documentation contains generic example screens with the sole purpose to demonstrate how the process looks like. In the subsequent screens the desired ANGIO register (Hospitalisation, Hospitalisation with PCI, Hospitalisation with FFR, Hospitalsation with FFR and PCI, Follow-up after PCI) needs to be selected.
Step 4: Select the desired ANGIO folder and open it by double-clicking on it:

Step 5: Now go to the folder on the left-hand side panel where the csv file to be uploaded is located:

Step 6: Drag the csv file to be uploaded from the left-hand side panel into the folder on the right-hand side panel:

Step 7: Wait until the polling system of the CSV Uploader has picked up the CSV file and has processed it.
Once the csv file has been processed it will disappear from the folder, when the page is manually refreshed!

3. Validate csv upload
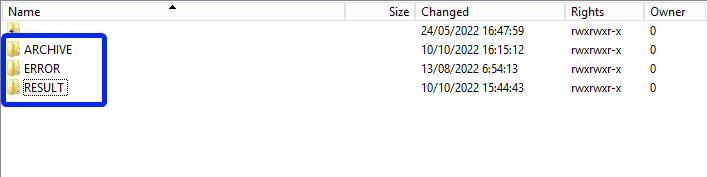
Once the csv file has been processed, 3 folders will be created (if they haven't been created already) in the DCD folder:
- ARCHIVE (after a csv file has been processed, the original csv file will be saved in this folder)
- RESULT (when the csv file is placed in this folder, it means that the csv file has been processed, a file will be created (or appended, if the file already existed) with the result of the upload of the csv file).
All the errors that are described in this file are business related, which means that they are technically correct, but in violation with the business rules or contain wrong values for that field. - ERROR (when the csv file is placed in this folder, it means that a technical error has occurred like the csv file contained erroneous formatting. The csv file won't get processed and an error file will be created with the errors and reason why the csv file couldn't be processed)
3.1 Validation of the csv upload via sftp tool:
Step 1: Double-click on the ERROR folder to open it, click on the refresh button and verify that there is no error file present.

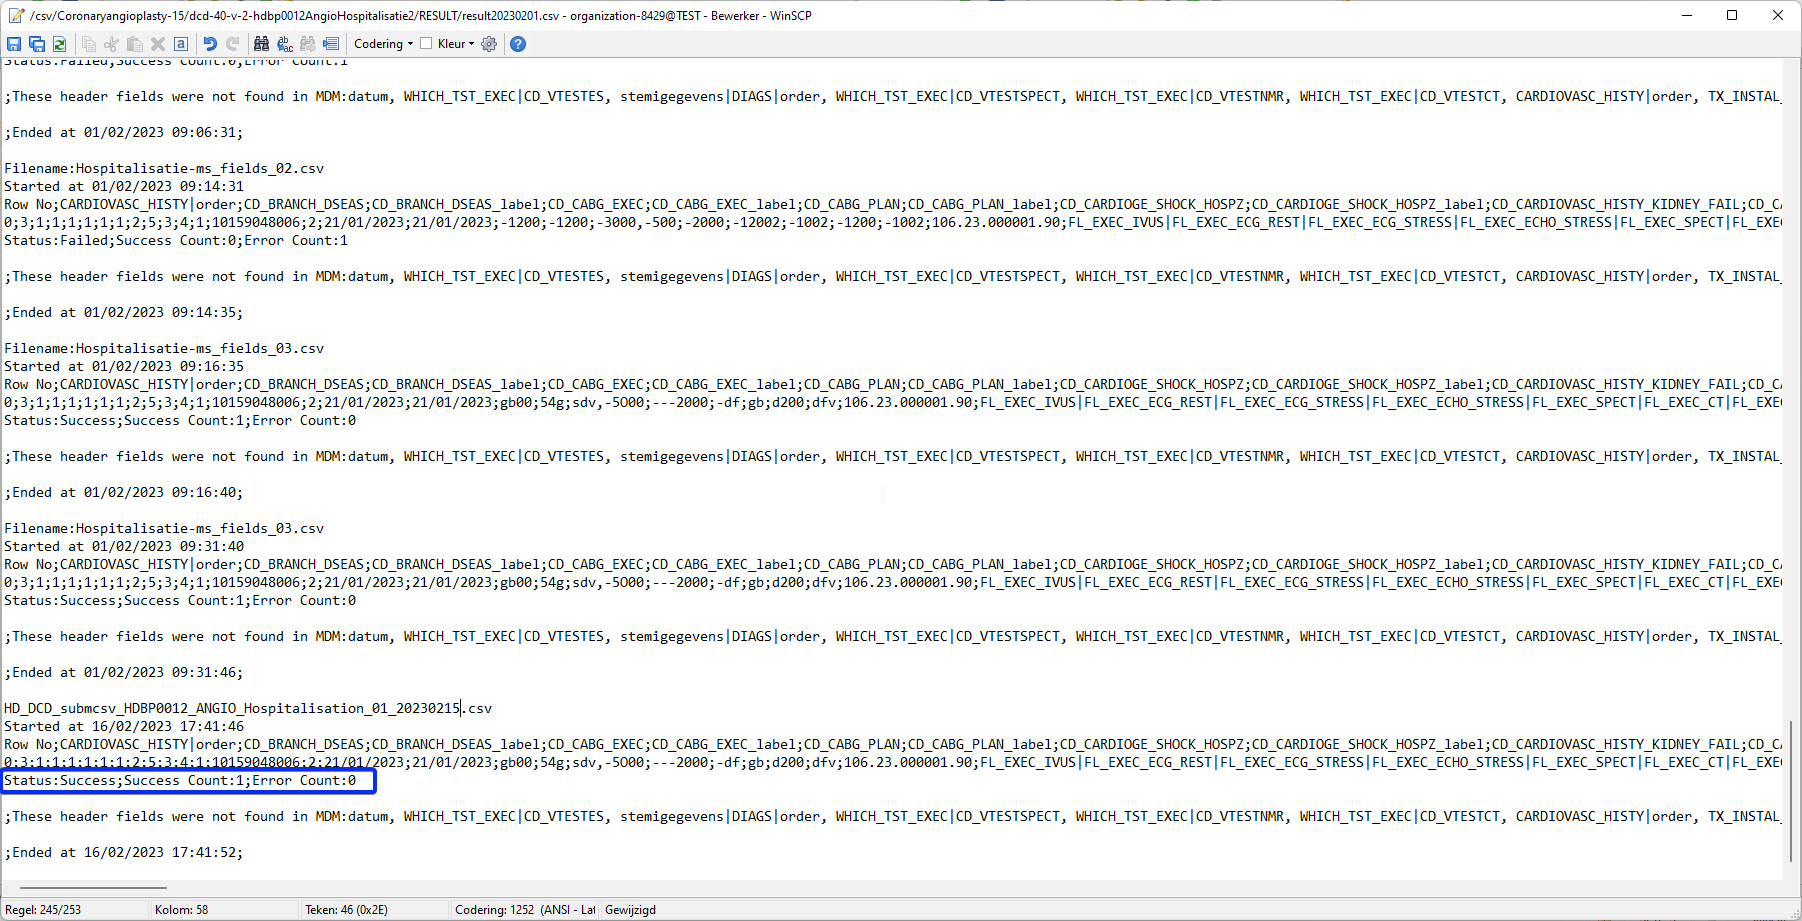
Step 2: Return to the DCD folder. Now double-click on the RESULT folder to open it, click on the refresh button and verify that the result file is present.

Step 3: Double-click on the result file to open it.
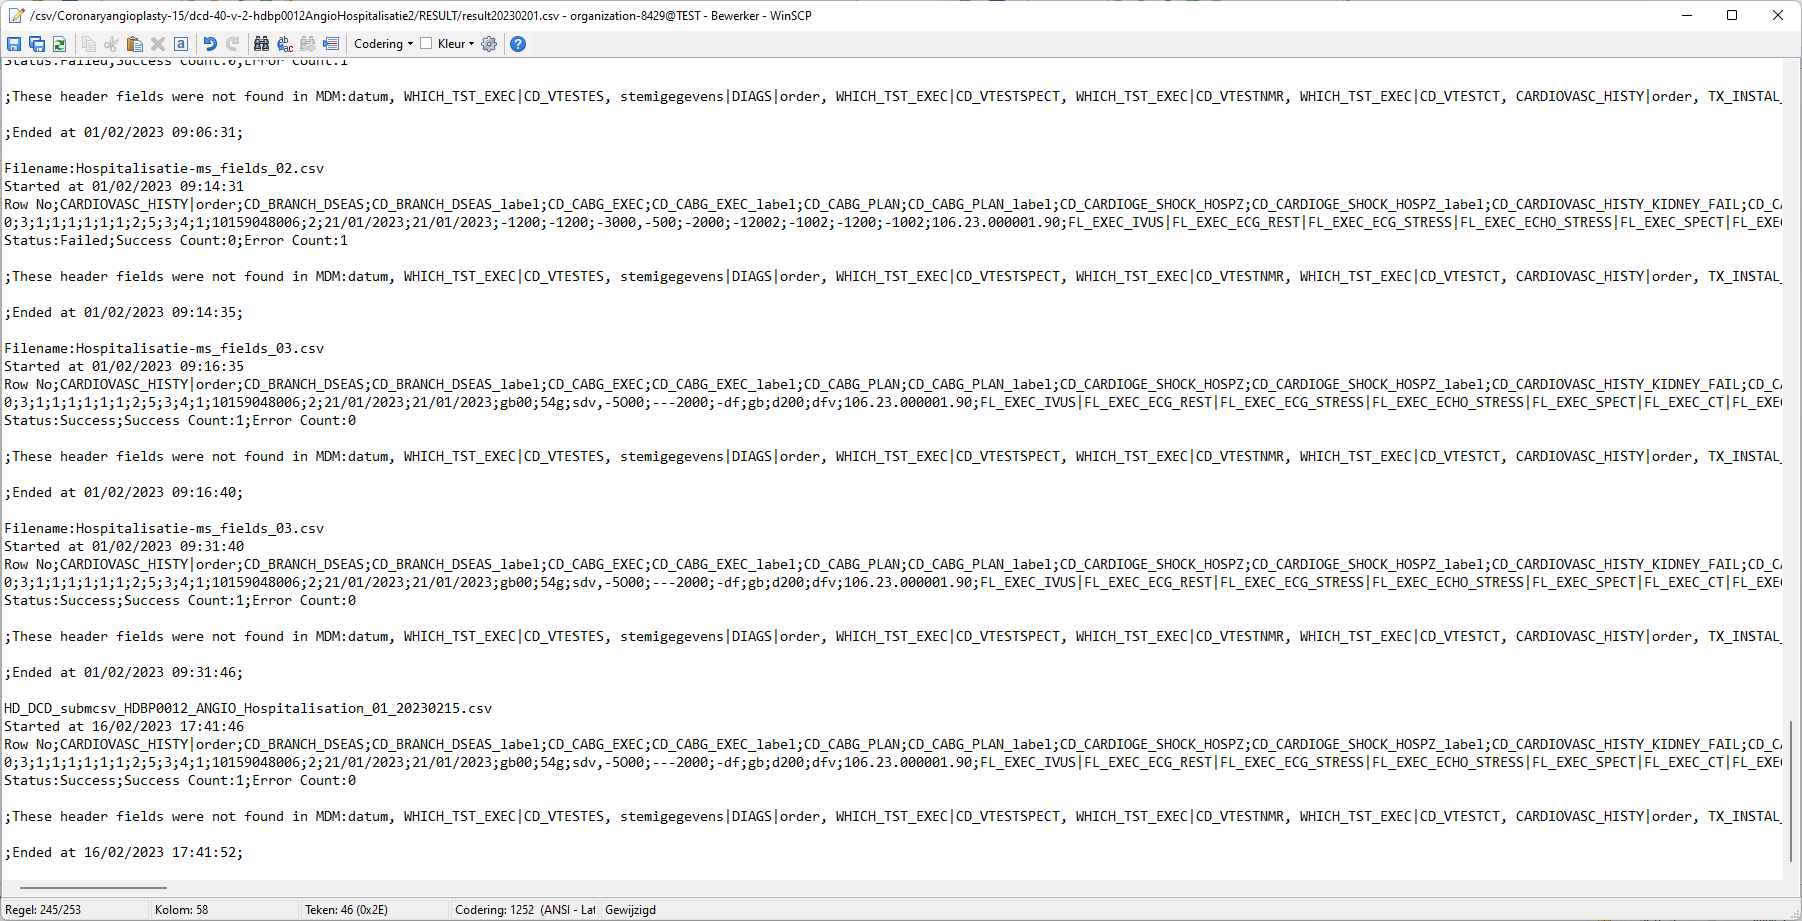
Step 4: If there are multiple records in the result file, scroll to the entry of the current csv upload by looking at the upload date (Started at dd/mm/yyyy hh:mm).
Verify the result file that the upload was successful by searching for the word SUCCESS and having a look at the Status. This Status must contain: Success;Success Count:1;Error Count:0
3.2 Validation of the csv upload via HD4DP 2.0:
Step 1: Open the HD4DP 2.0 web application.
Step 2: Select the organization in the dropdown list and click on Volgende (Next)
Step 3: Fill in the username and password, that has been provided by your IT Department or Healthdata team, and click on Log in to access the HD4DP v2.0 application.
Step 4: Navigate in the menu on the left-hand side panel to the desired study program:
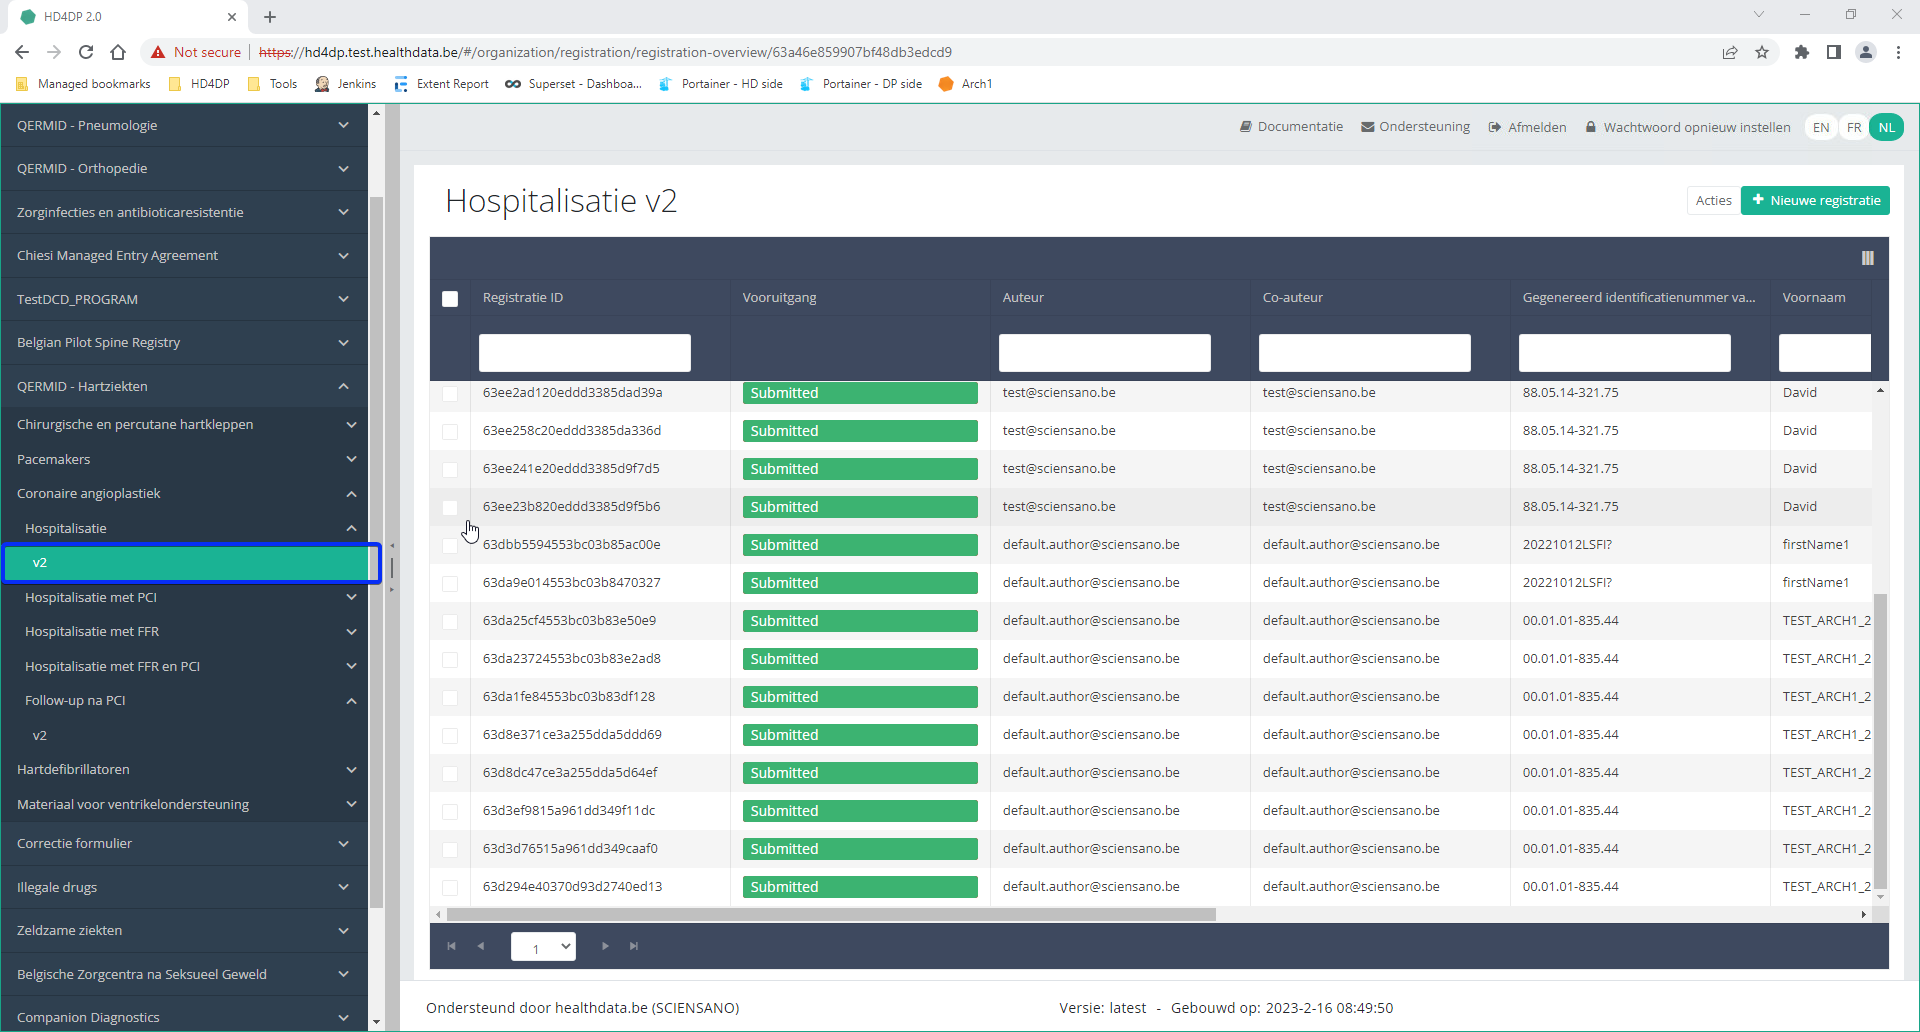
Step 5: Check that the uploaded registration(s) is/are displayed in the overview table.
This documentation is being updated regularly. We try to provide as correct, complete and clear as possible information on these pages. Nevertheless, if you see anything in the documentation that is not correct, does not match your experience or requires further clarification, please create support ticket via our portal (https://healthdatabe.atlassian.net/servicedesk/customer/portals) or send us an e-mail via support.healthdata@sciensano.be to report this documentation issue. Please, do not forget to mention the URL or web address of the page with the documentation issue. We will then adjust the documentation as soon as possible. Thank you!Architectuur 2.5
Architectuur 2.5 Bart.Servaes di, 04/09/2024 - 16:30Uniformed naming convention
Uniformed naming conventionDe inhoud van deze pagina is enkel beschikbaar in het Engels. Selecteer de EN knop in de rechterbovenhoek van het scherm om de pagina te openen.
Sending code values instead of code IDs in S2S requests
Sending code values instead of code IDs in S2S requestsDe inhoud van deze pagina is enkel beschikbaar in het Engels. Selecteer de EN knop in de rechterbovenhoek van het scherm om de pagina te openen.
MDM Mapping of billing codes for MyCareNet
MDM Mapping of billing codes for MyCareNetDe inhoud van deze pagina is enkel beschikbaar in het Engels. Selecteer de EN knop in de rechterbovenhoek van het scherm om de pagina te openen.
Databases
Databases Adelaide.DAmore di, 04/09/2024 - 16:31ANGIO data ophalen uit de lokale database van HD4DP v2
ANGIO data ophalen uit de lokale database van HD4DP v2De inhoud van deze pagina is enkel beschikbaar in het Engels. Selecteer de EN knop in de rechterbovenhoek van het scherm om de pagina te openen.
Nippin database
Nippin databaseDe inhoud van deze pagina is enkel beschikbaar in het Engels. Selecteer de EN knop in de rechterbovenhoek van het scherm om de pagina te openen.
Online Acceptance Environment (OACC) voor HD4DP v2
Online Acceptance Environment (OACC) voor HD4DP v2De inhoud van deze pagina is enkel beschikbaar in het Engels. Selecteer de EN knop in de rechterbovenhoek van het scherm om de pagina te openen.
Toegang aanvragen
Toegang aanvragenDe inhoud van deze pagina is enkel beschikbaar in het Engels. Selecteer de EN knop in de rechterbovenhoek van het scherm om de pagina te openen.