HD4DP v.2 (Health Data For Data Providers)
HD4DP v.2 (Health Data For Data Providers)Welcome to the technical documentation pages for the component "Health Data for Data Providers v2, or HD4DP v2", provided by the service healthdata.be (Sciensano).
These pages provide information about the technical processes of the component. The following sections are (will be) provided:
- How to request access to an HD application for a certain project (EAM)
- Access the application HD4DP v2
This documentation is being updated regularly. We try to provide as correct, complete and clear as possible information on these pages. Nevertheless, if you see anything in the documentation that is not correct, does not match your experience or requires further clarification, please create a support ticket via our portal Jira Service Management or send us an e-mail via support.hd@hda.fgov.be to report this documentation issue. Please do not forget to mention the URL of the page. We will then adjust the documentation as soon as possible. Thank you!Algemene beschrijving van de applicatie HD4DP v2
Algemene beschrijving van de applicatie HD4DP v2De HD4DP v2.x Local is een elektronisch gegevensregistratiesysteem (EDC): een geautomatiseerd systeem dat is ontworpen voor het verzamelen van klinische gegevens in elektronisch formaat voor gebruik in onderzoek ter ondersteuning van het volksgezondheidsbeleid. HD4DP (Health Data for Data providers) vervangt de traditionele op papier, spreadsheet, e-mail gebaseerde methode voor het verzamelen van gegevens en de wildgroei aan websites om het verzamelen van gegevens te stroomlijnen en de tijd tot analyse en rapportage te versnellen.
Componenten en functies
De HD4DP v2.x Local applicatie bevat de volgende hoofdcomponenten: NextGen Connect, Form.io, HD Connect (LOCAL Proxy), Local datawarehouse.
NextGen Connect
NextGen Connect is een integratiemotor voor de gezondheidszorg die berichtstandaarden vertaalt naar de standaard die vereist is door het ontvangende systeem, inclusief gegevensformaten en -standaarden zoals HL7, DICOM, ANSI X12, ASCII en XML. Belangrijkste functionaliteiten zijn filteren, transformeren, extraheren en routeren.
De NextGen Connect component wordt gebruikt om alle integraties binnen HD4DP v2.0 zelf af te handelen, maar ook alle integraties met de buitenwereld.
API voor gegevensverzamelingen: De form.io server biedt een REST API die kan worden gebruikt om gegevens in te dienen voor elke bekende gegevensverzameling. Gegevensprovider Master Systems heeft geen rechtstreekse toegang tot deze API, maar moet de API gebruiken die wordt weergegeven door de NextGen Connect-component. Deze API is gewoon een proxy voor de form.io API, maar biedt extra functies bovenop de form.io API zoals beveiliging, monitoring, throttling, …
CSV API: Voor elke dataverzameling kunnen gegevens file-based worden ingediend met behulp van een CSV. Een CSV kan meerdere ingevoerde gegevens bevatten voor een enkele definitie van gegevensverzameling. Deze gegevensinvoer wordt getransformeerd en door de NextGen Connect-component naar de form.io-server geduwd voor mogelijke handmatige naverwerking en validatie.
HL7 FHIR API: Voor sommige gegevensverzamelingen zal een HL7 FHIR API beschikbaar zijn. Het NextGen Connect-onderdeel voert de transformatie naar de API voor gegevensverzamelingen uit en pusht de gegevens naar de form.io-server.
Levering van de gegevens: de NextGen Connect-component zorgt voor alle routering van gegevens naar de buitenwereld. Dit betekent dat het de form.io-server verifieert op voltooide gegevensinvoer die nog niet is afgeleverd. Voor elke gegevensinvoer die moet worden afgeleverd, wordt bepaald waar de gegevens naartoe moeten worden gestuurd, hoe ze moeten worden getransformeerd en hoe ze moeten worden gesplitst. Hij voert al deze acties uit op een gegarandeerde leveringswijze: hij zorgt ervoor dat de gegevens hun bestemming bereiken, en probeert zo nodig opnieuw als er iets mis ging.Feedback: de NextGen Connect-component coördineert de ontvangst van feedback, transformeert deze mogelijk en duwt deze naar de respectieve invoer voor gegevensverzameling met behulp van de API voor gegevensverzamelingen.
Form.io
Form.io is een gegevensbeheerplatform met een formulierbouwer met een interface voor slepen en neerzetten, gegevensbeheer met een volledig API-platform, beheer van gebruikers, offline formulieren, dynamische formulieren, automatisch aanmaken van API en insluiten van applicaties. In HD4DP v2.0 is een Angular frontend-applicatie beschikbaar bovenop de form.io-server. Deze applicatie biedt een gebruikersinterface voor gegevensproviders waarin ze de verschillende gegevensverzamelingen kunnen zien waarvoor ze gegevens handmatig mogen registreren en indienen. Een backend-server van form.io is verantwoordelijk voor het leveren van de formulierdefinities en registraties van nieuwe/bijgewerkte items.
HD Connect (LOCAL Proxy)
De component HD Connect wordt gebruikt om metadata op te halen uit de Master Data Management Database (MDM DB) die zich aan de kant van healthdata.be bevindt.
Local datawarehouse
Elke wijziging in de gegevensinvoer op de form.io-server wordt naar het lokale datawarehouse (Lokale DWH) gepusht voor eenvoudige rapportage en gegevensextractie. Deze lokale DWH werkt met een PostgreSQL-database.
Installatie en onderhoud
De applicatie HD4DP v2.0 Local wordt gratis ter beschikking gesteld en op afstand geïnstalleerd op de infrastructuur van de zorgorganisatie door healthdata.be. Zorgorganisaties krijgen de systeemvereisten voor de installatie van de HD4DP v2.0 applicatie. Zorgorganisaties die niet aan de systeemeisen kunnen voldoen, kunnen ervoor kiezen om toegang en gebruik te vragen van een HD4DP v2.0 Local applicatie van een andere zorgorganisatie. Zorgorganisaties die niet aan de systeemvereisten kunnen voldoen en geen toegang hebben tot en gebruik kunnen maken van een HD4DP v2.0 Local applicatie van een andere zorgorganisatie, kunnen toegang tot en gebruik vragen van HD4DP v2 WEB gehost door healthdata.be.
De applicatie HD4DP v2.0 Local wordt door healthdata.be kosteloos op afstand onderhouden op de infrastructuur van de zorgorganisatie. De infrastructuur waarop de applicatie HD4DP v2.0 Local is geïnstalleerd, dient door de zorgorganisatie te worden onderhouden.
Positie van HD4DP v2 in HD-Architectuur 2.0
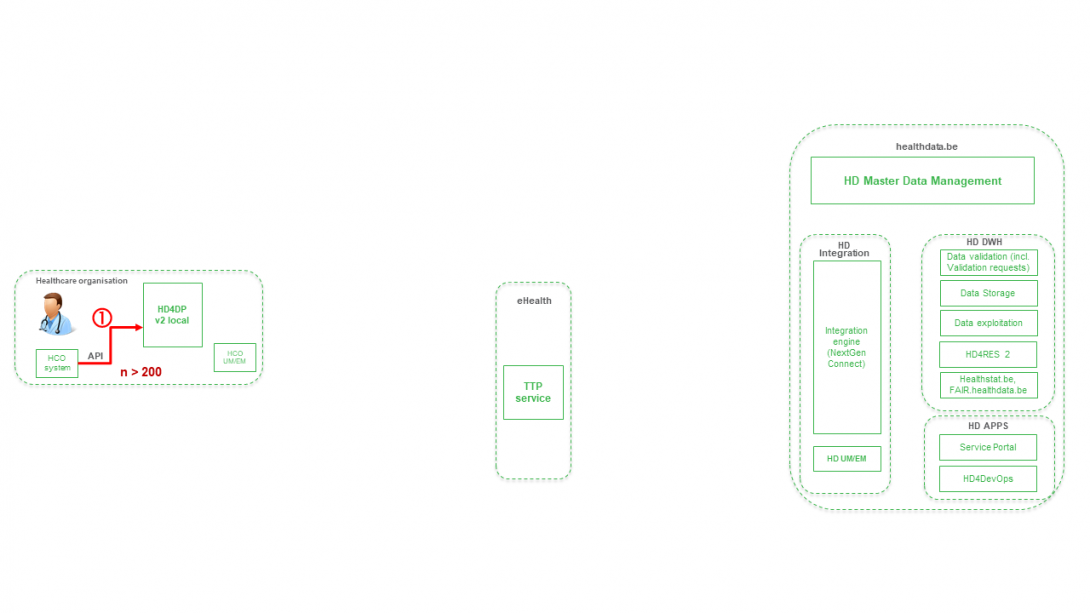
Positie van HD4DP v2 in HD-Architectuur 2.0De HD4DP v2 applicatie is één van de onderdelen van de bredere architectuur voor gegevensverzameling en -beheer die wordt beheerd door de dienst healthdata.be van Sciensano. Hieronder vindt u een high level beeld van die gegevensverzamelings- en beheerarchitectuur (versie 2).

Beschrijving van de HD4DP v2 dataflow
Beschrijving van de HD4DP v2 dataflowHieronder beschrijven we (op hoog niveau) de dataflow tussen HD4DP v2 en het healthdata.be platform.
Stap 1. Automatische data export vanuit systemen van dataleverancier naar HD4DP v2 en prefill van formulieren indien niet volledig.
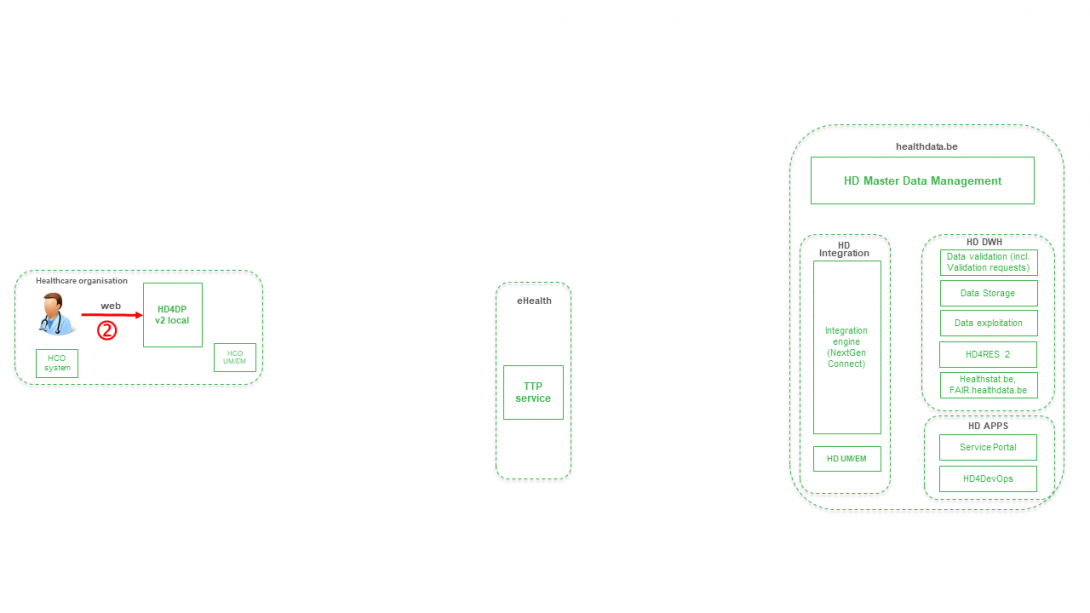
Stap 2. Handmatige registratie (de novo of aanvulling) van gegevens in formuliercomponent van HD4DP v2.
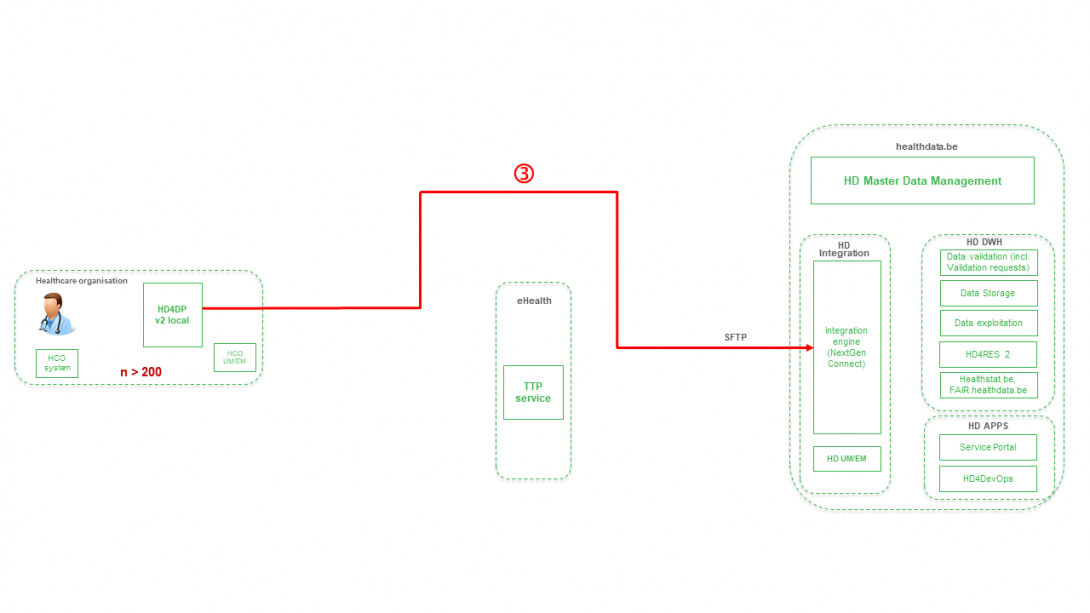
Stap 3. Directe real time overdracht van registervariabelen en technische ID van record van HD4DP v2 naar HD.
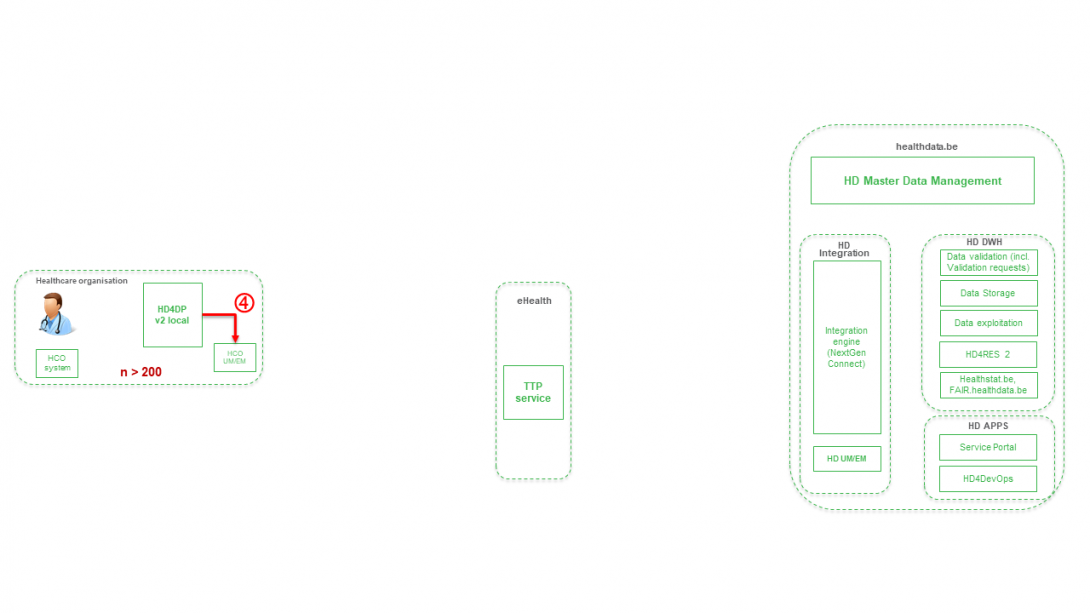
Stap 4. Overdracht van patiëntidentifiers en technische ID van dossier van HD4DP v2 naar eHBox-berichtenclient van HCO (HCO UM/EM).
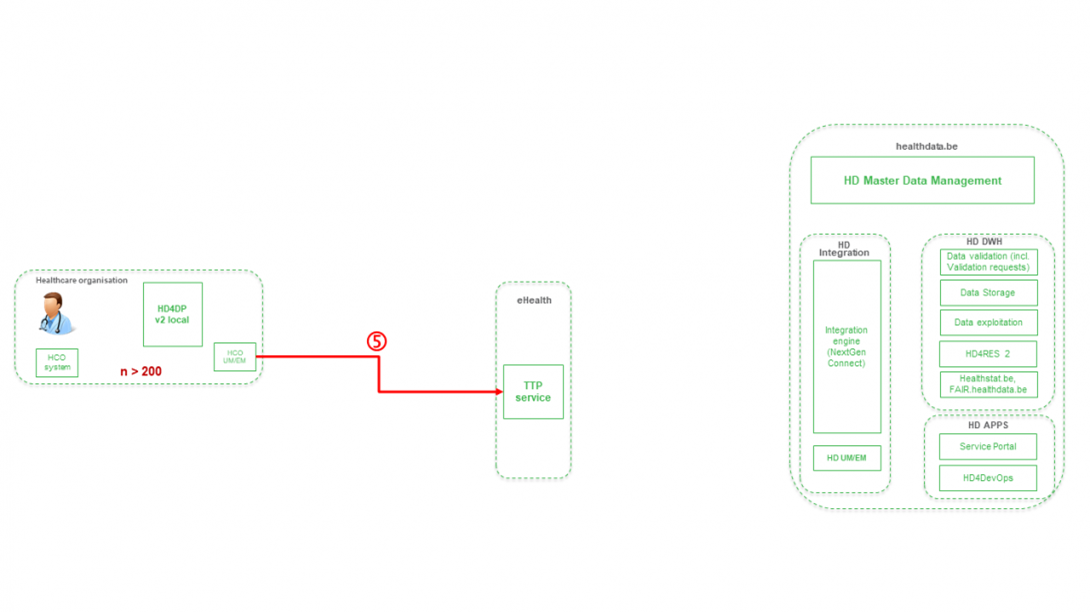
Stap 5. Overdracht van patiëntidentifiers en technische ID van dossier van eHBox-berichtencliënt van HCO (HCO UM/EM) naar TTP-dienst van eHealth.
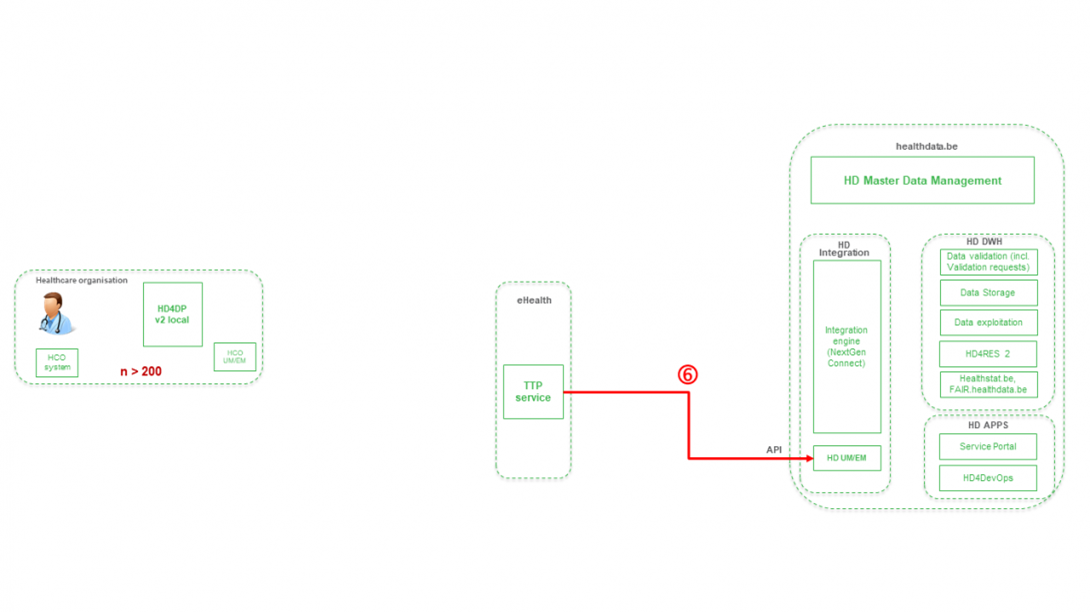
Stap 6. Overdracht van gepseudonimiseerde patiëntidentificatoren en technische ID van dossier van TTP-dienst van eHealth naar eHBox-berichtenclient van HD (HD UM/EM).
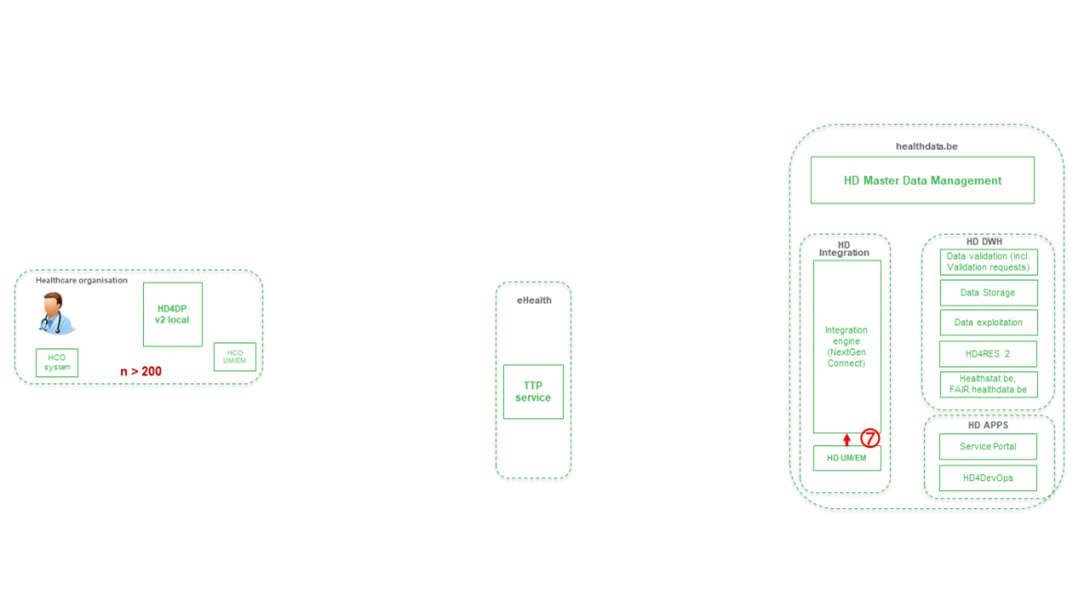
Stap 7. Overdracht van gepseudonimiseerde patiëntidentificatoren en technische ID van het dossier van de eHBox-client voor berichtenverkeer van HD (HD UM/EM) naar de HD-integratie-engine.
Stap 8. Samenvoeging en overdracht van gepseudonimiseerde patiënt-ID's, registervariabelen en technische ID's van records van de HD-integratie-engine naar de gegevensvalidatieomgeving op de DHW.

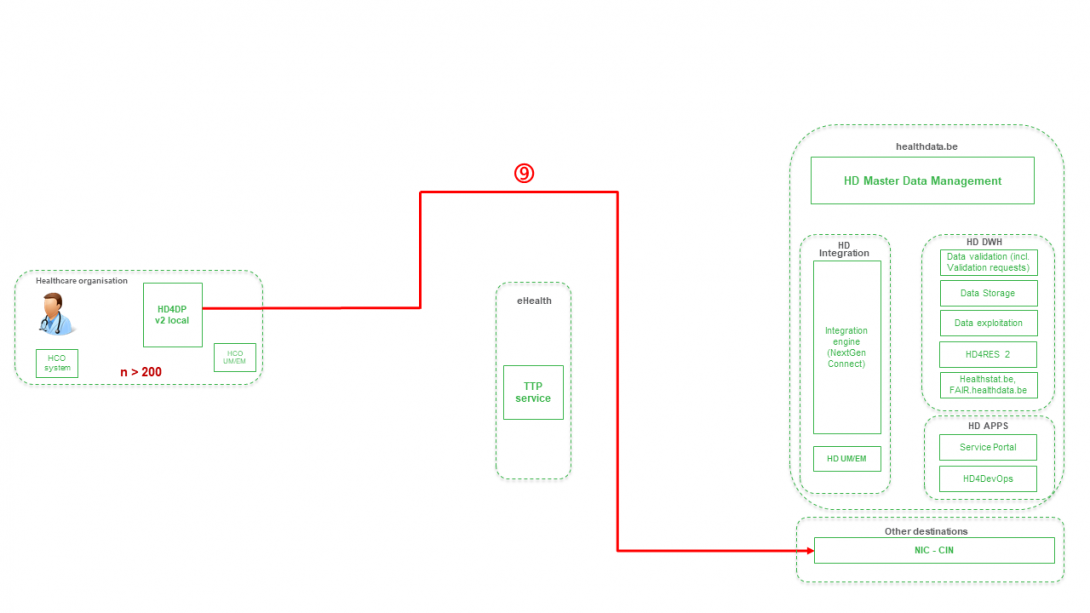
Stap 9 - Optie 1. Indirecte overdracht of patiëntidentificatoren en NIC-CIN-variabelen van HD4DP v2 Local via de MyCareNet-component van de HCO naar NIC-CIN (default).

Stap 9 - Optie 2. Directe realtime-overdracht van patiëntidentificatoren, NIC-CIN-variabelen en technische ID van het dossier van HD4DP v2 naar NIC-CIN (facultatief).
Gebruikershandleiding van de applicatie HD4DP v2
Gebruikershandleiding van de applicatie HD4DP v2In deze handleiding beschrijven we de volgende functies van de applicatie HD4DP v2:
Toegang tot een HD applicatie aanvragen voor een specifiek project
Toegang tot een HD applicatie aanvragen voor een specifiek projectApplicaties van healthdata.be zoals HD4DP v2.0 en healthstat.be verwerken gevoelige persoonlijke informatie. Daarom worden nauwkeurig gecontroleerde processen gebruikt om toegang te verlenen tot deze applicaties. De Entity Access Management (EAM) portal van healthdata.be vergemakkelijkt deze processen.
Zorg steeds dat u gebruikt maakt van de huidige versie van het EAM-systeem. De gebruikersdocumentatie vindt u hier.
Deze documentatie wordt regelmatig bijgewerkt. We proberen de informatie zo correct, volledig en zo duidelijk mogelijk weer te geven. Als u desondanks iets in de documentatie ziet dat niet correct is, niet overeenkomt met uw ervaring, of verdere verduidelijking vereist, maak dan een support ticket via ons portaal Jira Service Management of stuur ons een e-mail via support.hd@hda.fgov.be om dit documentatieprobleem te melden. Vergeet niet de URL van de pagina te vermelden. Wij zullen de documentatie dan aanpassen. Bedankt!Gebruikersrollen in HD4DP v2
Gebruikersrollen in HD4DP v2Elke gezondheidszorgorganisatie heeft een Access Manager die waakt over de toegangsrechten tot de applicaties van de eigen organisatie en deze beheert in het HD Entity Access Management (EAM) systeem. In dit proces worden toegangsaanvragen van medewerkers van gezondheidszorgorganisaties geanalyseerd en gevalideerd als ze legitiem zijn. Het niveau van de verleende toegang kan verschillen, wat tot uiting komt in verschillende gebruikersrollen. Op basis van toegangsrechten kunnen de volgende drie gebruikersrollen worden onderscheiden:
Local Study Lead (auteur):
De Local Study Lead kan:
- alle registraties van collega's (ongeacht hun rol) voor de studie of het project zien en bewerken;
- registraties maken in HD4DP v2.
Deze rol kan, maar hoeft niet beperkt te zijn tot, de verantwoordelijke voor het onderzoek of project binnen de deelnemende gezondheidszorgorganisatie.
Local Study Associate (auteur):
De Local Study Associate kan:
- alleen de eigen registraties bekijken en bewerken, niet die van andere collega's van dezelfde gezondheidszorgorganisatie die aan hetzelfde onderzoek of project deelnemen. De aangeduide registraties zijn beperkt tot de patiënten die behandeld worden door de Local Study Associate;
- registraties maken in HD4DP v2.
De Local Study Associate is een gezondheidszorgverstrekker die deelneemt aan de studie of het project.
Local Study Support (co-auteur):
De Local Study Support kan:
- alleen de registraties zien en bewerken die behoren tot de auteursgroep waaraan hij/zij is gekoppeld;
- registraties maken in HD4DP v2.
Een Local Study Associate en Local Study Lead kunnen registratietaken delegeren aan een Local Study Support. Dit kan, maar hoeft niet beperkt te zijn tot, een administratief medewerker of personeel van een afdeling voor medische codering. De Local Study Associate en Local Study Lead worden nog steeds beschouwd als de auteur van de registratie. De Local Study Associate en Local Study Lead kunnen de gegevens van de Local Study Support bekijken en wijzigen.
De toegangsrechten zijn bedoeld om te voorkomen dat gebruikers van HD4DP v2 persoonlijke en gevoelige informatie zien van personen met wie ze geen therapeutische relatie hebben. De toegangsrechten weerspiegelen daarom niet noodzakelijk de hiërarchie binnen de gezondheidszorgorganisatie. Het personeel van de gezondheidszorgorganisatie kan de Data Protection Officer (DPO) raadplegen voor meer gedetailleerde informatie over deze toegangsrechten. Het is aan de Access Manager om rollen goed te keuren of te wijzigen van/naar Local Study Lead, Local Study Associate en Local Study Support. Deze verzoeken worden in het EAM-systeem uitgevoerd door de Access managers van elke gezondheidszorgorganisatie.
Opmerkingen:
- Het niveau van de toegangsrechten weerspiegelt niet noodzakelijkerwijs de hiërarchie binnen uw gezondheidszorgorganisatie.
- Het is aan de Access manager om de rollen van Local Study Lead, Local Study Associate en Local Study Support onderling te wijzigen. Deze acties gebeuren in het EAM-systeem.
Deze documentatie wordt regelmatig bijgewerkt. We proberen de informatie zo correct, volledig en zo duidelijk mogelijk weer te geven. Als u desondanks iets in de documentatie ziet dat niet correct is, niet overeenkomt met uw ervaring, of verdere verduidelijking vereist, maak dan een support ticket via ons portaal Jira Service Management of stuur ons een e-mail via support.hd@hda.fgov.be om dit documentatieprobleem te melden. Vergeet niet de URL van de pagina te vermelden. Wij zullen de documentatie dan aanpassen. Bedankt!Toegang tot de HD4PD v2 applicatie
Toegang tot de HD4PD v2 applicatieOm toegang te krijgen tot de applicatie HD4DP v2 (zowel de lokale versie als de website versie), moet u eerst een account aanvragen. Als u nog geen account heeft, lees dan eerst het artikel "Toegang tot een HD applicatie aanvragen voor een specifiek project".
Zodra uw account is aangemaakt, ontvangt u een e-mail met de volgende informatie (let op: de tekst tussen de [ ] wordt aangepast.):
- Organisatie: [RIZIV nummer - Naam]
- Login: [email]
- Wachtwoord: [wachtwoord]
- Applicatie URL: [url]
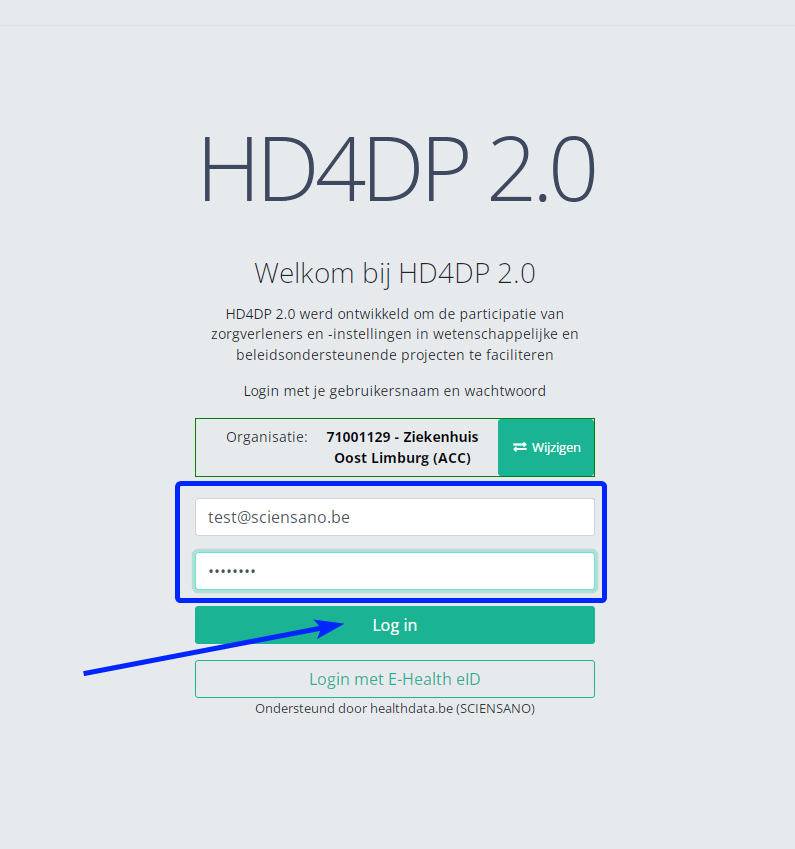
Met deze referenties heeft u toegang tot de applicatie HD4DP v2.0 van uw organisatie:
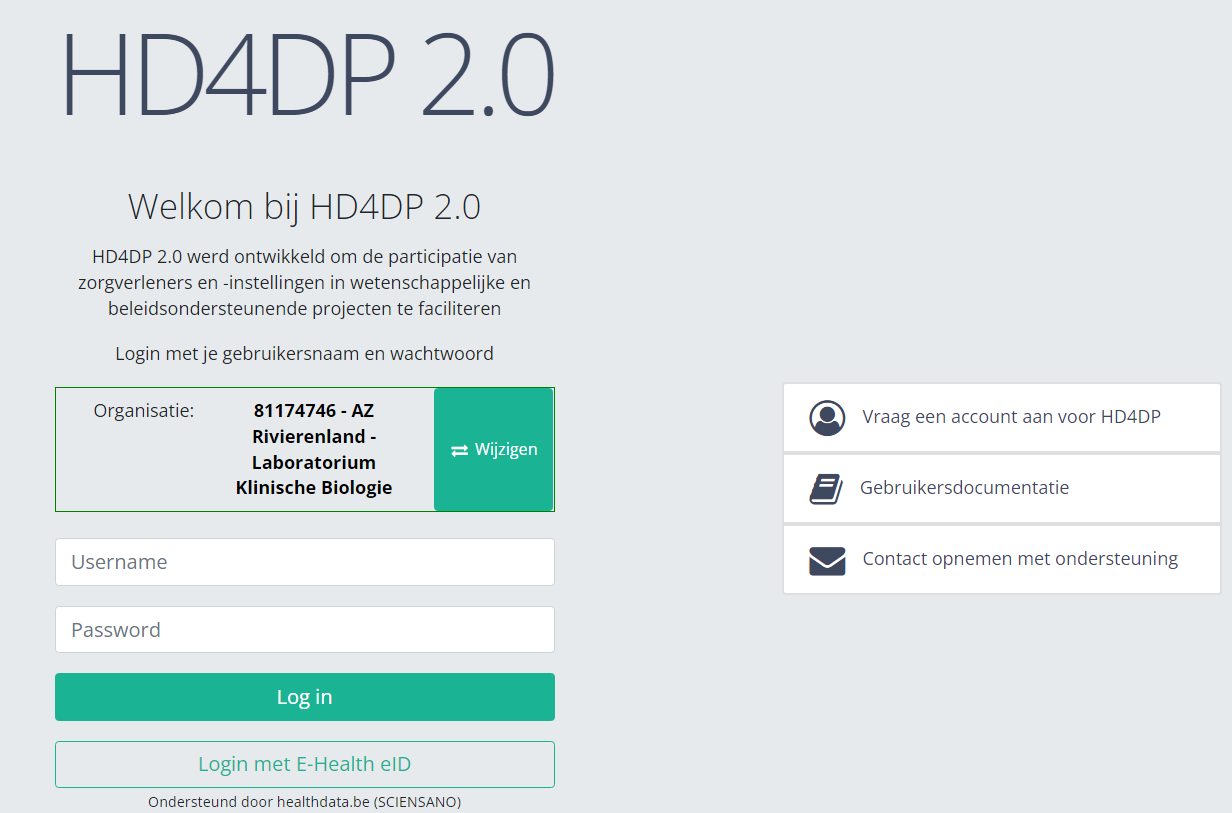
- Ga naar de url vermeld in de mail
- Selecteer "uw organisatie" uit de lijst
- Uw organisatie: [RIZIV nummer–Naam]
- Klik op "Volgende"
- Vul uw "username" en "password"
- Klik op "Log in"
Zorg ervoor dat u uitlogt nadat u gebruik hebt gemaakt van de HD4DP v2.0 applicatie of een andere healthdata.be applicatie. Het afsluiten van uw internetbrowser garandeert niet dat uw toepassing met registraties is afgesloten.
Naar een project navigeren
Naar een project navigerenAls u bent ingelogd, ziet u de Welkomstpagina. In het linker donkerblauwe menu zie je alle studieprogramma's en projecten waartoe je toegang hebt.

Stel dat we willen deelnemen aan de studie Orthopride Heup. In dat geval moeten we eerst het studieprogramma QERMID Orthopedie selecteren. U ziet nu drie studieprojecten: Orthopride Heup, Orthopride Knie en Orthopride totale femur.

Selecteer het studieproject Orthopride Heup.
U zult zien dat het studieproject Orthopride Heup uit drie delen bestaat: Primo-implantatie, Revisie en Resectie.

Deze pagina werd vertaald met behulp van een automatische vertaalmachine met als doel om de inhoud sneller in uw taal te kunnen aanbieden. Een menselijke vertaler moet deze pagina nog beoordelen. Bijgevolg kan deze pagina nog grammaticale en andere taalfouten bevatten. Als u iets in de documentatie ziet dat niet correct is vertaald, neem dan contact met ons op via support.healthdata@sciensano.be (vergeet niet het webadres van de pagina te vermelden). Wij zullen de vertaling dan aanpassen. Bedankt!Deze documentatie wordt regelmatig bijgewerkt. We proberen de informatie zo correct, volledig en zo duidelijk mogelijk weer te geven. Als u desondanks iets in de documentatie ziet dat niet correct is, niet overeenkomt met uw ervaring, of verdere verduidelijking vereist, maak dan een support ticket via ons portaal Jira Service Management of stuur ons een e-mail via support.hd@hda.fgov.be om dit documentatieprobleem te melden. Vergeet niet de URL van de pagina te vermelden. Wij zullen de documentatie dan aanpassen. Bedankt!Een registratie creëren
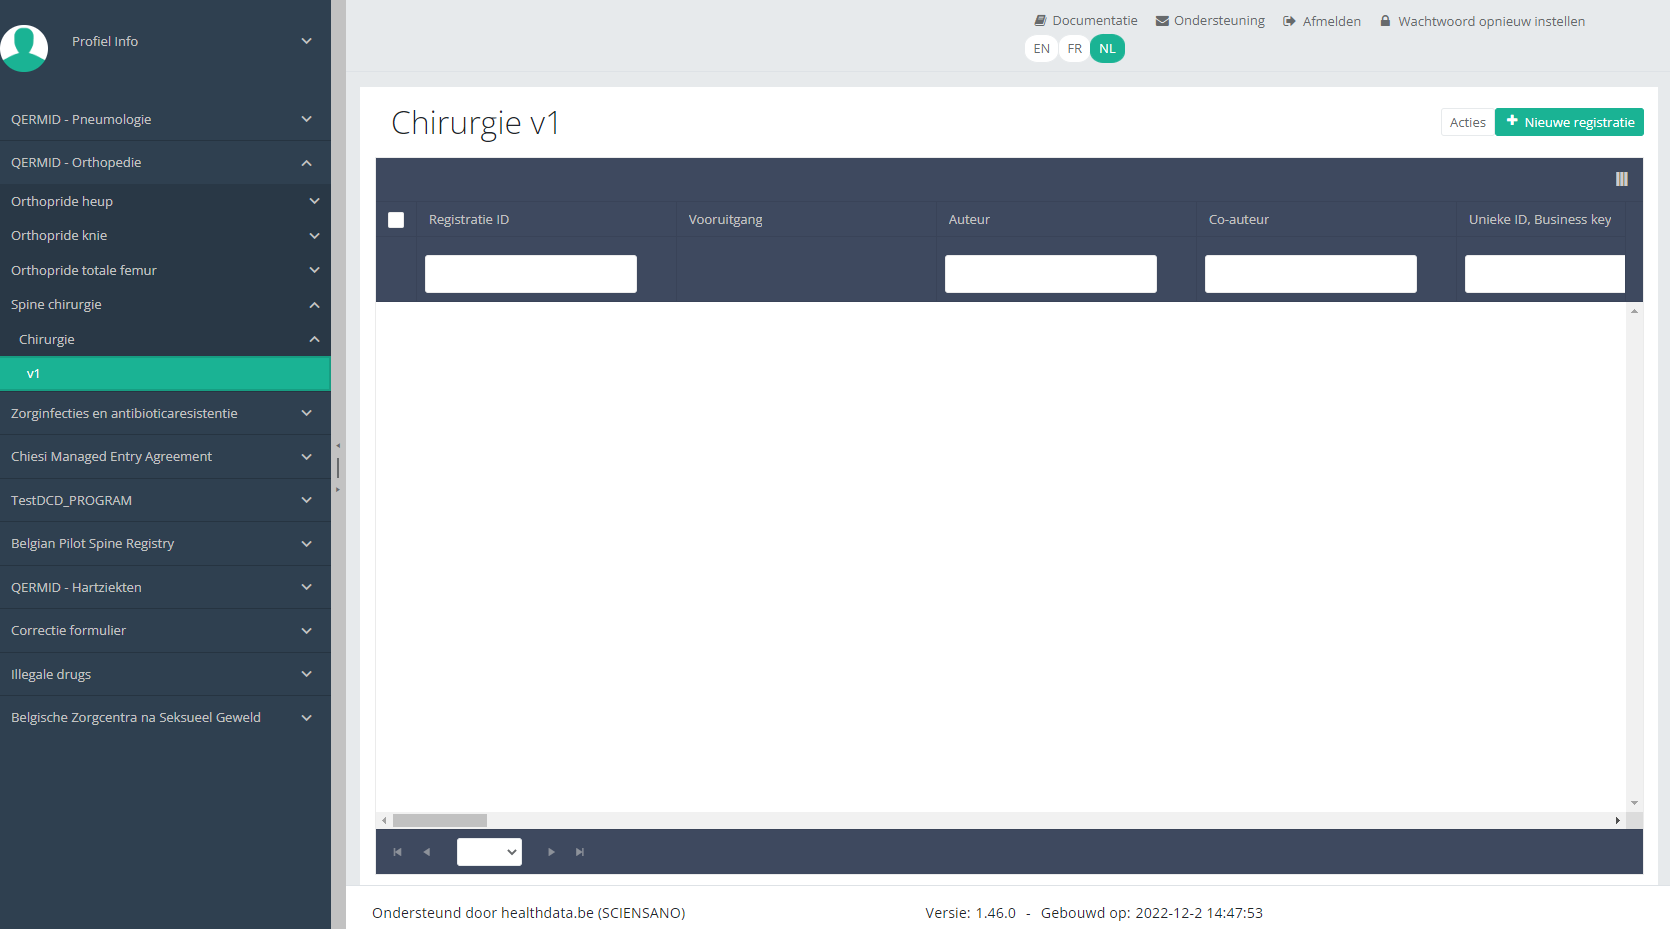
Een registratie creërenStel dat we een "Primo-implantatie" registratie willen creëren voor het studieproject Orthopride Heup. In dat geval moeten we navigeren naar het studieprogramma QERMID Orthopedie en vervolgens naar het studieproject Orthopride Heup. Daar moeten we "Primo-implantatie" selecteren in het donkerblauwe linkermenu.

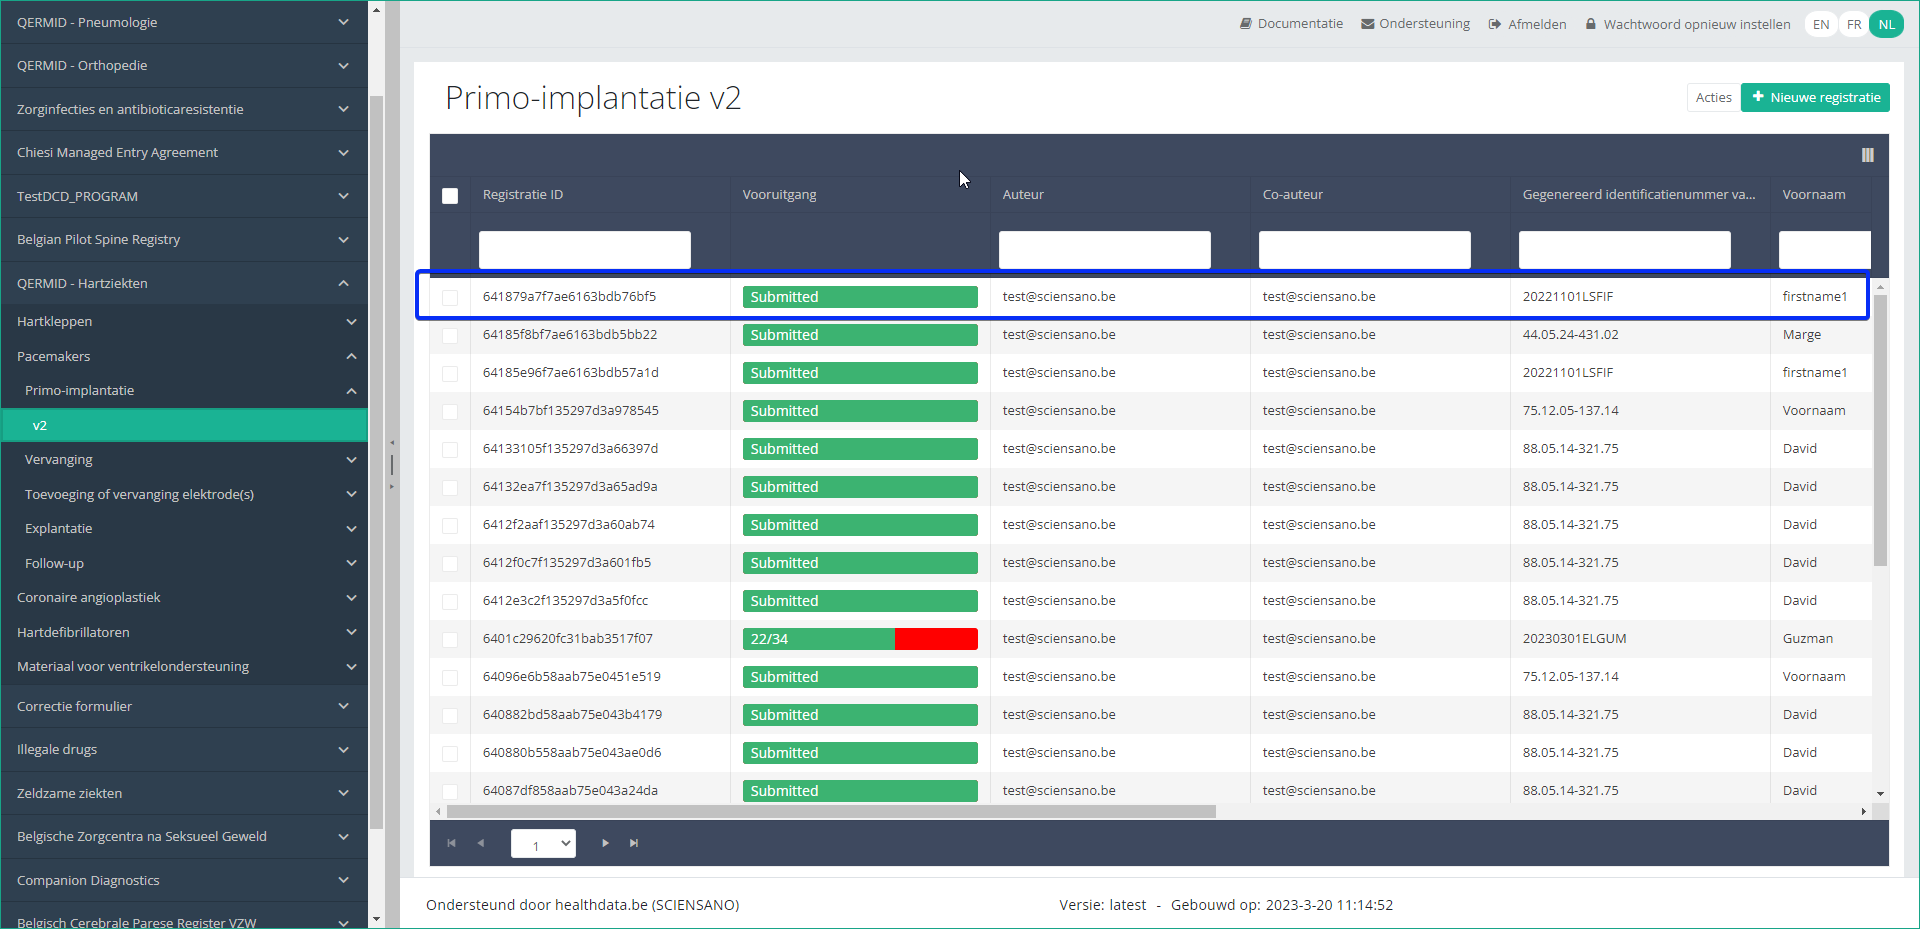
U ziet het aantal versies van dit studieonderdeel. In dit geval is er maar één versie.
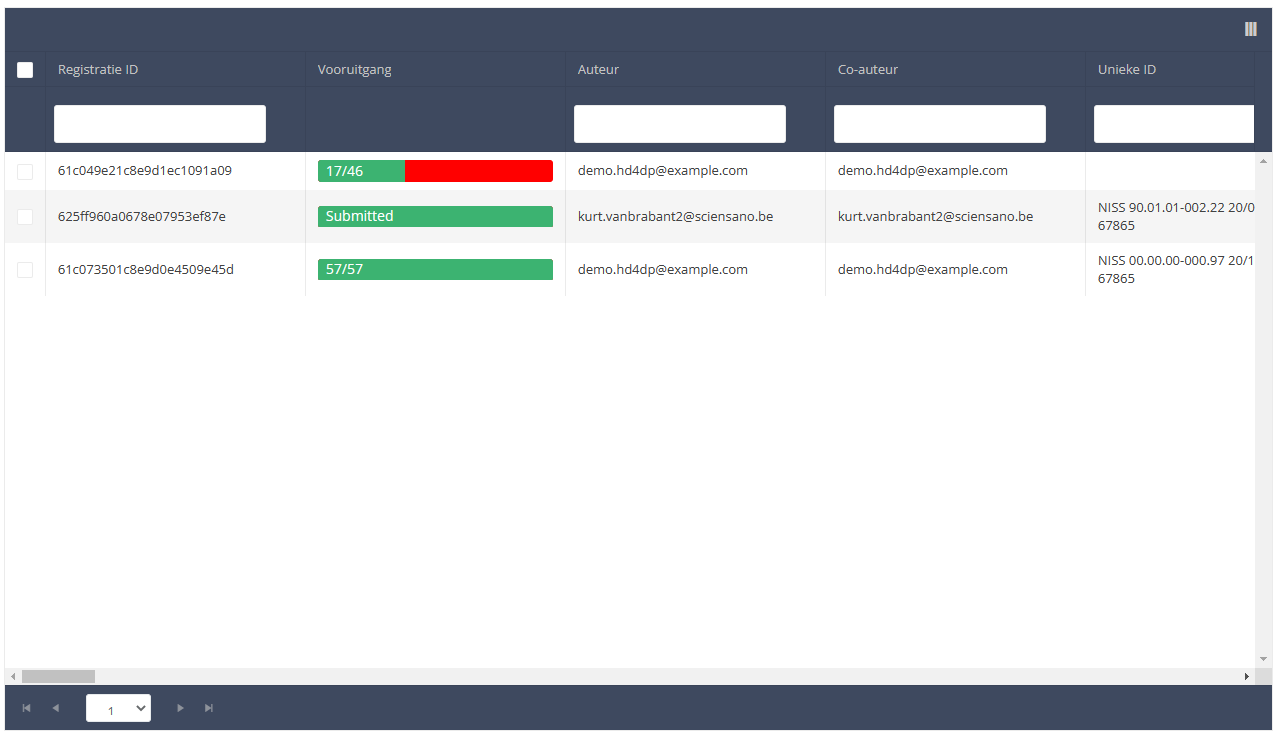
Wanneer u voor het eerst de hoogste versie van dit studieonderdeel selecteert, ziet u een lege tabel in het hoofdgedeelte van uw scherm. De tabel bevat onder andere de volgende items: Registratie ID, Vooruitgang, Auteur, Co-auteur, Unieke ID, Business Key, Registratiecode, Rijksregisternummer van de patiënt...
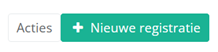
In de rechterbovenhoek van het scherm vindt u een groene knop "+ Nieuwe registratie". Druk op deze knop.

Nadat u op de knop "+ Nieuwe registratie" heeft gedrukt, wordt het hoofdscherm vervangen door 2 secties: een onderzoeksformulier (in het midden van het scherm) en een inhoudstafel (aan de rechterkant van het scherm).
Door het invullen van het onderzoeksformulier maakt u een "Primo-implantatie" registratie aan voor het studieproject Orthopride Heup.
De Inhoudstafel geeft aan welke onderdelen u moet invullen. U kunt de inhoudstafel ook gebruiken om door het onderzoeksformulier te navigeren: door op een onderdeel in de inhoudstafel te drukken, gaat u naar dit onderdeel in het onderzoeksformulier.

Door op het tabblad "Vooruitgang" aan de rechterkant van het scherm te drukken, wordt de inhoudstafel vervangen door een voortgangsbalk en een lijst met openstaande valideringsfouten.
U kunt de lijst met openstaande validatiefouten gebruiken om door het onderzoeksformulier te navigeren: door op een validatiefout in de lijst te drukken, gaat u naar dit onderdeel in het onderzoeksformulier.

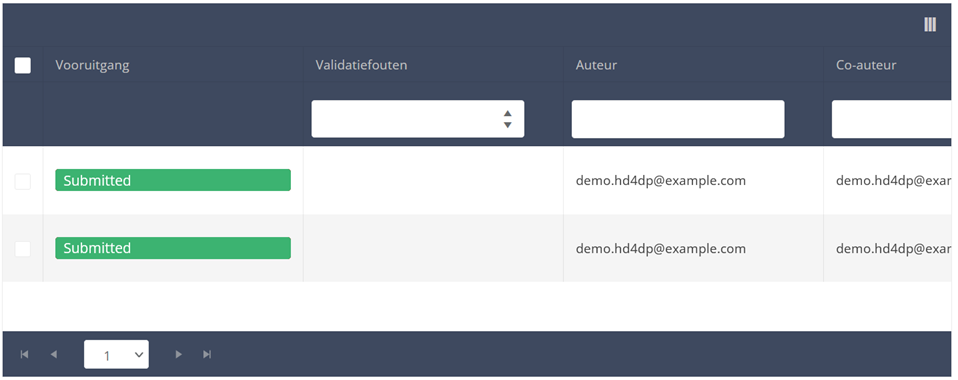
Als het onderzoeksformulier is ingevuld en er geen validatiefouten zijn, kunt u deze registratie Opslaan of Verzenden. Merk op dat de knop Verzenden donker groen is.

Als het onderzoeksformulier is ingevuld maar er zijn validatiefouten, dan kunt u deze registratie wel Opslaan maar niet Verzenden. Merk op dat de knop Verzenden schemerig groen is.

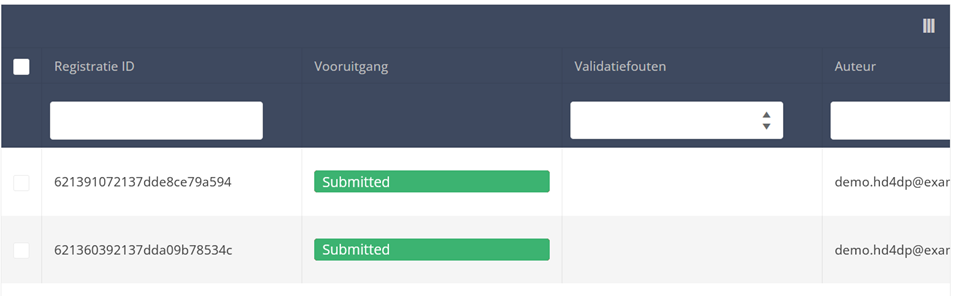
Wanneer het onderzoeksformulier is opgeslagen of verzonden, schakelt het scherm over naar de overzichtstabel. Deze tabel is nu niet meer leeg, maar toont de opgeslagen of verzonden registratie.

Deze documentatie wordt regelmatig bijgewerkt. We proberen de informatie zo correct, volledig en zo duidelijk mogelijk weer te geven. Als u desondanks iets in de documentatie ziet dat niet correct is, niet overeenkomt met uw ervaring, of verdere verduidelijking vereist, maak dan een support ticket via ons portaal Jira Service Management of stuur ons een e-mail via support.hd@hda.fgov.be om dit documentatieprobleem te melden. Vergeet niet de URL van de pagina te vermelden. Wij zullen de documentatie dan aanpassen. Bedankt!Een registratie vinden
Een registratie vindenStel dat we een "Primo-implantatie" registratie willen vinden van het studieproject Orthopride Heup. In dat geval moeten we navigeren naar het studieprogramma QERMID Orthopedie en vervolgens naar het studieproject Orthopride Heup. Daar moeten we "Primo-implantatie" selecteren in het donkerblauwe linkermenu.

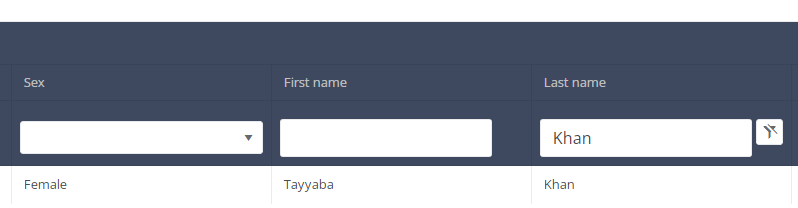
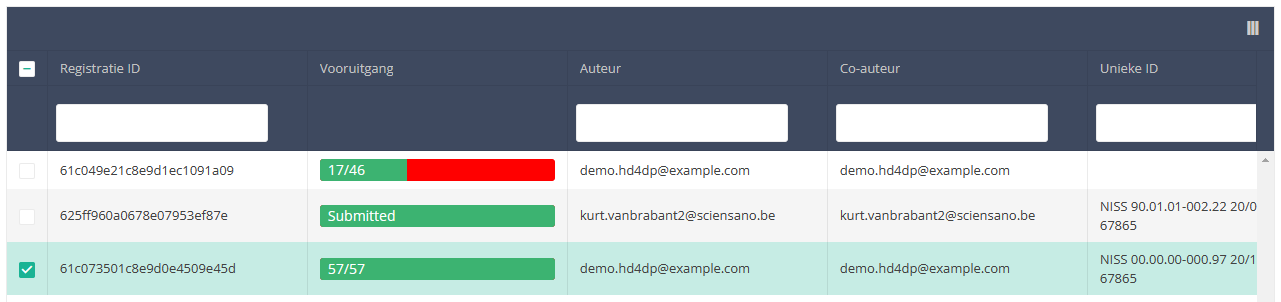
Wanneer u een versie van dit studieonderdeel selecteert, ziet u de samenvattende tabel in het hoofdgedeelte van uw scherm. Deze tabel bevat onder andere: Registratie ID, Vooruitgang, Auteur, Co-auteur, Unieke ID, Business Key, Registratiecode, Rijksregisternummer van de patiënt…

In de koptekst van de overzichtstabel kunt u het filter onder elk kolomlabel gebruiken. In het onderstaande voorbeeld is in het filter (tekstveld) de achternaam "Khan" ingevoerd: als resultaat wordt alleen het record met "Khan" weergegeven.
Deze pagina werd vertaald met behulp van een automatische vertaalmachine met als doel om de inhoud sneller in uw taal te kunnen aanbieden. Een menselijke vertaler moet deze pagina nog beoordelen. Bijgevolg kan deze pagina nog grammaticale en andere taalfouten bevatten. Als u iets in de documentatie ziet dat niet correct is vertaald, neem dan contact met ons op via support.healthdata@sciensano.be (vergeet niet het webadres van de pagina te vermelden). Wij zullen de vertaling dan aanpassen. Bedankt!Deze documentatie wordt regelmatig bijgewerkt. We proberen de informatie zo correct, volledig en zo duidelijk mogelijk weer te geven. Als u desondanks iets in de documentatie ziet dat niet correct is, niet overeenkomt met uw ervaring, of verdere verduidelijking vereist, maak dan een support ticket via ons portaal Jira Service Management of stuur ons een e-mail via support.hd@hda.fgov.be om dit documentatieprobleem te melden. Vergeet niet de URL van de pagina te vermelden. Wij zullen de documentatie dan aanpassen. Bedankt!Een registratie bijwerken
Een registratie bijwerkenStel dat we een "Primo-implantatie" registratie van het studieproject Orthopride Hip willen updaten. In dat geval moeten we navigeren naar het studieprogramma QERMID Orthopedie en vervolgens naar het studieproject Orthopride Heup. Daar moeten we "Primo-implantatie" selecteren in het donkerblauwe linkermenu.
Belangrijk: een registratie kan worden bijgewerkt zolang de registratie nog niet is verzonden. Als de status van een registratie "Opgeslagen" is, kan de registratie nog worden bijgewerkt.

Wanneer u een versie van dit studieonderdeel selecteert, ziet u de overzichtstabel in het hoofdgedeelte van uw scherm. Deze tabel bevat onder andere: Registratie ID, Vooruitgang, Auteur, Co-auteur, Unieke ID, Business Key, Registratiecode, Rijksregisternummer van de patiënt…
Gebruik de filters in de kop van de tabel om de registratie te vinden die u wilt bijwerken.
Als u de registratie hebt gevonden, kunt u het onderzoeksformulier openen door op de overeenkomstige rij in de overzichtstabel te klikken.
U kunt de ontbrekende velden invullen en / of de eerder ingevulde velden in het onderzoeksformulier wijzigen.
Aan het eind van het onderzoeksformulier kunt u de registratie "Opslaan" of "Verzenden".
Een registratie kan worden bijgewerkt zolang de registratie de status "Opgeslagen" heeft en zolang de registratie niet is verzonden. Een verzonden registratie kan niet meer worden gewijzigd of verwijderd.
Deze pagina werd vertaald met behulp van een automatische vertaalmachine met als doel om de inhoud sneller in uw taal te kunnen aanbieden. Een menselijke vertaler moet deze pagina nog beoordelen. Bijgevolg kan deze pagina nog grammaticale en andere taalfouten bevatten. Als u iets in de documentatie ziet dat niet correct is vertaald, neem dan contact met ons op via support.healthdata@sciensano.be (vergeet niet het webadres van de pagina te vermelden). Wij zullen de vertaling dan aanpassen. Bedankt!Deze documentatie wordt regelmatig bijgewerkt. We proberen de informatie zo correct, volledig en zo duidelijk mogelijk weer te geven. Als u desondanks iets in de documentatie ziet dat niet correct is, niet overeenkomt met uw ervaring, of verdere verduidelijking vereist, maak dan een support ticket via ons portaal Jira Service Management of stuur ons een e-mail via support.hd@hda.fgov.be om dit documentatieprobleem te melden. Vergeet niet de URL van de pagina te vermelden. Wij zullen de documentatie dan aanpassen. Bedankt!Een registratie verwijderen
Een registratie verwijderenStel dat we een "Primo-implantatie" registratie van het studieproject Orthopride Hip willen verwijderen. In dat geval moeten we navigeren naar het studieprogramma QERMID Orthopedie en vervolgens naar het studieproject Orthopride Heup. Daar moeten we "Primo-implantatie" selecteren in het donkerblauwe linkermenu.
Belangrijk: een registratie kan worden verwijderd zolang de registratie nog niet is verzonden. Als de status van een registratie "Open" is, kan de registratie nog steeds worden verwijderd.

Wanneer u een versie van dit studieonderdeel selecteert, ziet u de overzichtstabel in het hoofdgedeelte van uw scherm. Deze tabel bevat onder andere: Registratie ID, Vooruitgang, Auteur, Co-auteur, Unieke ID, Business Key, Registratiecode, Rijksregisternummer van de patiënt…
Gebruik de filters in de kop van de tabel om de registratie te vinden die u wilt verwijderen.
Als u de registratie hebt gevonden die u wilt verwijderen, moet u de registratie selecteren door het selectievakje aan het begin van de rij in de overzichtstabel aan te vinken.

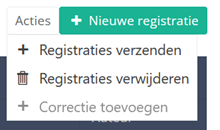
Vervolgens moet u op de knop "Acties" rechtsboven in de overzichtstabel drukken
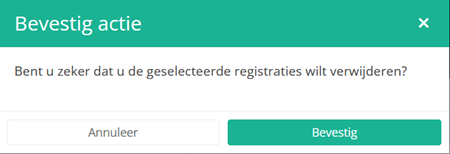
Twee opties zijn nu beschikbaar: "Registraties verzenden" en "Registraties verwijderen". Druk nu op "Registraties verwijderen".

Nadat u op "Registraties verwijderen" hebt gedrukt, verschijnt een pop-upvenster waarin u wordt gevraagd de verwijdering van de geselecteerde registratie(s) te bevestigen. Als u zeker bent van deze actie, drukt u op "Bevestig". Zo niet, druk dan op "Annuleer".
Als u de registratie verwijdert, kunt u de status of inhoud ervan niet meer wijzigen.
De verwijderde registratie wordt niet uit de overzichtstabel verwijderd. Het blijft aanwezig, maar de status is veranderd van "Open" in "Verwijderd".
Als u alleen open en verzonden registraties wilt zien, kunt u het filter op het item "Status" in de overzichtstabel aanpassen.
Een registratie kan worden verwijderd zolang de registratie niet is verzonden. Als de status van de registratie "Open" is, kan de registratie nog steeds worden verwijderd.
Deze pagina werd vertaald met behulp van een automatische vertaalmachine met als doel om de inhoud sneller in uw taal te kunnen aanbieden. Een menselijke vertaler moet deze pagina nog beoordelen. Bijgevolg kan deze pagina nog grammaticale en andere taalfouten bevatten. Als u iets in de documentatie ziet dat niet correct is vertaald, neem dan contact met ons op via support.healthdata@sciensano.be (vergeet niet het webadres van de pagina te vermelden). Wij zullen de vertaling dan aanpassen. Bedankt!Deze documentatie wordt regelmatig bijgewerkt. We proberen de informatie zo correct, volledig en zo duidelijk mogelijk weer te geven. Als u desondanks iets in de documentatie ziet dat niet correct is, niet overeenkomt met uw ervaring, of verdere verduidelijking vereist, maak dan een support ticket via ons portaal Jira Service Management of stuur ons een e-mail via support.hd@hda.fgov.be om dit documentatieprobleem te melden. Vergeet niet de URL van de pagina te vermelden. Wij zullen de documentatie dan aanpassen. Bedankt!Een registratie verzenden
Een registratie verzendenStel dat we een "Primo-implantatie" registratie willen verzenden van het studieproject Orthopride Heup. In dat geval moeten we navigeren naar het studieprogramma QERMID Orthopedie en vervolgens naar het studieproject Orthopride Heup. Daar moeten we "Primo-implantatie" selecteren in het donkerblauwe linkermenu.
Een registratie kan op twee manieren worden verzonden. De eerste manier is aan het eind van het creatieproces met behulp van het studieformulier (zie: "Een registratie creëren").
Als de registratie via het studieformulier is voltooid, opgeslagen en er geen validatiefouten meer zijn, kan de registratie ook via de overzichtstabel worden verzonden. Deze methode kan handig zijn om meerdere registraties in dezelfde actie te verzenden.

Wanneer u een versie van dit studieonderdeel selecteert, ziet u de overzichtstabel in het hoofdgedeelte van uw scherm. Deze tabel bevat onder andere: Registratie ID, Vooruitgang, Auteur, Co-auteur, Unieke ID, Business Key, Registratiecode, Rijksregisternummer van de patiënt…
Gebruik de filters in de koptekst van de tabel om de registratie(s) te vinden die u wilt verzenden. U kunt bijvoorbeeld de filters "Status" (ingesteld op "Open") en "Validatiefouten" (ingesteld op "0") gebruiken om de registraties te krijgen die kunnen worden verzonden.

Als u de registratie(s) hebt gevonden die u wilt verzenden, moet u deze selecteren door het selectievakje aan het begin van de rij in de overzichtstabel aan te vinken.
Vervolgens moet u op de knop "Acties" rechtsboven in de overzichtstabel drukken.

Twee opties zijn nu beschikbaar: "Registraties verzenden" en "Registraties verwijderen". Druk nu op "Registraties verzenden".
Nadat u op "Registraties verzenden" hebt gedrukt, verschijnt een pop-upvenster waarin u wordt gevraagd de verzending van de geselecteerde registratie(s) te bevestigen. Als u zeker bent van deze actie, klikt u op "Bevestig". Zo niet, klik dan op "Annuleer".
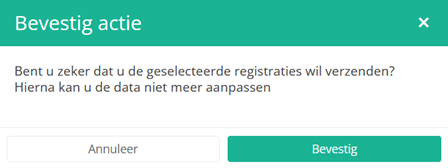
Als u de verzending bevestigt, kunt u de inhoud van de registratie(s) niet meer wijzigen. Verzonden registraties kunnen ook niet meer worden gewist.
De verzonden registratie blijft in de overzichtstabel, maar de status ervan is gewijzigd van "Open" in "Verzonden".
Als u alleen "open" registraties wilt zien, kunt u het filter op het item "Status" in de overzichtstabel aanpassen.
Een registratie kan aan het eind van het creatieproces worden verzonden via het onderzoeksformulier (zie: Een [project] registratie creëren).
Als de registratie via het onderzoeksformulier is voltooid, opgeslagen en er geen validatiefouten meer zijn, kan de registratie ook via de overzichtstabel worden verzonden. Deze methode kan handig zijn om meerdere registraties in dezelfde actie te verzenden.
Deze pagina werd vertaald met behulp van een automatische vertaalmachine met als doel om de inhoud sneller in uw taal te kunnen aanbieden. Een menselijke vertaler moet deze pagina nog beoordelen. Bijgevolg kan deze pagina nog grammaticale en andere taalfouten bevatten. Als u iets in de documentatie ziet dat niet correct is vertaald, neem dan contact met ons op via support.healthdata@sciensano.be (vergeet niet het webadres van de pagina te vermelden). Wij zullen de vertaling dan aanpassen. Bedankt!Deze documentatie wordt regelmatig bijgewerkt. We proberen de informatie zo correct, volledig en zo duidelijk mogelijk weer te geven. Als u desondanks iets in de documentatie ziet dat niet correct is, niet overeenkomt met uw ervaring, of verdere verduidelijking vereist, maak dan een support ticket via ons portaal Jira Service Management of stuur ons een e-mail via support.hd@hda.fgov.be om dit documentatieprobleem te melden. Vergeet niet de URL van de pagina te vermelden. Wij zullen de documentatie dan aanpassen. Bedankt!Een correctie van een registratie verzenden
Een correctie van een registratie verzendenOm een correctie voor een registratie te verzenden, moet u de volledige record opnieuw verzenden.
De functie (en knop) Correctie toevoegen op het registratieformulier is afgeschaft. Ze is niet meer beschikbaar via de overzichtstabel, noch via de voorbeeldpagina van een registratie.
De volledige record opnieuw verzenden
De beste manier om een correctie voor een registratie te verzenden bestaat erin het registratieformulier volledig ingevuld met de juiste waarden opnieuw te verzenden. De meest recente versie van de record die healthdata.be dan ontvangt, wordt als de correcte beschouwd.
Of een record al dan niet in aanmerking komt, wordt bepaald door de zogeheten business key. Dit is een unieke set waarden uit specifieke velden per record, bijvoorbeeld een combinatie van de patiënt-ID en de hospitalisatiedatum, of van de NISS-code en de staal-ID. De business key wordt aangemaakt bij verzending van de originele record en zorgt dat meest recente record wordt geïdentificeerd bij ontvangst ervan in de healthdata.be-database.
Opgelet: Als een van de velden die de business key vormen, moet worden gecorrigeerd, zal de opnieuw verzonden record een andere business key hebben. De originele en de nieuwe records worden bijgevolg als correct beschouwd, precies omdat de business key niet identiek is.
We kunnen uw foutieve registratie spijtig genoeg niet onmiddellijk verwijderen. We zoeken naar een oplossing om dit op termijn toch te kunnen doen.
Er zijn twee opties om een record opnieuw te verzenden:
Optie 1: Verzenden via S2S API / CSV Upload
De waarden worden rechtstreeks in het json- of csv-bestand gecorrigeerd. De procedure om de volledige record opnieuw te verzenden via de back-end vindt u op de desbetreffende technische documentatiepagina's. In de onderstaande links vindt u voorbeelden voor Pacemaker Primo-Implantatie:
- Voor het verzenden van de volledige record als een .json-bestand via S2S API, klik hier.
- Voor het verzenden van de volledige record als een .csv-bestand via CSV Upload, klik hier.
Optie 2: Verzenden via de webapplicatie HD4DP v2.0
Open eerst de webapplicatie HD4DP v2.0, navigeer naar het studieprogramma en selecteer het gewenste studieproject in het linker donkerblauwe menu. Vul het volledige registratieformulier vervolgens handmatig in met de juiste waarden en verzend het opnieuw.
De vorige verzonden record is niet meer relevant op basis van de business key.
Registratiestatussen in HD4DP v2
Registratiestatussen in HD4DP v2Dit artikel licht de verschillende registratiestatussen in HD4DP v2 toe.
De statussen worden weergegeven in de kolom Status

U kunt de kolommen die u wenst weer te geven, selecteren via het menu Zichtbare kolommen selecteren in de rechterbovenhoek:
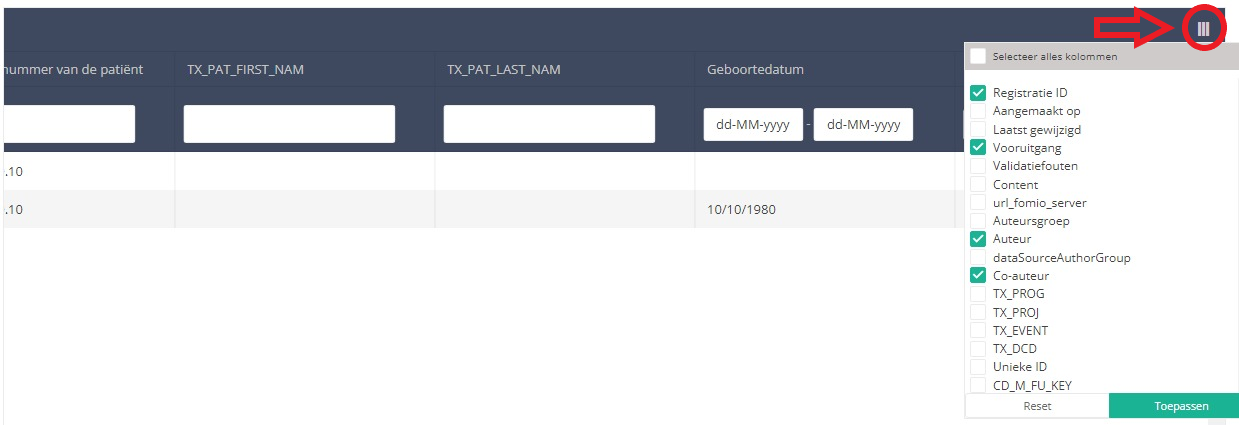
Selecteer de kolommen die u wenst weer te geven en klik op Toepassen.
Beschrijving van de statussen:
Open: Registratie is aangemaakt en opgeslagen. Ze is niet verzonden.
Verwijderd: Registratie is verwijderd.
Verzonden: Registratie is ingediend en verzonden.
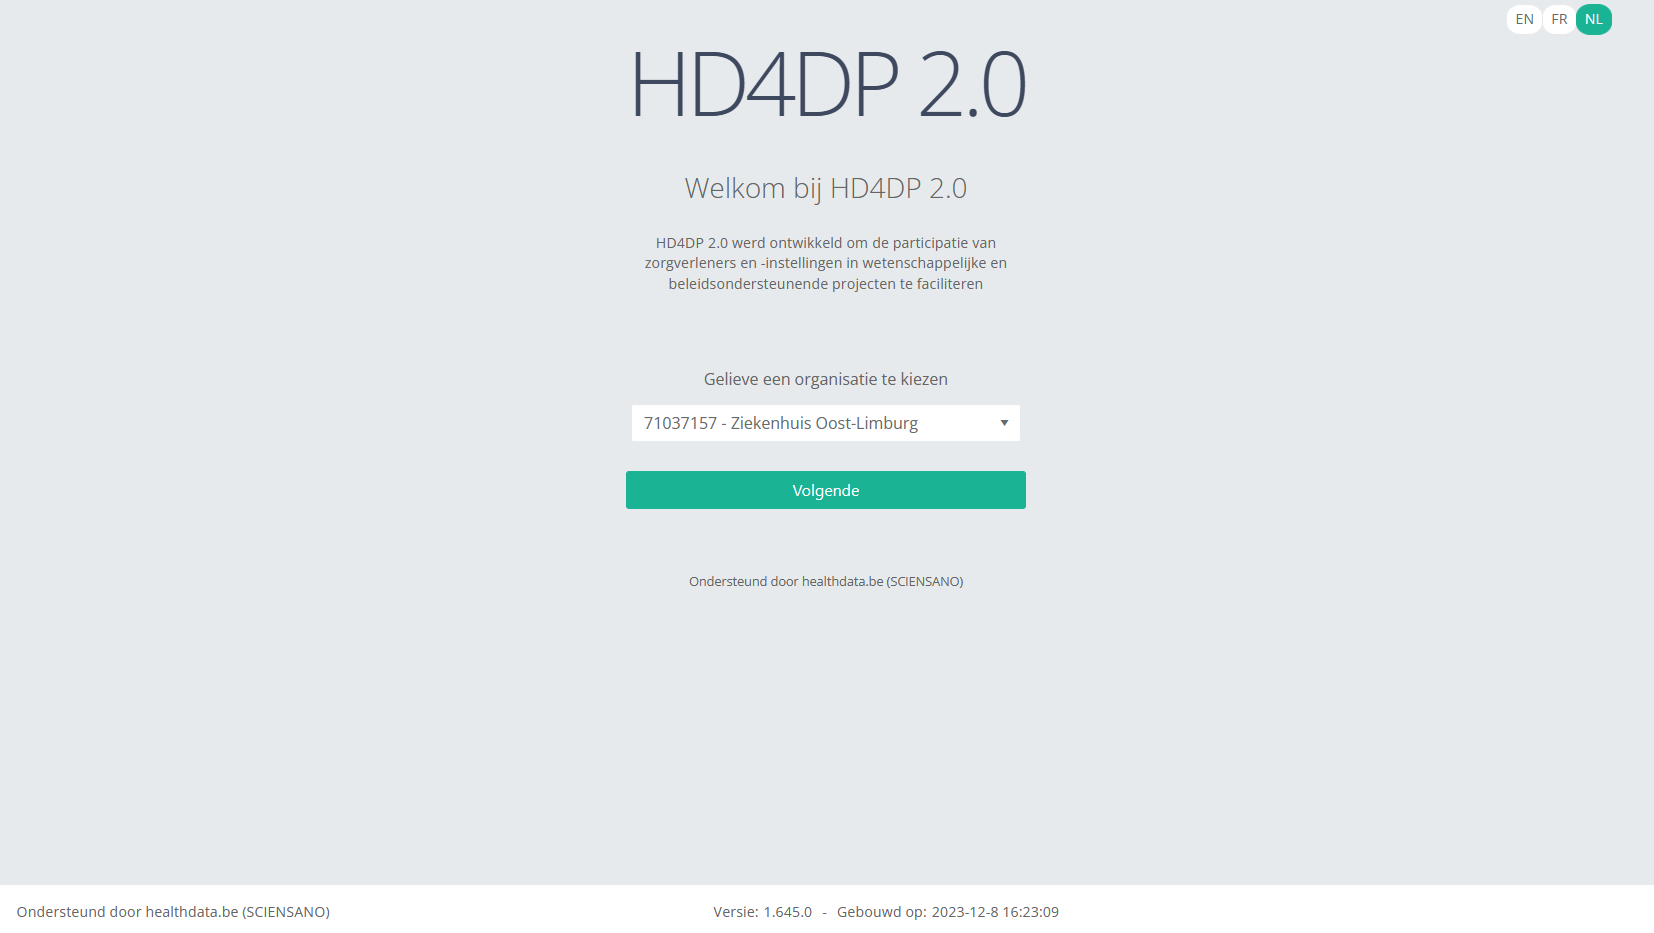
Wachtwoord voor HD4DP v2 resetten
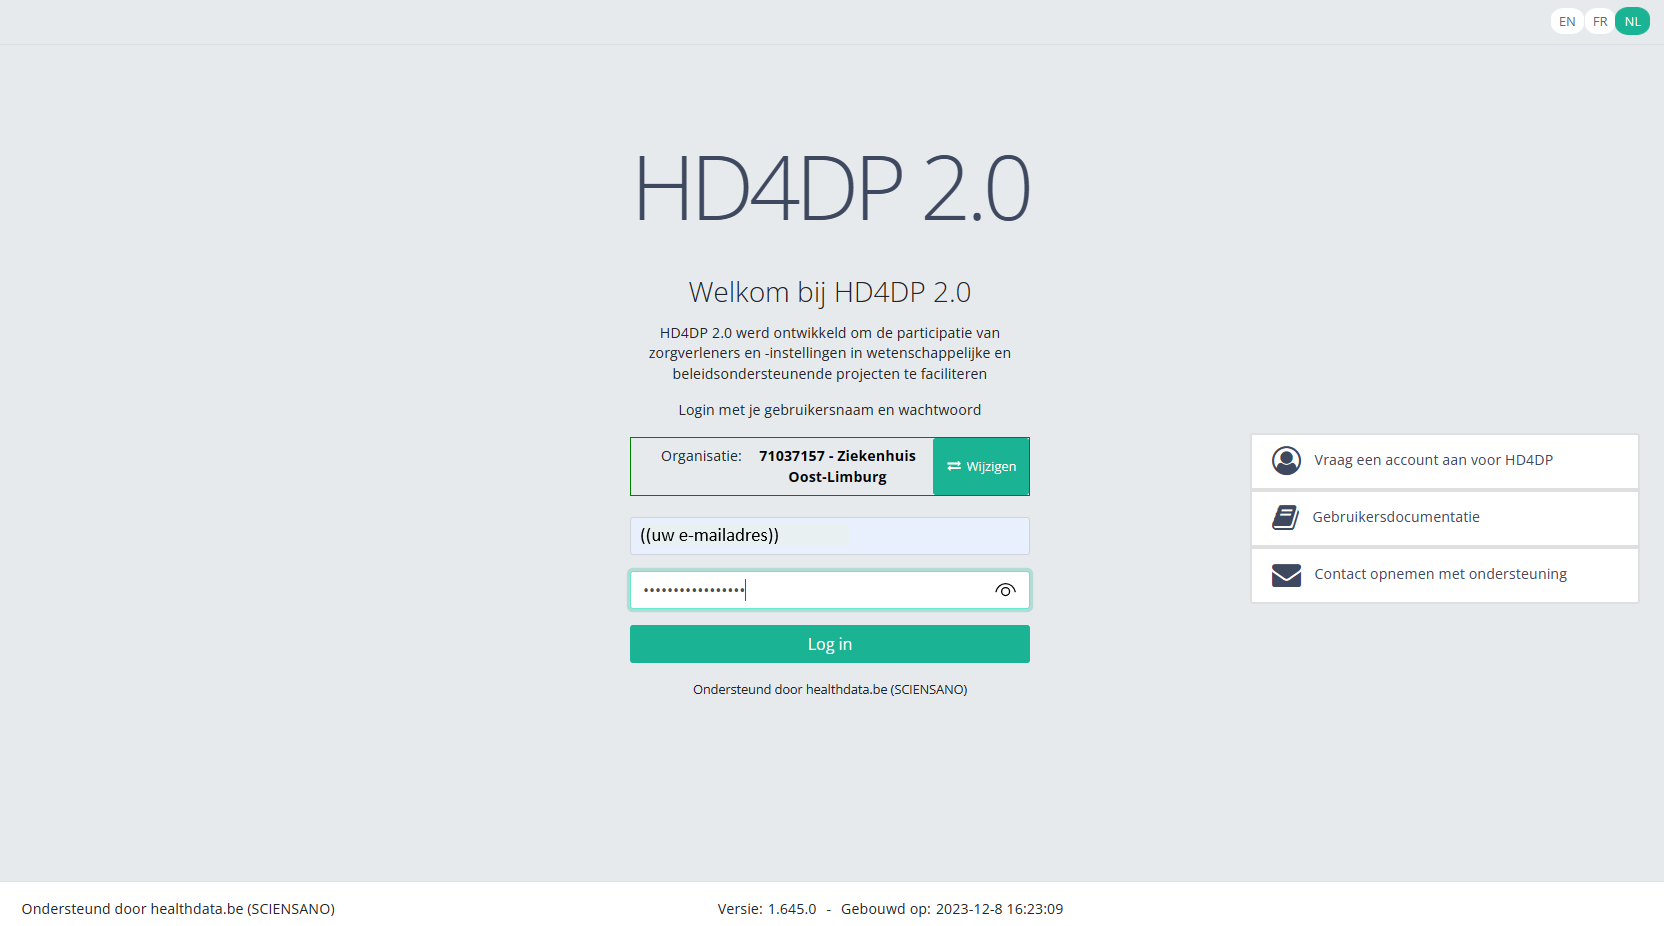
Wachtwoord voor HD4DP v2 resettenNadat u uw credentials hebt ontvangen om in te loggen op de HD4DP 2.0 applicatie, kunt u overwegen om uw wachtwoord opnieuw in te stellen en er een te kiezen dat u makkelijker kunt onthouden.
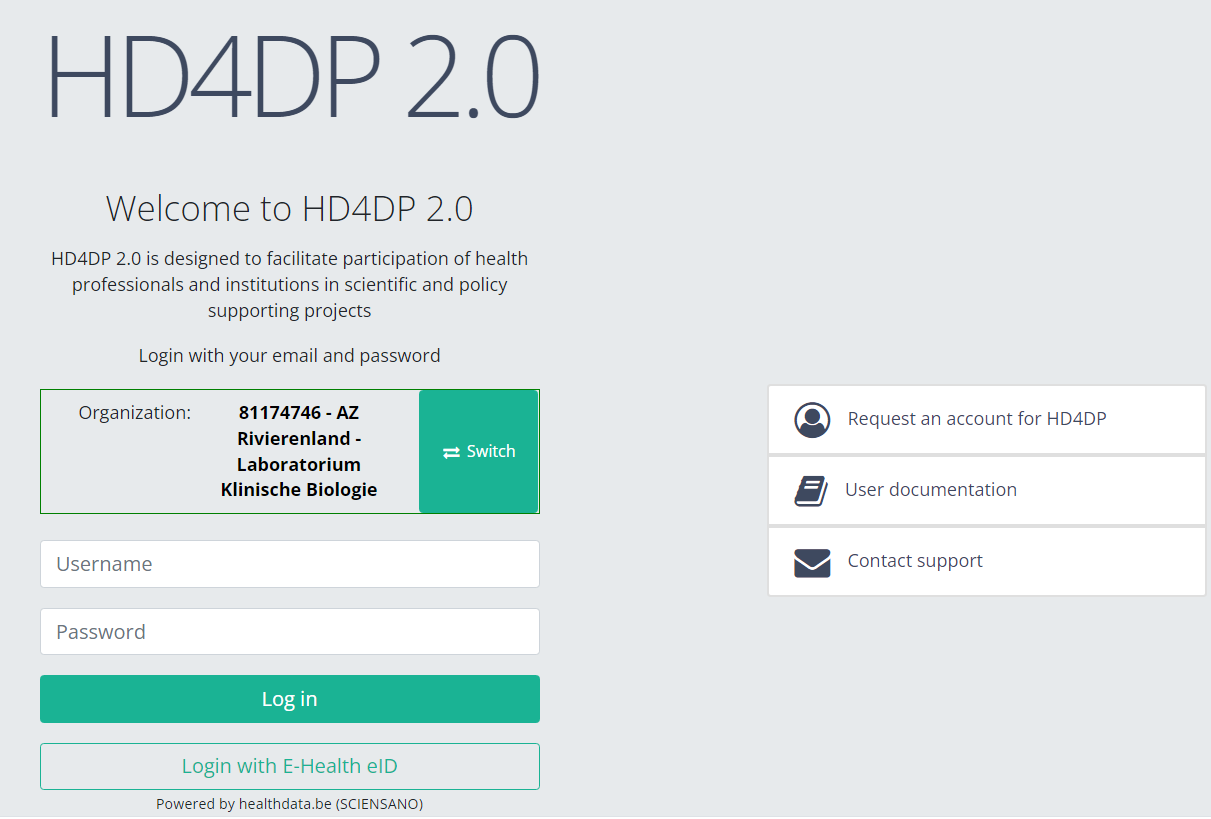
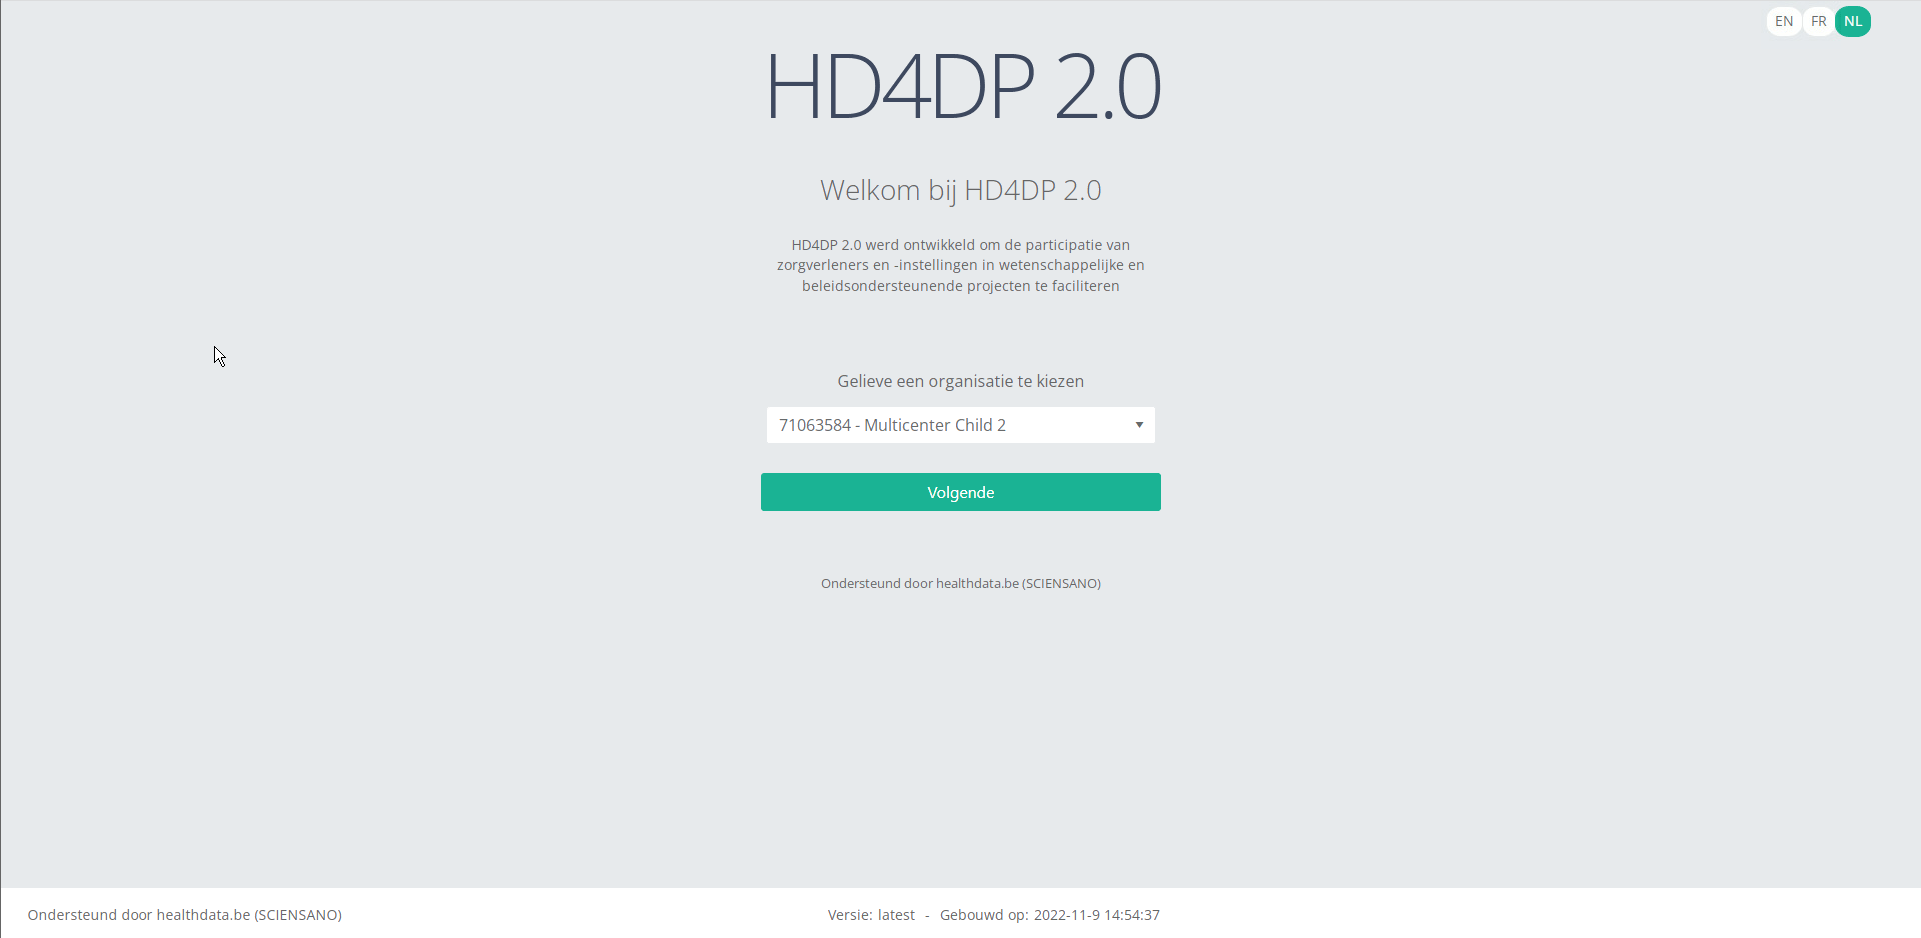
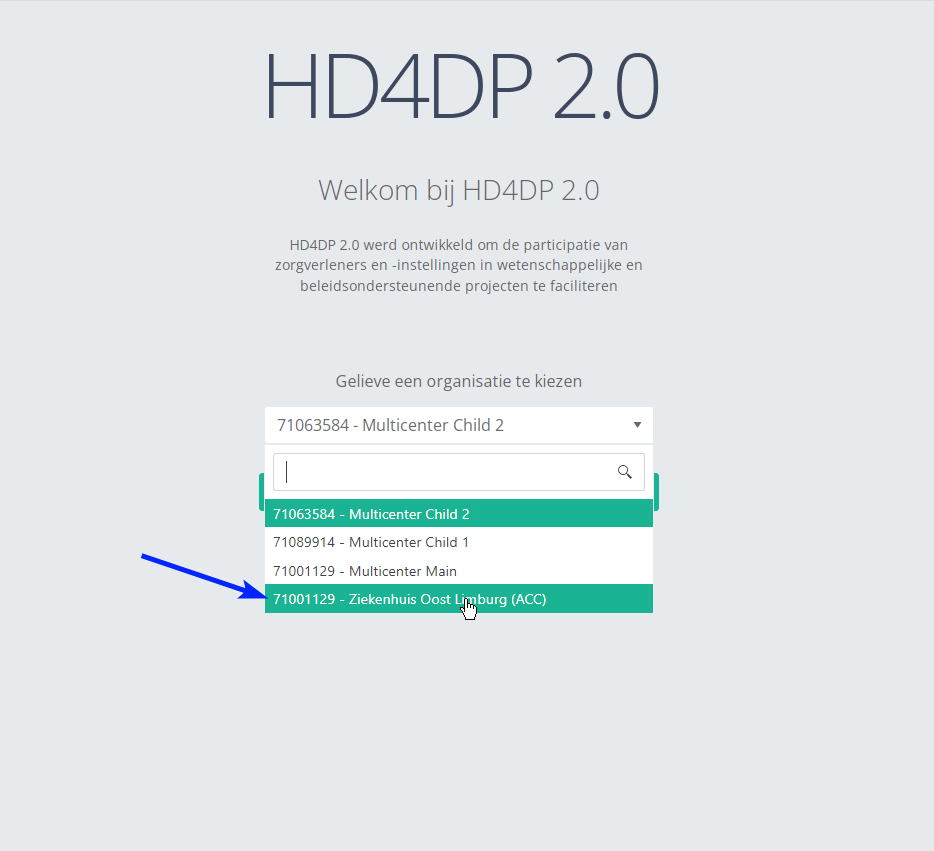
Ga naar URL https://hd4dp.healthdata.be/, selecteer uw organisatie en klik op de knop Volgende.
Vul uw e-mailadres en het ontvangen wachtwoord in. Klik op de knop Log in.
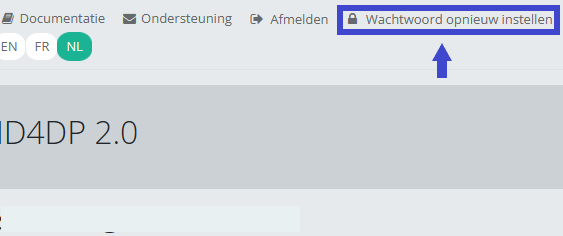
Het hoofdmenu van de applicatie HD4DP 2.0 wordt weergegeven. Links vindt u het navigatiemenu met studieprogramm's en studieprojecten, terwijl u rechts de sectie ziet waarin de respectieve registraties beschikbaar zullen zijn.

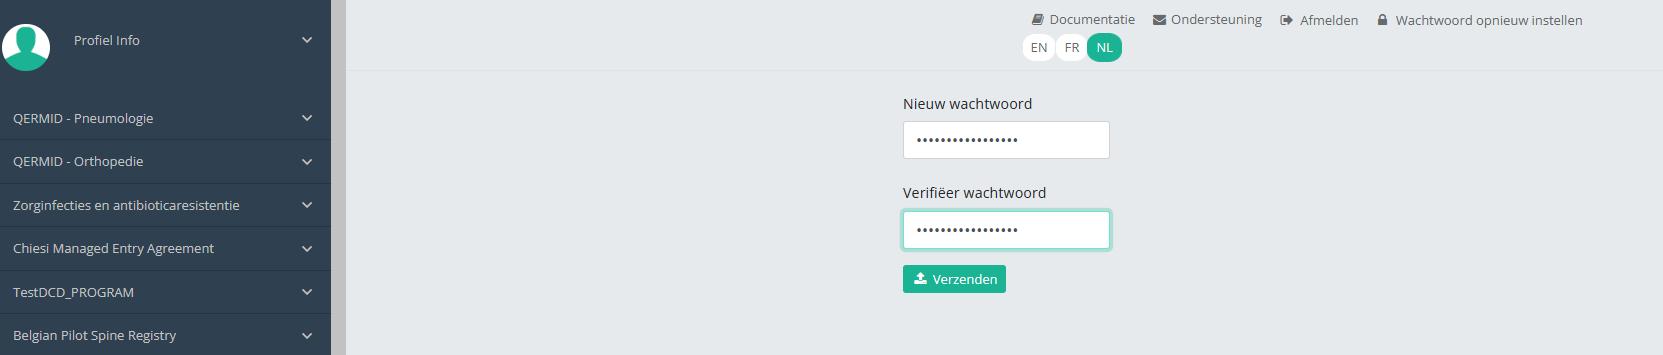
Bovenaan rechts op het scherm ziet u de link Wachtwoord opnieuw instellen. Klik op deze link.
Stel het wachtwoord dat u hebt ontvangen opnieuw in door het gewenste wachtwoord in te voeren. Herhaal het nieuwe wachtwoord in het verificatieveld en klik op de knop Verzenden.
U keert terug naar het hoofdmenu, en het wachtwoord wordt automatisch opnieuw ingesteld. U hoeft hier niet opnieuw in te loggen.
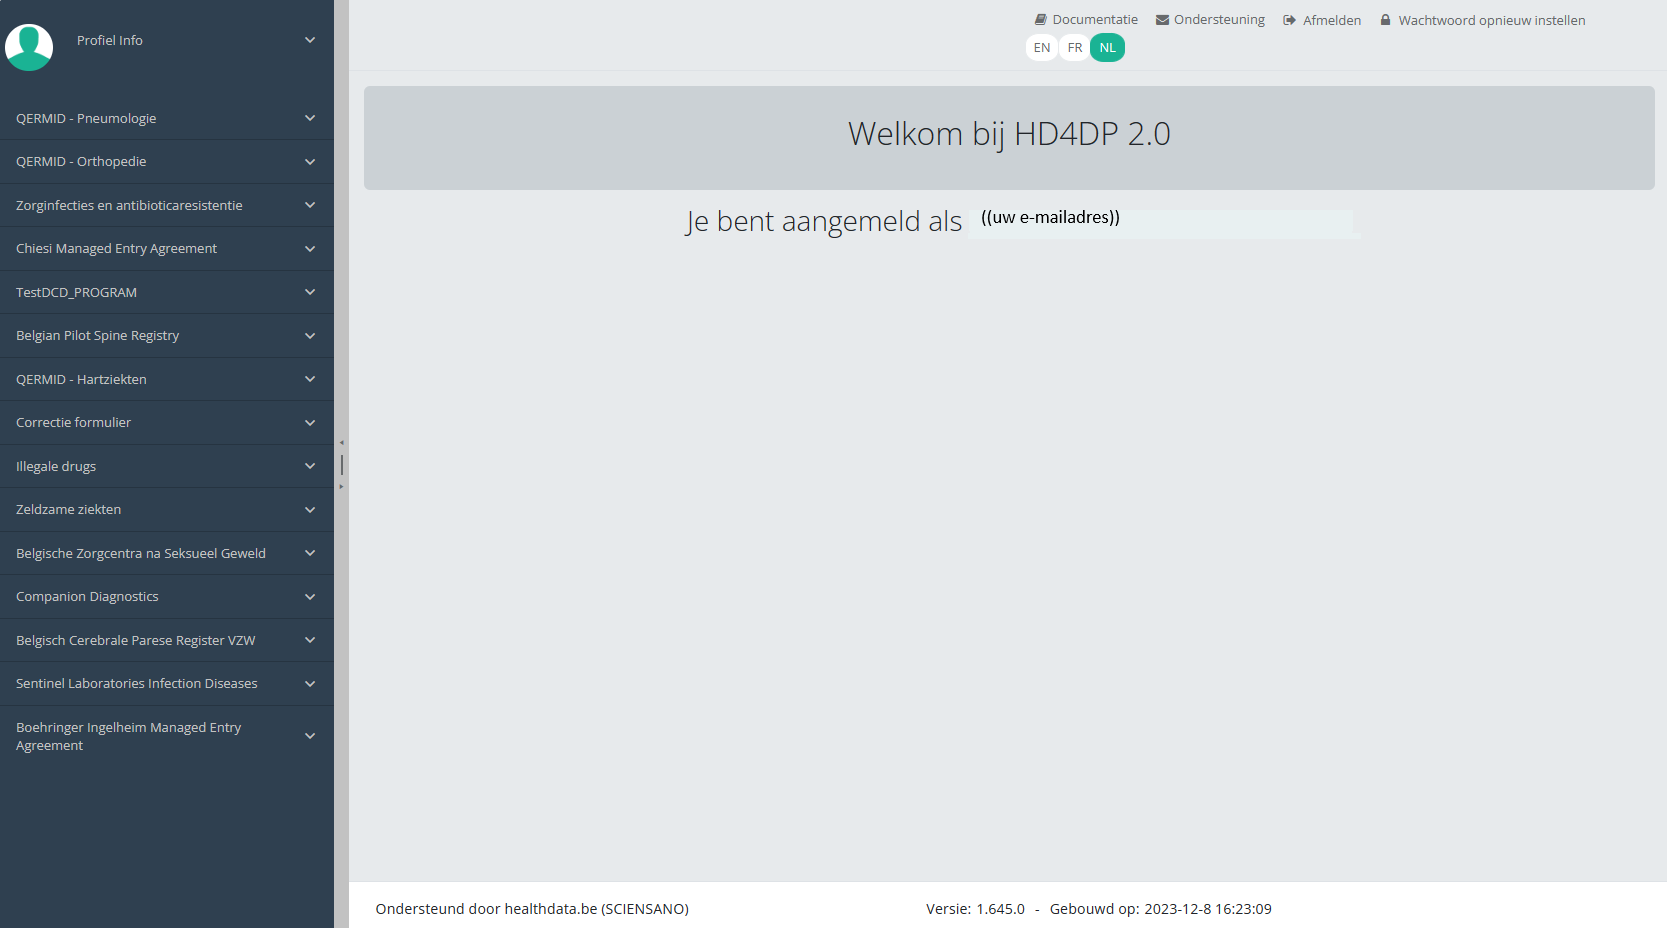
Wanneer u opnieuw inlogt voor een volgende registratiesessie, maakt u gebruik van uw nieuwe wachtwoord.
Technische handleiding van de applicatie HD4DP v2
Technische handleiding van de applicatie HD4DP v2De inhoud van deze pagina is enkel beschikbaar in het Engels. Selecteer de EN knop in de rechterbovenhoek van het scherm om de pagina te openen.
HD4DP v2 Installatie
HD4DP v2 InstallatieDe inhoud van deze pagina is enkel beschikbaar in het Engels. Selecteer de EN knop in de rechterbovenhoek van het scherm om de pagina te openen.
HD4DP v2 Infrastructure instructions
HD4DP v2 Infrastructure instructionsIntroduction
This document is written for IT staff / system engineers of data providers and therefore assumes technical knowledge. It acts as a guide through the on-boarding process of HD4DP v2 and covers installation of the server, user configuration, network configuration and remote access.
The order of steps in this document should be respected during execution.
If you need more informationor have any questions, feel free to contact us.
Overview
HD4DP v2 consists of a modular application stack, which allows Healthdata to seamlessly upgrade individual elements.
An HD4DP v2 deployment comprises of following components:
- Form.io component
- MongoDB
- PostgreSQL
- Nextgen Connect
As it is the case in HD4DP 1.0, an Encryption Module with a connection to the eHealthBox is still required for HD4DP v2 and must be provided by the data provider.

Network configuration
IP
The HD4DP server needs to be accessible via domain names in DNS, and must have a static IP in your private network.
DNS
The application stack of HD4DP v2 requires four domain names pointing to the IP of the locally installed HD4DP v2 server. Use the following names in your DNS:
- nextgenconnect.hd4dp.<yourdomain.be>
- hd4dp.<yourdomain.be>
- metabase.hd4dp.<yourdomain.be>
- admin.hd4dp.<yourdomain.be>
Firewall
The following connections should be possible in the firewall flow:
- To and from (a) machine(s) in your IT department on port 22 for initial configuration and local support.
- To and from the Encryption Module server. The protocol and ports depend on your local EM implementation. Contact your EM vendor if more information is necessary.
- Reachable by your staff who uses HD4DP, on ports 80 and 443 for HTTP(s) traffic.
- To and from the LDAP server (this is not mandatory if you are not using LDAP to authenticate) (port 389 by default)
The Healthdata proxy server is used as a gateway to the internet for the security of HD4DP servers. The configuration of this proxy server will be provided to you by Healthdata at a later date.
Server installation
To install the application stack of HD4DP v2, Healthdata requires a fresh installed operating system, specifically Ubuntu Server 22.04 LTS.
Please use these instructions even if you have previous experience with installing this operating system, as its configuration is specific for Healthdata.
These instructions assume that the network configuration described in the previous section is completed.
Instructions
HD4DP v2 requires a (virtual) machine running Ubuntu Server 22.04 LTS.
We assume knowledge of loading an .iso file onto a (virtual) machine. Healthdata can’t provide instructions for this, as the environment of your center is unknown. Should you have any trouble, however, please contact Healthdata support so that we can help out.
Please find the installation steps below.
Installation steps
- Download the .iso file from the link below.
Download Ubuntu Server 22.04 LTS - Create a new (virtual) machine with Linux Ubuntu 64 bit as the OS family
- When prompted, select the .iso file downloaded in step 1.
- After some time, you will be prompted to select a system language. Select English.
- “Keyboard configuration”
Select your preferred keyboard layout and press enter - “Network Connections”
Highlight the network interface and press enter. Navigate as follows:
Edit IPv4 -> Manual -> enter the network details -> save -> Done - Proxy IP -> Leave default/empty.
- “Configure Ubuntu Archive Mirror” -> leave default
- “File system Setup” -> Use An Entire Disk
- Proceed until “Confirm destructive action” -> press continue. The installation process starts, this can take several minutes.
- In the meantime, create the user for Healthdata.
username = healthdata,
Password = choose a secure password and communicate it to Healthdata. - Mark “Install OpenSSH server”. This will be used for remote access. “Import SSH Identity” -> no -> done
- “Featured Server Snaps” -> Select nothing and press Done.
- Wait until installation is finished.
Configuration steps
Connecting to the server
Log into the machine with the Healthdata user created in the previous section.
Instructions (from a Windows machine):
- Install the tool Putty and open the application.
- On the configuration screen, enter the following (replace cursive text with the appropriate values)
- Host Name: healthdata@server_private_ip
- Port: 22
- Connection type: SSH
- Click Open. Enter the Healthdata password (you will not see text as you type, you can paste into putty by right-clicking in the terminal).
- You should now be logged in and see a prompt “healthdata@server_name:~$”
Administrator account for internal use
An administrator account for internal use can be created on the HD4DP v2 server.
The configuration of remote access (described below) should not happen on this account, but on the Healthdata account.
The internal account can later be used to install and configure OS monitoring software and antivirus software by the internal IT team. For more information, see the section on Antivirus and Monitoring.
(Text with a gray background should be entered as a command in the terminal of the server)
Create the user:
sudo adduser <username>
Add the user to the sudo group
sudo usermod -aG sudo <username>
Installation and configuration of the software stack
Healthdata.be support will instruct you when to execute the next step, which is to enable remote access so that Healthdata can execute the software installation and configuration.
Backups
The configuration of the HD4DP v2 server is administered by Healthdata and does not require backups. This configuration will be based on the information shared on the infrastructure sheet. If no network drive information is shared with Healthdata, no backups of the databases will be foreseen.
HD4DP v2 regularly dumps its databases automatically to the /backup directory on the server. A network storage should be mounted at this location.
Please fill out the infrastructure sheet with the required credentials, domain name/url, protocol… to connect to the network drive. The connection will then be configured by Healthdata.
Patching and Updates
Healthdata configures HD4DP v2 servers to automatically receive recommended security updates. The choice for Ubuntu 22.04 is motivated by the long-term support for this version. Security flaws are rare in this distribution, and security updates are quick and often don’t require a system reboot.
If the IT department of your organization prefers to manage patches, this is possible but not encouraged. Please use the account for internal use created in Section Server installation for this purpose.
Antivirus and Monitoring
Most data providers will want to manage their own antivirus and OS monitoring on all machines in their network. Installation of such software on the HD4DP v2 server is allowed, but Healthdata should be informed about all extra software installed on the server. Additionally, Healthdata will not provide support for the installation of this software.
Contact information
Email: support.healthdata@sciensano.be
Phone: +32 2 793 01 42
HD4DP v2 Infrastructure Sheet
HD4DP v2 Infrastructure SheetThe HD4DP v2 Infrastructure Sheet contains information that healthdata.be needs in order to start the installation of the HD4DP 2.0 Software at your organization.
Below you can find the description of the necessary information:
SERVER CONNECTION
Healthdata.be performs its installation and support tasks remotely (using VPN or remote port forwarding via SSH). Please provide the required credentials.
- Type of connection (VPN / Remote port forwarding via SSH)
- Link (IF VPN)
- Username, token, other (if VPN)
- Password (if VPN)³
- Public SSH Key (if remote port forwarding)
³ For security reasons, we advise to communicate passwords to us either by phone, or via a link using a secret-sharing service such as onetimesecret.com.
SERVER MACHINE
- Server Name
- Internal IP-Address
- Ram (in GB)
- CPU (number of CPU's and number of cores)
- Disk space (in GB)
- Username: Healthdata
- Password ³
³ For security reasons, we advise to communicate passwords to us either by phone, or via a link using a secret-sharing service such as onetimesecret.com.
ATTACHED DRIVE FOR BACKUPS
HD4DP 2.0 regularly performs data dumps for backup purposes. Please provide connection information to a network share volume.
- Link / IP address
- Path
- Username
- Password ³
³ For security reasons, we advise to communicate passwords to us either by phone, or via a link using a secret-sharing service such as onetimesecret.com.
USER MANAGEMENT
HD4DP can either connect to a LDAP server or use its own application database for performing user authentication and management. Please check the user management mechanism you want to use.
- LDAP user management : Yes / No
- Application user management : Yes / No
LDAP configuration (Optional)
If you chose ‘LDAP user management’ as user management mechanism, please provide the following information that allows us to connect to your LDAP system.
- Connection URL
- Username
- Password³
³ For security reasons, we advise to communicate passwords to us either by phone, or via a link using a secret-sharing service such as onetimesecret.com.
SOFTWARE CONFIGURATION
Encryption Module interface
HD4DP communicates with the Encryption Module (EM) either using the file system interface or by calling a REST web service. Please choose which interface HD4DP should use for its communication with the Encryption Module.
- REST web service
- File system
REST web service interface
If you chose to communicate with the Encryption Module using a REST interface, please provide the web service URLs that should be used by HD4DP for its communication with EM.
- "Outgoing flow URL: Example: http://host:8080/encryptionmodule/send"
- "Incoming flow URL : Example: http://host:8080/encryptionmodule/receive"
File system interface
- "Incoming directory: Directory where HD4DP checks for incoming files"
- "Incoming directory: Directory where HD4DP writes outgoing files"
- "Incoming directory: Directory to which HD4DP moves successfully processed files"
- "Incoming directory: Directory to which HD4DP moves unsuccessfully processed files"
Requirements for the HD4DP installation
Requirements for the HD4DP installationThis documentation details the necessary adaptations to be performed in order to allow the necessary technical accesses and smooth operation of the different healthdata.be platforms and interfaces.
The file is available for download below.
Encryption module
Encryption moduleNote: the procedure for the Encryption module is the same for HD4DP v1 and v2.
While HD4DP is developed by healthdata.be, the EM module is not. It can be developed by data providers or third party vendors.
The architecture workgroup of the eHealth platform have strict rules concerning the encoding. Encryption and decryption from the HD4DP software are kept separate.
A new component, whose main functionality, is the encryption of the data before it leaves the organization. Since “data encryption” is the main purpose of this module, it will be referred to as Encryption Module (or EM).
Development by Data Providers
A cookbook containing detailed instructions onhow to implement the module are attached.
HD4DP needs to be configured for the encryption module (cf "How to configure HD4DP for an encryption module").
Finally, validation (cf. article "Encryption module validation scenario") the encryption module implementations is done by healthdata.
Development by Third Parties
The two main functionalities of the encryption module are:
- Encryption and decryption data
- Sending and receiving data
HD4DP needs to be configured for the encryption module (cf. article "How to configure HD4DP for an encryption module").
Encryption and decryption
Healthdata.be has validated (cf. Encryption module validation scenario) the encryption module implementations, developed by the following parties:
- Amaron (Amaron)
- HealthConnect (Hector/Unified Messaging)
- Hôpital Erasme (custom)
- NexuzHealth (NexuzHealth)
- Réseau Santé Wallon (XConnect)
Sending and receiving data
In Belgium, different eHealthBox client softwareapplications are available.
An eHealthBox client application provides an interface to use the eHealthBox service. The eHealth-platform communicates medical files, lab results or other sensible information.
The use of an eHealthBox client application is required for sending data to healthdata.
The main vendors are:
HD4DP v2 S2S API
HD4DP v2 S2S APIGeneral description
API is the acronym for Application Programming Interface, enabling two applications to communicate with each other. The HD4DP v2 System to System (S2S) API allows stakeholders (data providers, healthcare organizations ...) to submit registered data to HD4DP v2 in a fully automated way.
In the manual of the application HD4DP v2 we provide detailed information about the S2S API. Please read the below documentation before its project-specific use.
- API Endpoint for supporting the DCD submit process
- MDM Field description - DB Model
- Swagger API
- Postman collection
Important note:
For code fields (fieldType = 'CODE') the id of the codeListValue item must be sent, not the code value or the label. In future releases it will be made possible to also send the code value.
Training
Below you can review the S2S API training organized by healthdata.be:
This documentation is being updated regularly. We try to provide as correct, complete and clear as possible information on these pages. Nevertheless, if you see anything in the documentation that is not correct, does not match your experience or requires further clarification, please create a support ticket via our portal Jira Service Management or send us an e-mail via support.hd@hda.fgov.be to report this documentation issue. Please do not forget to mention the URL of the page. We will then adjust the documentation as soon as possible. Thank you!S2S API data submission for registries
S2S API data submission for registriesData submission procedure in Architecture 2 using S2S API
1. Requirements at Data Provider's side
In order to be able to communicate with the healthdata.be S2S API, the IT services of the healthcare organizations must setup their systems as follows:
- Ensure to have the credentials available for the endpoint/URL for which authorization is necessary. If this is not the case, please contact our service portal: https://healthdatabe.atlassian.net/servicedesk/customer/portals
- Ensure to have the end-to-end API process in place in order to submit data registrations in a fully automated manner.
- Ensure capability of submitted data retrieval in the local database.
2. Preparing the JSON file
- To send data to healthdata.be by S2S API, the file must be in a .json file format.
- Extract the requested data from the electronic patient files and/or other local databases.
- Map the data according to the fields and formats as described in the DCD specifications of this section and the general code lists.
- Go here for additional information on the codes and the formats used for the Author group, SSIN code, Status, "Date" - "Date:Time", Repeatable fields and Multiple choice.
Note: The example files are only provided as a guideline and do not contain real life data.
Note: Below documentation contains generic example screens with the sole purpose to demonstrate how the process looks like regardless of the register.
3. Uploading the JSON file
- The IT department of the Data Provider implements a data transmission system (e.g. Postman) to send the API queries by means of a json file. The correct endpoints for uploading of the json file can be found here.
- The URL that needs to be entered after POST (selected method for uploading) should have a syntax similar to the one below:
POST {{baseURL}}/api/dcd/payload/submit?organization-id={organizationId}&dcd-id={dcdId}&dcd-version-id={dcdVersionId}&data-src-type={dataSrcType}
- Whereby:
- {organizationId} needs to be replaced by the id of your organization; go here for more information
- {dcdId} needs to be replaced by a register-specific numerical value; go here for more information
- <optional> {dcdVersionId} needs to be replaced by the intended version number; if not provided, the latest version of the dcd specifications is assumed; go here for more information
- <optional> {dataSrcType} needs to be replaced by the data source type. Permitted values are API or CSV; go here for more information
- a GET method URL should not contain /submit/ in the endpoint or path
- multiple query parameters need to be connected by an ampersand (&) (see example above)
- In the Authorization tab, select “Basic Auth” in the “Auth Type” drop-down list. Subsequently, fill out the API credentials in the username and password fields.

- In Body tab, select the “raw” option from the top line and paste the content of the JSON file in the box.
- Once the request settings are completed, press the Send button to submit the records.
- After succesful submission of the data, the “Status: 202 Accepted” code will appear below the box where the data was pasted. The bottom box should return a message about the records uploaded or an error message if any.
- A 401 Unauthorized message instead indicates missing or incorrect credentials. Request the correct credentials as described above in the Requirements at Data Provider's side.

- A 400 Bad request might refer to incorrect syntax of the API query. Check the query parameters and ensure to connect multiple parameters with the ampersand (&) character.

4. Validating the JSON Upload
4.1 Validation of the S2S API Upload via the response:
Verify in the same way the request was sent, that the returned response is containing a valid Business key.
If a valid Business key has been provided, the registration upload via System 2 System API was succesful.
4.2 Validation of the S2S API via HD4DP 2.0:
Step 1: Open the HD4DP 2.0 application.
Step 2: Select the organization in the dropdown list and click on Volgende (Next).
Step 3: Fill in the username and password, that has been provided by your IT Department or Healthdata team, and click on Log in to access the HD4DP v2.0 application.
Step 4: Navigate in the menu on the left-hand side panel to the desired study program:

Step 5: Check that the uploaded registration(s) is/are displayed in the overview table:
This documentation is being updated regularly. We try to provide as correct, complete and clear as possible information on these pages. Nevertheless, if you see anything in the documentation that is not correct, does not match your experience or requires further clarification, please create support ticket via our portal (https://healthdatabe.atlassian.net/servicedesk/customer/portals) or send us an e-mail via support.healthdata@sciensano.be to report this documentation issue. Please, do not forget to mention the URL or web address of the page with the documentation issue. We will then adjust the documentation as soon as possible. Thank you!1. API endpoint description to support the data submission process
1. API endpoint description to support the data submission processTable of contents
- API endpoint overview
- Get organizations
- Get the DCD menu structure
- Get DCD field definitions
- Get DCD payload example
- Get DCD field definition list
- Get DCD code list values
- Get DCD menu translations
- Get DCD field definition translations
- Submit DCD registrations
- Search for SADMI medical devices
- User password
- Additional fields
API endpoint overview
The baseURL to be used has the following built: https://<hd4dp_url>/proxy.
Go here for further details on the syntax of API queries to ensure correct uploading of the json file.
| API endpoint | Respons | Notes |
|---|---|---|
| {{baseURL}}/api/organizations | List of organizations. Client must select the right organizationId | GET method Currently existing endpoint is: /api/installation/organizations We’ll create this new endpoint with a different signature re-routing the call to this existing one or we will refactor the existing one to this new signature. |
| {{baseURL}}/api/externalreference/sadmi?notificationCode={notificationCode} <optional> name={name} <optional> reference={reference} <optional> distributorName={distributorName} <optional> manufacturerName={manufacturerName} <optional> classificationCode={classificationCode} | List of Medical Device Types: - NotificationCode - Name - Reference URL - Distributor - Manufacturer - Classification - State Client must select the desired information. | GET method |
| {{baseURL}}/api/dcd/payload/submit?organization-id={organizationId} <optional> dcd-id={dcdId} <optional> dcd-version-id={dcdVersionId} <optional> data-src-type={dataSrcType} | Results info if succeed Error info if failed | POST method Some implementation tasks are needed here in order to return the result info (either succeed or failed). Similar like the one in HDConnectProxyRestTemplate.postCsv method, and the CsvExecutionResult object build. <optional parameter> dcd-version-id={dcdVersionId}: If this parameter is not provided, latest one is assumed. <optional parameter> data-src-type={dataSrcType} : permitted values: - API - CSV If this parameter is not provided, default values is <HD4DP>. |
| {{baseURL}}/api/dcd/payload/example?dcd-id={dcdId} <optional> version={version} | Example of payload in JSON format | GET method Providing this API end-point in order to help the Client on the Payload build with an example <optional parameter> version={version}: If this parameter is not provided, latest one is assumed |
| {{baseURL}}/api/dcd/payload/definition?dcd-id={dcdId} <optional> version={version} <optional> language-id={languageId} | List of all the fields of the form as well as their corresponding data-types that are allowed in the json data structure for the Payload | GET method This field names values are the key properties in the formIO json config form. When we implement this new api end-point, we need to parse the json content in order to get the key properties. Given these field keys, we’ll get each field definition from new API end-points helpers: /api/dcd/field?field-id={fieldId} /api/dcd/codelist?codelist-id={codelistId} These ones are described in the next table. <optional parameter> version = {version}: If this parameter is not provided, latest one is assumed <optional parameter> language-id = {languageId}: language id for the code_list example results. If this parameter is not provided, default language will be English. Current permitted values: en: English nl: Dutch fr: French Client must build this json object as the payload data to be sent based on this list of fields, on the last api call |
| {{baseURL}}/api/dcd/menu/structure?organization-id={organizationId} | List of projects of the given organization, dcds of each project, dcdVersions of each dcd in a JSON format Client can get dcdId and dcdVersionId (optional) which are needed on following API calls. | GET method |
| {{baseURL}}/api/dcd/field?dcd-id={dcdId} <optional> dcd-version-id={dcdVersionId} <optional> included-codelist-values={inclCodelistValues} <optional> field-name={fieldname} <optional> language-id={languageId} | List of DCD fields definition, even with codelist values if the field is CODE field type. | GET method <optional parameter> dcd-version-id={dcdVersionId}: If this parameter is not provided, latest one is assumed <optional parameter> included-codelist-values={inclCodelistValues}: permitted values: - true - false If this parameter is not provided, default value is <true> <optional parameter> field-name={fieldname}: A field name e.g: TX_AUTHOR_GR <optional parameter> language-id={languageId}: language id for the code_list example results If this parameter is not provided, default language will be English. Current permitted values: - en: English - nl: Dutch - fr: French |
| {{baseURL}}/api/dcd/field/translation?dcd-id={dcdId} <optional> dcd-version-id={dcdVersionId} <optional> language-id={languageId} <optional> field-name={fieldName} | List of fields translations for a given dcdId in the specified languageId (English if it is not provided) in a JSON format. Optional fieldId parameter can be provided just for getting this info but only for this fieldId. | GET method <optional parameter> dcd-version-id={dcdVersionId}: If this parameter is not provided, lastest one is assumed <optional parameter> language-id={languageId}: language id for the code_list example results. If this parameter is not provided, default language will be English. Current permitted values: - en: English - nl: Dutch - fr: French <optional parameter> field-name={fieldName}: A field name e.g: TX_AUTHOR_GR |
| {{baseURL}}/api/dcd/codelist?code-list-id={codelistId} <optional> language={language} | List of values for the codelist of the given codelistId.(List<CodeListItem>) | GET method Checking and getting this info based on MDM -> CODE_LIST table and the relationed tables (CODE, CODE_CONTENT etc.) See MDM – Field description – DB model diagram at the Attachment chapter for more details. <optional parameter> language={languageId}: language id for the code_list example results. If this parameter is not provided, default language will be English. Current permitted values: - en: English - nl: Dutch - fr: French |
Get organizations
Request example
GET {{baseURL}}/api/organizations
Request response

Get the DCD menu structure
Request example
GET {{baseURL}}/api/dcd/menu/structure?organization-id={organizationId}
Request parameters
- {organizationId}: Id of the organization as provided by Healthdata.be and for which we want to list the menu structure
- {{baseURL}}: the value for this field is https://<hd4dp_url>/proxy
Request response
All the menu structure for that organization, including projects, dcds of each project and dcd versions of each dcd, in a JSON format.

Get DCD field definitions
Request example
GET {{baseURL}}/api/dcd/payload/definition?dcd-id={dcdId}&version={version}&language-id={languageId}
Request parameters
- {dcdId}: Id of the dcd
- <optional parameter> {version}: If this parameter is not provided, latest one is assumed
- <optional parameter> {languageId}: language id for the code_list example results. If this parameter is not provided, default language will be English. Current permitted values:
- en: English
- nl: Dutch
- fr: French
Request response

https://hd4dp.acceptance.healthdata.be/proxy/api/dcd/payload/definition?dcd-id=18&version=1&language-id=nl
Get DCD payload example
Request example
GET {{baseURL}}/api/dcd/payload/example?dcd-id={dcdId}&version={version}
Request parameters
- {dcdId}: Id of the dcd
- <optional parameter> {version}: If this parameter is not provided, latest one is assumed
Request response
Given the previous Payload field definition example on previous chapter, we build a payload content example accordingly.
{
"CD_SURGL_APPR_FEMO": 68224,
"D_IMPLANT": "2021-04-30T22:00:00",
"TX_TPE_INSTRU": "P-432",
"MS_PAT_HGHT": 180
}
Get DCD field definition list
Request example
GET {{baseURL}}/api/dcd/field?dcd-id={dcdId}&dcd-version-id={dcdVersionId}&included-codelist-values={inclCodelistValues}&field-name={fieldName}&language-id={languageId}
Request parameters
- {dcdId}: Id of the menu dcd which we want to get all the translations.
- <optional parameter> {dcdVersionId}: If this parameter is not provided, latest one is assumed.
- <optional parameter> {includedCodelistValues}: boolean value (true or false). If this parameter is not provided, default value will be true. If true and for those fields with type equal to CODE, codelist values will be provided in the result.
- <optional parameter> {fieldName}: A field name e.g: TX_AUTHOR_GR
- <optional parameter> {languageId} : language id for the menu options example results. If this parameter is not provided, default language will be English. Current permitted values:
- en: English
- nl: Dutch
- fr: French
Request response
with parameter includeCodelistValues equal to true (default value)
{
"TX_TPE_INSTRU": {
"field_type": "FREE TEXT",
"code_list": null
},
"D_IMPLANT": {
"field_type": "DATE",
"code_list": null
},
"MS_PAT_XXXX": {
"field_type": "UNKNOWN",
"code_list": null
},
"MS_PAT_HGHT": {
"field_type": "CODE",
"code_list": [
{
"ID": 68224,
"CODE_VALUE": "870646003",
"LABEL_EN": "Femoral (Hemi)"
},
{
"ID": 68225,
"CODE_VALUE": "465954006",
"LABEL_EN": "Femoral + Cup"
}
]
}
}
with parameter includeCodelistValues equal to false
{
"TX_TPE_INSTRU": {
"field_type": "FREE TEXT",
"code_list": null
},
"D_IMPLANT": {
"field_type": "DATE",
"code_list": null
},
"MS_PAT_XXXX": {
"field_type": "UNKNOWN",
"code_list": null
},
"MS_PAT_HGHT": {
"field_type": "CODE",
"code_list": 23
}
}
Get DCD code list values
Request example
GET {{baseURL}}/api/dcd/codelist?code-list-id={codelistId}&language={languageId}
Request parameters
- {code-list-Id} : Id of codelist which we want to get the permitted values
- <optional parameter> {language} : language id for the code_list example results. If this parameter is not provided, default language will be English. Current permitted values:
- en: English
- nl: Dutch
- fr: French
Request response
{
{
"ID": 68224,
"CODE_VALUE": "870646003",
"LABEL_EN": "Femoral (Hemi)"
},
{
"ID": 68225,
"CODE_VALUE": "465954006",
"LABEL_EN": "Femoral + Cup"
}
}
Get DCD menu translations
Request example
GET {{baseURL}}/api/dcd/menu-translations?dcd-id={dcdId}&dcd-version-id={dcdVersionId}&language-id={languageId}
Request parameters
- {dcdId} : Id of the menu dcd which we want to get all the translations.
- <optional parameter> {dcdVersionId} : If this parameter is not provided, lastest one is assumed.
- <optional parameter> {languageId} : language id for the menu options example results. If this parameter is not provided, default language will be English. Current permitted values:
- en: English
- nl: Dutch
- fr: French
Request response
Example 1: languageId = “en” - English language menu translations
{
{
"zephyr_ortho_program": "QERMID - Orthopedics",
"zephyr_ortho_knee_project": "Orthopride knee",
"zephyr_ortho_knee_t1_dcd": "Primo-implantation"
},
{
"zephyr_ortho_program": "QERMID - Orthopedics",
"zephyr_ortho_knee_project": "Orthopride knee",
"zephyr_ortho_knee_t2_dcd": "Revision"
}
. . . . .
}
Example 2: languageId = “nl” - Dutch language menu translations
{
{
"zephyr_ortho_program": "QERMID - Orthopedie",
"zephyr_ortho_knee_project": "Orthopride knie",
"zephyr_ortho_knee_t1_dcd": "Primo-implantatie"
},
{
"zephyr_ortho_program": "QERMID - Orthopedie",
"zephyr_ortho_knee_project": "Orthopride knie",
"zephyr_ortho_knee_t2_dcd": "Revisie"
},
. . . . .
}
Example 3: languageId = “fr” French language menu translations
{
{
"zephyr_ortho_program": "QERMID - Orthopédie",
"zephyr_ortho_knee_project": "Orthopride genou",
"zephyr_ortho_knee_t1_dcd": "Primo-implantation"
},
{
"zephyr_ortho_program": "QERMID - Orthopédie",
"zephyr_ortho_knee_project": "Orthopride genou",
"zephyr_ortho_knee_t2_dcd": "Revision"
},
}
Get DCD field definition translations
Request example
GET {{baseURL}}/api/dcd/fields/translation?dcd-id={dcdId}&dcd-version-id={dcdVersionId}&language-id={languageId}&field-id={fieldId}
Request parameters
- {dcdId} : Id of the menu dcd which we want to get all the translations.
- <optional parameter> {dcdVersionId} : If this parameter is not provided, lastest one is assumed.
- <optional parameter> {languageId} : language id for the menu options example results. If this parameter is not provided, default language will be English. Current permitted values:
- en: English
- nl: Dutch
- fr: French
- <optional parameter> {fieldName} : Id of field which we want to get the translation from
Request response
Example 1: languageId = "en" - English language fields translations
{
"author_group": "Authors group",
"CD_SLEEVE_LON": "Long sleeves",
"TX_TTL_UNT": "Unit",
"TX_CTNT_BEF_CONT_VEN_ARTER": "Before venous/arterial contact",
"CD_NAIL_DIRT": "Dirty nails",
"CD_PLSH": "Nail polish",
"TX_NHH": "No hand hygiene",
"CD_SITE": "Site number",
"CD_NAIL_EXT": "Nail extensions",
"TX_TTL_STDY": "Study design",
"CD_WATCH": "Wearing a watch",
"D_OBS": "Observation date",
"T_STP_OBS": "Time end observation period",
"CD_OPT_MDL": "Participation module optional",
"CD_SPLTY": "Specialty of the ward",
"CD_PROF": "Profession",
"TX_TTL_OBS": "Observations",
"CD_NAIL_LON": "Long nails",
"CD_RING": "Wearing a ring"
}
Example 2: languageId = "nl" - Dutch language fields translations
{
"author_group": "Auteursgroep",
"CD_SLEEVE_LON": "Lange mouwen",
"TX_TTL_UNT": "Eenheid",
"TX_CTNT_BEF_CONT_VEN_ARTER": "Voor contact met intravasculair stelsel",
"CD_NAIL_DIRT": "Vuile nagels",
"CD_PLSH": "Nagellak",
"TX_NHH": "Geen handhygiëne",
"CD_SITE": "Campus nummer",
"CD_NAIL_EXT": "Kunst-nagels",
"TX_TTL_STDY": "Study design",
"CD_WATCH": "Het dragen van polshorloge",
"D_OBS": "Observatiedatum",
"T_STP_OBS": "Tijdstip einde observatieperiode",
"CD_OPT_MDL": "Deelname optioneel module",
"CD_SPLTY": "Specialiteit van de dienst",
"CD_PROF": "Beroepsgroep",
"TX_TTL_OBS": "Observaties",
"CD_NAIL_LON": "Lange nagels",
"CD_RING": "Het dragen van ring"
}
Example 3: languageId = "fr" - French language fields translations
{
"author_group": "Groupe d’auteurs",
"CD_SLEEVE_LON": "Longues manches",
"TX_TTL_UNT": "Unité",
"TX_CTNT_BEF_CONT_VEN_ARTER": "Avant contact veineux/artériel",
"CD_NAIL_DIRT": "Ongles sales",
"CD_PLSH": "Ongles vernis",
"TX_NHH": "Pas d’hygiène des mains",
"CD_SITE": "Numéro du site",
"CD_NAIL_EXT": "Ongles artificiels",
"TX_TTL_STDY": "Study design",
"CD_WATCH": "Le port d’une montre",
"D_OBS": "Date de l’observation",
"T_STP_OBS": "Heure fin de la période d’observation",
"CD_OPT_MDL": "Participation module optionel",
"CD_SPLTY": "Spécialité du service",
"CD_PROF": "Profession",
"TX_TTL_OBS": "Observations",
"CD_NAIL_LON": "Ongles longs",
"CD_RING": "Le port d’une bague"
}
Submit DCD registrations
Request example
POST {{baseURL}}/api/dcd/payload/submit?organization-id={organizationId}&dcd-id={dcdId}&dcd-version-id={dcdVersionId}&data-src-type={dataSrcType}
Header:
MediaType.APPLICATION_JSON
Body:
{
{
"CD_SURGL_APPR_FEMO": 68224,
"D_IMPLANT": "2021-04-30T22:00:00",
"TX_TPE_INSTRU": "P-432",
"MS_PAT_HGHT": 180
},
{
"CD_SURGL_APPR_FEMO": 68225,
"D_IMPLANT": "2021-04-14T22:00:00",
"TX_TPE_INSTRU": "P-545",
"MS_PAT_HGHT": 1209
},
{
"CD_SURGL_APPR_FEMO": 68224,
"D_IMPLANT": "2021-05-01T22:00:00",
"TX_TPE_INSTRU": "T-678",
"MS_PAT_HGHT": 210
}
}
Request parameters
- {organizationtId}: Id of the organization for which we want to submit the DCD registration.
- {dcdId}: Id of the DCD we want to submit.
- <optional parameter> {dcdVersionId}: Id of the DCD Version we want to submit. If this parameter is not provided, latest one is assumed.
- <optional parameter> {dataSrcType}: The data source type e.g: API or CSV.
Request payload
- {Header}: MediaType.APPLICATION_JSON
- {Body}: JSON object with an array of DCDs data to be submitted, following the specifications and examples provided by the described api end-points:
- GET /api/dcd/payload/definition
- GET /api/dcd/payload/example
Request response
Client get a response per each DCD line. If the DCD submission was successful, Client will get a TXT_BUSINESS_KEY value. If it was failed, Client will get an error detailed info: Http Status Code, Name and Exception details:
{
"TX_BUSINESS_KEY": "NISS 12.06.01-052.46 30/04/2021 67864",
{
"HTTP_STATUS_CODE": 405,
"HTTP_STATUS_NAME": "Method Not Allowed",
"HTTP_STATUS_EXCEPTION_DETAILS": "Exception details for Method Not Allowed example",
},
"TX_BUSINESS_KEY": "NISS 12.06.01-071.48 01/05/2021 67864",
}
Search for SADMI medical devices
Request example
GET {{baseURL}}/api/externalreference/sadmi?notificationCode={notificationCode}&reference={reference}
Request parameters
- <optional parameter> {notificationCode}
- <optional parameter> {name}
- <optional parameter> {reference}
- <optional parameter> {distributorName}
- <optional parameter> {manufacturerName}
- <optional parameter> {classificationCode}
Request response
{
{
"NotificationCode": "First Notification Code Example",
"Name": "First Name Example",
"Reference": "First Reference Example",
"URL": "http://first.url.example",
"Distributor": {
"NotificationNumber": "First Notification Number Example",
"Name": "First Distribuitor Name Example"
},
"Manufacturer": {
"Name": "First Manufacturer Name Example",
"CountryCode": {
"value": "First Country Code Value Example",
"standard": "First Country Code Standard Example"
},
"CountryName": {
"value": "First Country Name Value Example",
"lang": "First Country Name Lang Example"
}
},
"Classification": {
"Code": "First Classification Code Example",
"Description": "First Classification Description Example"
},
"State": {
"Name": "First State Name Example",
"ValidFrom": "First State ValidFrom Example",
"ValidTo": "First State ValidTo Example"
}
},
{
"NotificationCode": "Second Notification Code Example",
"Name": "Second Name Example",
"Reference": "Second Reference Example",
"URL": http://second.url.example,
. . . . .
},
. . . . .
}
User / password
The username and password can be requested at our Servicedesk.
Additional fields
In addition to this, more in depth information about the codes and the formats used for the Author group, NISS code, status, Postal Code, "Date" - "Date:Time", repeatable fields and multiple choice fields are available here.
This documentation is being updated regularly. We try to provide as correct, complete and clear as possible information on these pages. Nevertheless, if you see anything in the documentation that is not correct, does not match your experience or requires further clarification, please create a support ticket via our portal Jira Service Management or send us an e-mail via support.hd@hda.fgov.be to report this documentation issue. Please do not forget to mention the URL of the page. We will then adjust the documentation as soon as possible. Thank you!2. MDM Field description - DB Model
2. MDM Field description - DB Model
3. Swagger API
3. Swagger APIThe Swagger API is available on the local installation of HD4DP2.0. Go to https://<hd4dp2_url>/proxy/api-docs.html.

Some API calls are password protected (S2S api). If you want access to this API, you can request the user/password by creating a ticket in our servicedesk.
Attention: The baseURL to be used has to following built: https://<hd4dp_url>/proxy
This documentation is being updated regularly. We try to provide as correct, complete and clear as possible information on these pages. Nevertheless, if you see anything in the documentation that is not correct, does not match your experience or requires further clarification, please create a support ticket via our portal Jira Service Management or send us an e-mail via support.hd@hda.fgov.be to report this documentation issue. Please do not forget to mention the URL of the page. We will then adjust the documentation as soon as possible. Thank you!4. Postman collection
4. Postman collectionPostman collection HD4DP2.0 can be downloaded here.
Attention: The baseURL to be used has the following built: https://<hd4dp_url>/proxy
This documentation is being updated regularly. We try to provide as correct, complete and clear as possible information on these pages. Nevertheless, if you see anything in the documentation that is not correct, does not match your experience or requires further clarification, please create a support ticket via our portal Jira Service Management or send us an e-mail via support.hd@hda.fgov.be to report this documentation issue. Please do not forget to mention the URL of the page. We will then adjust the documentation as soon as possible. Thank you!HD4DP v2 CSV Upload
HD4DP v2 CSV UploadGeneral description of the CSV Upload
The CSV Upload functionality in HD4DP v2.0 is designed for bulk record uploads and facilitates the submission of data by making use of CSV files. Each row in such file corresponds to a single record. Hence, multiple records can be included in a single CSV for efficient data submission.
For uploading a csv file, the data provider needs to drop this file at a specific location on the own installation. This pick-up location is identical for all registries. The file will then be picked up and processed periodically. The file should be “final”, meaning that no application is writing to them.
Additionally, pre-registry processing relies on adherence to a specific naming convention for the CSV files.
A technical explanation of the CSVUploader and its architecture can be found further down this page.
Training
In order to make users familiar with preparing csv files for upload, we have organized a training of which the recording is shared with you below.
Below you can review the HD4DP v2 CSV Upload training organized by healthdata.be:
Architecture
The CSVUploader is located under hd-connect/csvuploader. It uses both hd-connect-csvuploader and hd-connect-proxy modules.
The general architecture of the CSVUploader is explained in the sequence diagram below.

Third-party libraries and frameworks
- Apache Camel: https://camel.apache.org/
- Spring Boot
Testing and working
- The CSVUploader creates a folder at root level (SFTP for end-user, or hd-all for developer) that contains a subfolder per existing organization.
- The CSVUploader will poll with a delay of 1 min, process the csv file and then create 3 folders:
- ARCHIVE folder: contains the source csv file.
- RESULTS folder: contains the results of processing the csv file. This file contains the specified data, and the final status of the processing: Success or Error. If an error occurred, the error message is displayed. For multiple uploads, the result is added to the end of the result file each time.
- ERROR folder: this folder is created if the csv test file was not processed, due to an I/O error (file corrupted, not found etc.). So for now, only technical errors are caught and the source csv file is moved to that folder instead of the ARCHIVE folder. In principle, this folder should contain any result that is an error. The RESULT folder should only contain results that end with a SUCCESS status.
Formats
Some formats are specific. In addition to this, detailed information about the codes and the formats used for the Author group, NISS code, status, Postal Code, "Date" - "Date:Time", repeatable fields and multiple choice fields are available here.
CSV Upload data submission for registries
CSV Upload data submission for registriesData submission procedure in Architecture 2 using CSV Upload
1. Preparing the csv file
- Extract the requested data from the electronic patient files and/or other local databases.
- Mapping of the data according to the fields and formats as described in the DCD specifications of this section and the general code lists.
- Go here for additional information on the codes and the formats used for the Author group, NISS code, Status, "Date" - "Date:Time", Repeatable fields and Multiple choice.
- Make sure the name of the csv test file(s) has the correct format (see Examples below):
HD_DCD_submcsv_HDBPnumber_HDBPabbreviation_versionnumber_versionreleasedate - An alternative method for migrated projects would be to export the csv file from Architecture 1 and to manually add the additional fields that are required in Architecture 2. (see Additional fields below, if applicable
- Please use UTF-8 encoding when uploading your CSV
Disclaimer: The example files are only provided as a guideline and do not contain real life data.
2. Uploading the csv file
Step 1: Open the sftp tool like WinSCP

Step 2: Get the credentials (Host name, Port number, User name and Password) from the IT department of the Data Provider, to log on to the sftp server located on the Data Provider side. In case the credenials are unavailable we advise you to request your credentials through our service portal at the Jira Service Management (JSM) Portal via the Request something tab and subsequently the Request for Information box.
Step 3: Fill in the credentials into the Login screen and click on Login to be able to access the different upload folders:
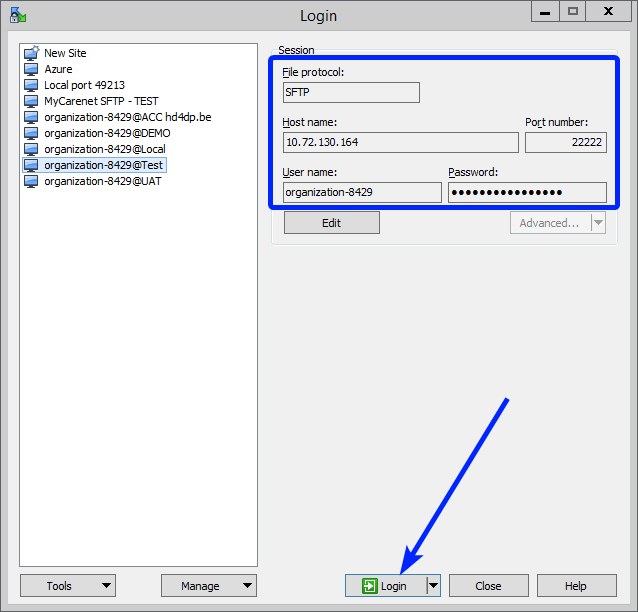
Note: a warning might be given, just click on Update
Now the CSV Upload folder structure is displayed on the right-hand side panel. You will notice draftcsv folders and submcsv folders for the diverse HD business projects. Historically, a directly submitted csv file would end up in the submitted folder, whereas a csv file featuring ‘draft’ in the status field would have ended up in the draft folder. At this stage there is no real distinction between both folders, so you can save the csv file in either of them.
Attention: If you wish to create a draft to work on at a later stage, don’t forget to add ‘draft’ in the status column of the csv file.
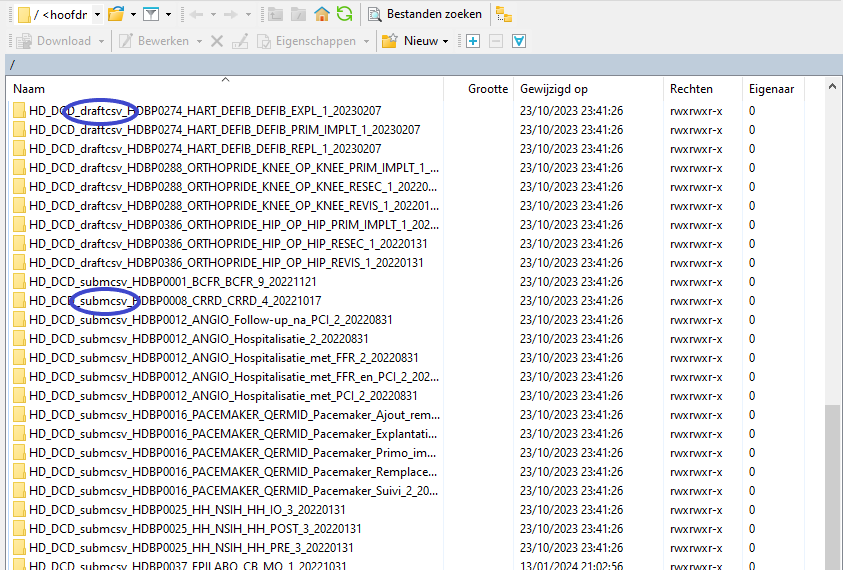
Below documentation contains generic example screens with the sole purpose to demonstrate how the process looks like. In the subsequent screens the desired register needs to be selected.
Step 4: Select the desired folder and open it by double-clicking on it:

Step 5: Now go to the folder on the left-hand side panel where the csv file to be uploaded is located:

Step 6: Drag the csv file to be uploaded from the left-hand side panel into the folder on the right-hand side panel:

Step 7: Wait until the polling system of the CSV Uploader has picked up the CSV file and has processed it.
Once the csv file has been processed it will disappear from the folder, when the page is manually refreshed!

3. Validating CSV Upload
Once the csv file has been processed, 3 folders will be created (if they haven't been created already) in the DCD folder:
- ARCHIVE (after a csv file has been processed, the original csv file will be saved in this folder)
- RESULT (when the csv file is placed in this folder, it means that the csv file has been processed, a file will be created (or appended, if the file already existed) with the result of the upload of the csv file).
All the errors that are described in this file are business related, which means that they are technically correct, but in violation with the business rules or contain wrong values for that field. - ERROR (when the csv file is placed in this folder, it means that a technical error has occurred like the csv file contained erroneous formatting. The csv file won't get processed and an error file will be created with the errors and reason why the csv file couldn't be processed)
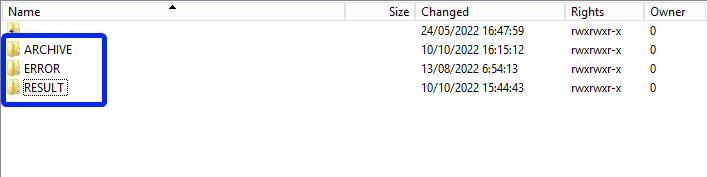
3.1 Validation of the csv upload via sftp tool:
Step 1: Double-click on the ERROR folder to open it, click on the refresh button and verify that there is no error file present.

Step 2: Return to the DCD folder. Now double-click on the RESULT folder to open it, click on the refresh button and verify that the result file is present.

Step 3: Double-click on the result file to open it.
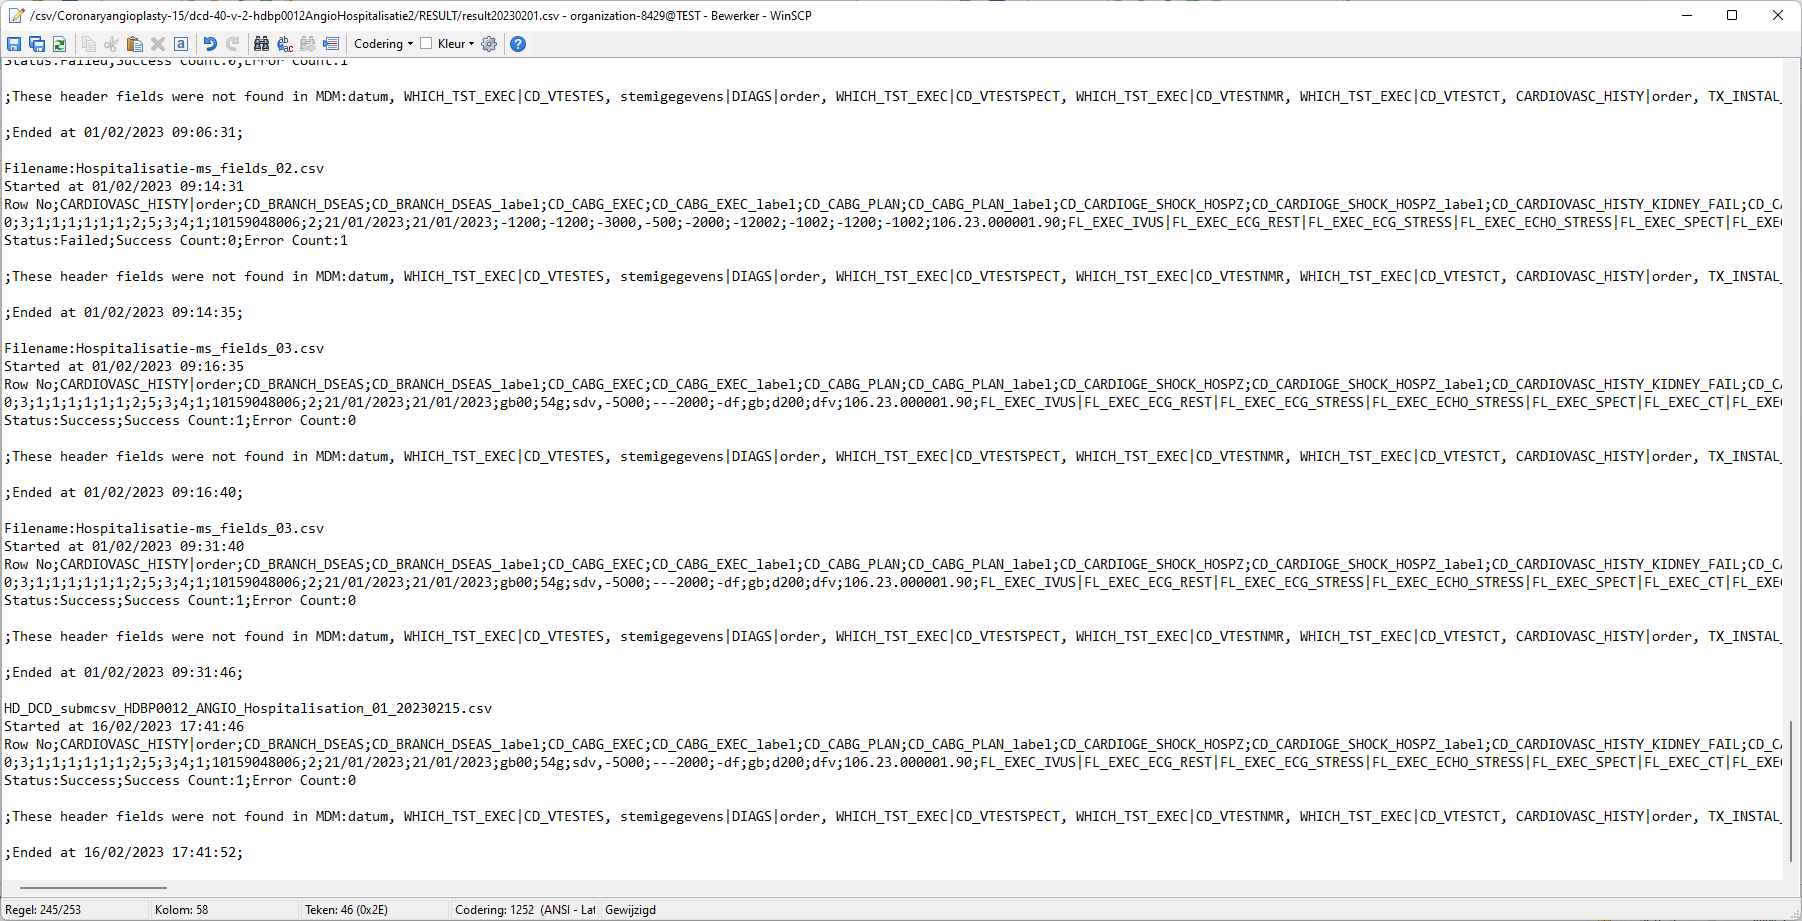
Step 4: If there are multiple records in the result file, scroll to the entry of the current csv upload by looking at the upload date (Started at dd/mm/yyyy hh:mm).
Verify the result file that the upload was successful by searching for the word SUCCESS and having a look at the Status. This Status must contain: Success;Success Count:1;Error Count:0
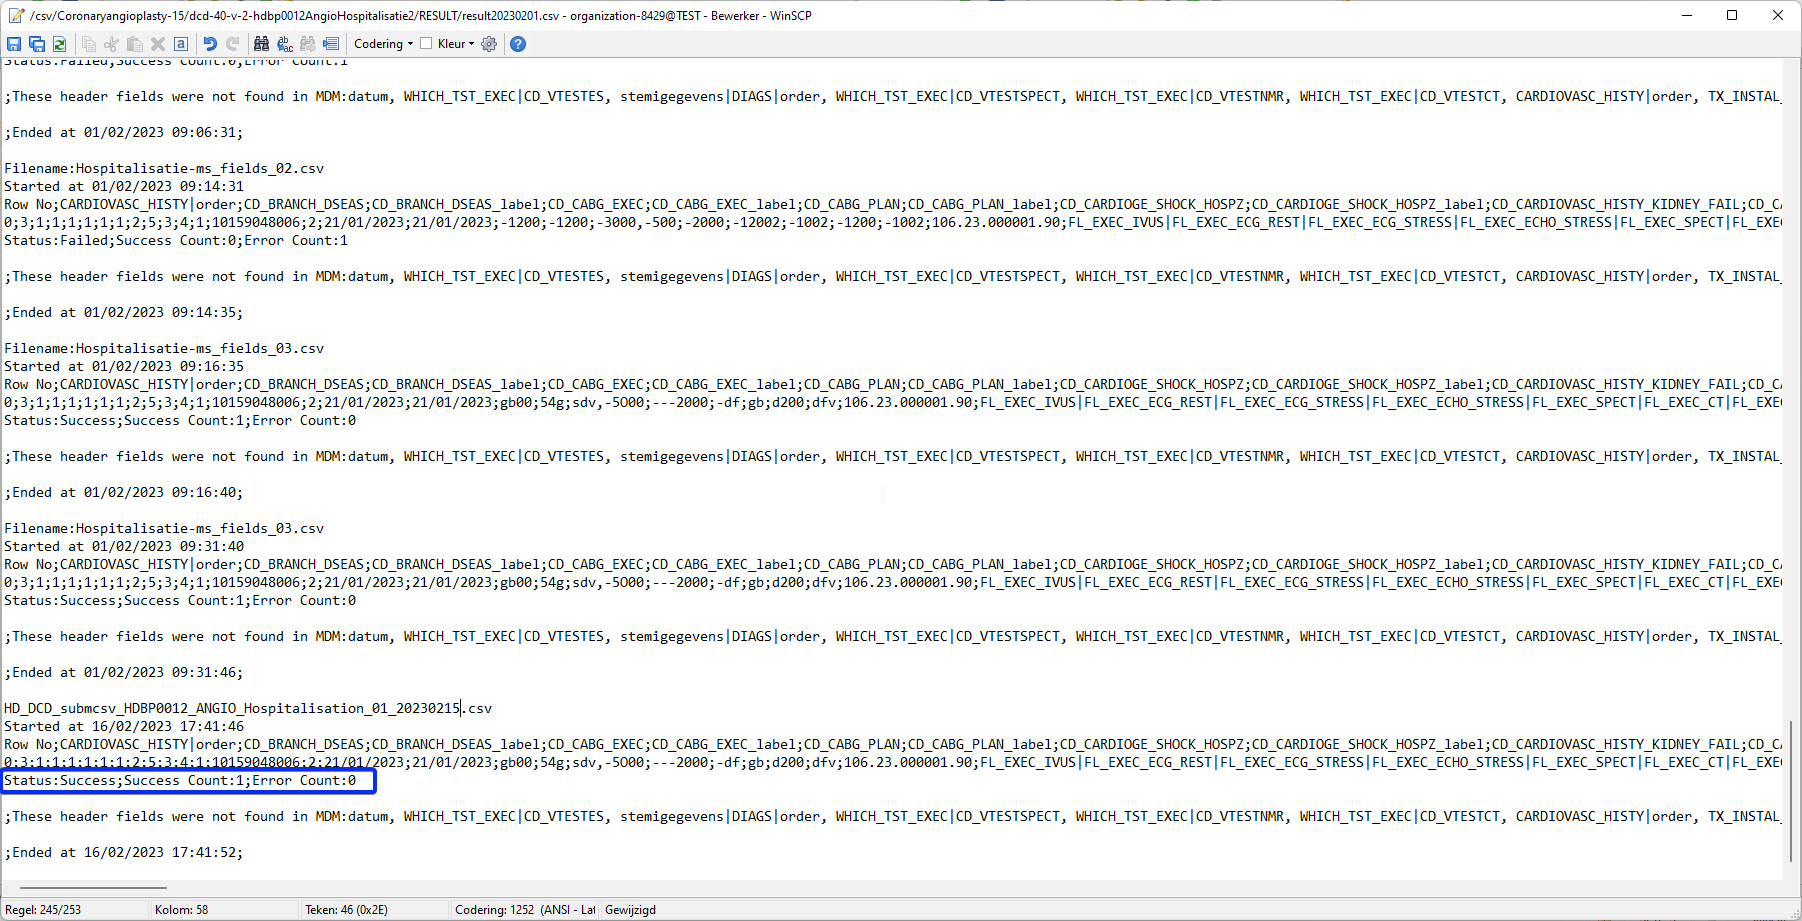
3.2 Validation of the csv upload via HD4DP 2.0:
Step 1: Open the HD4DP 2.0 web application.
Step 2: Select the organization in the dropdown list and click on Volgende (Next)
Step 3: Fill in the username and password, that has been provided by your IT Department or Healthdata team, and click on Log in to access the HD4DP v2.0 application.
Step 4: Navigate in the menu on the left-hand side panel to the desired study program:
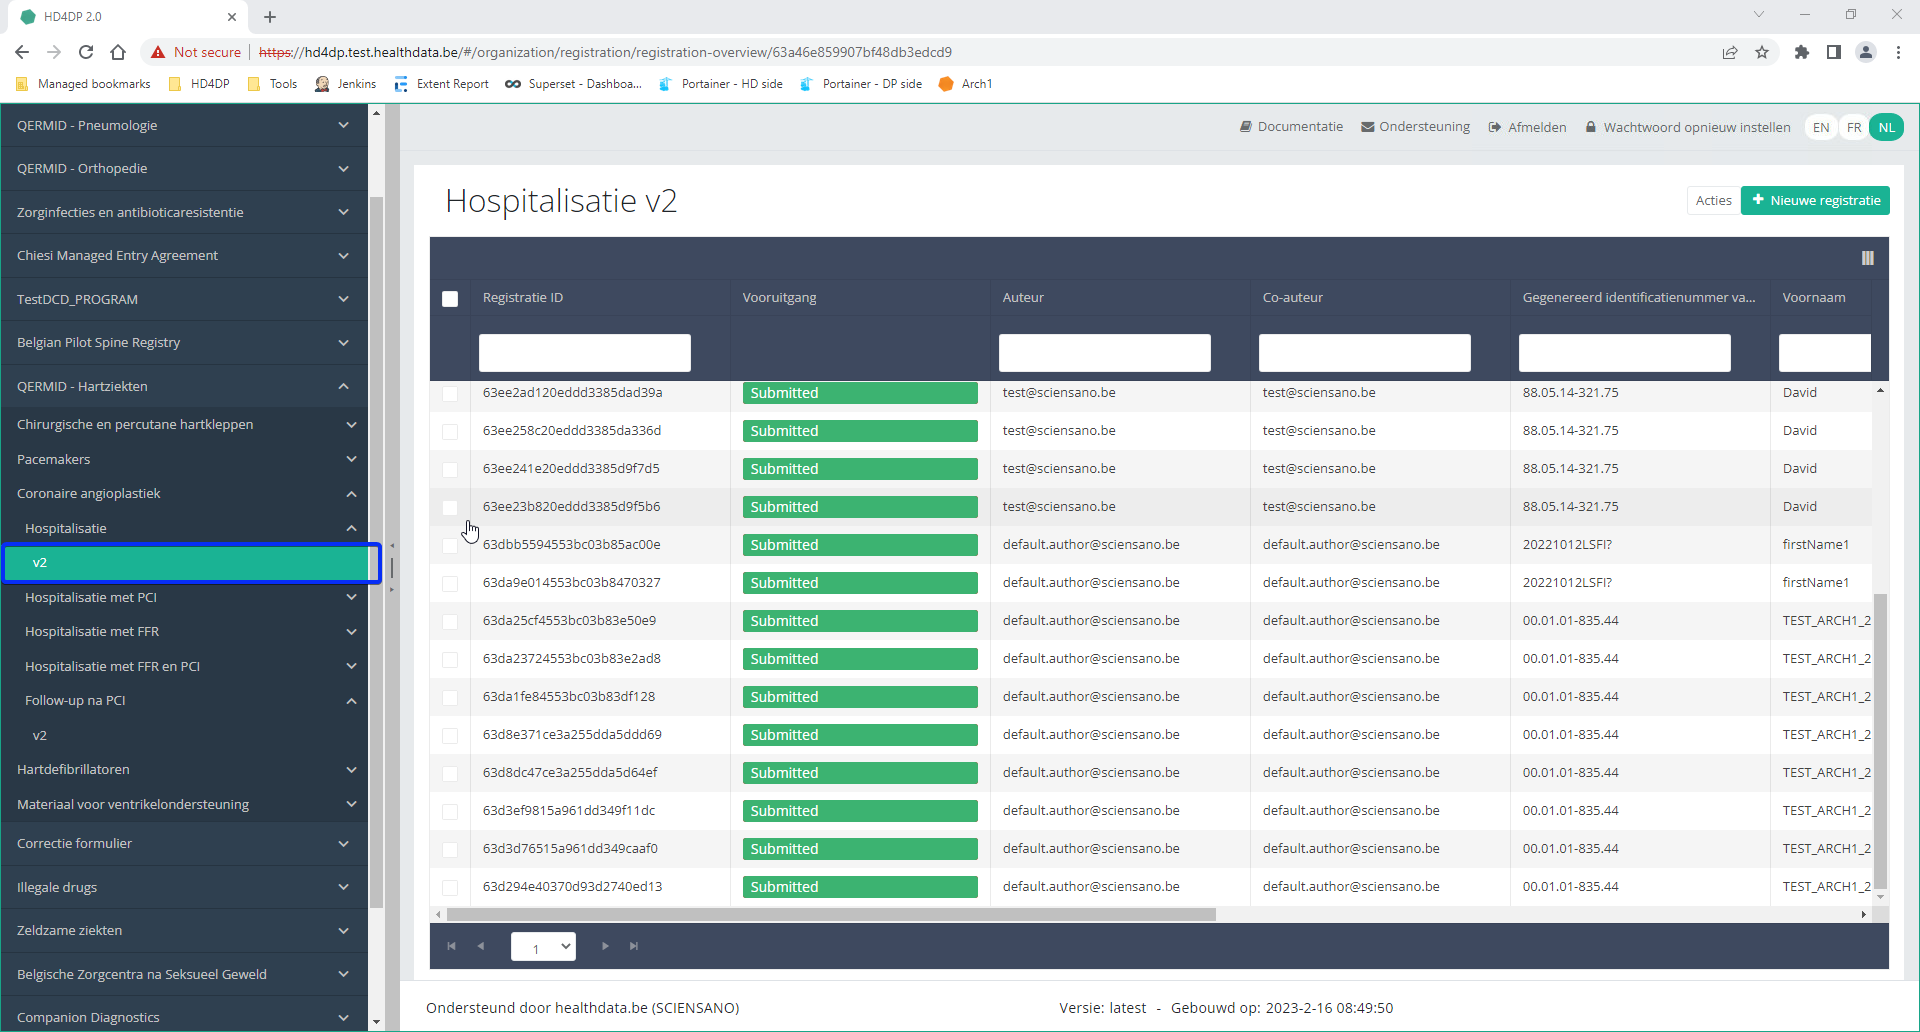
Step 5: Check that the uploaded registration(s) is/are displayed in the overview table.
This documentation is being updated regularly. We try to provide as correct, complete and clear as possible information on these pages. Nevertheless, if you see anything in the documentation that is not correct, does not match your experience or requires further clarification, please create support ticket via our portal (https://healthdatabe.atlassian.net/servicedesk/customer/portals) or send us an e-mail via support.healthdata@sciensano.be to report this documentation issue. Please, do not forget to mention the URL or web address of the page with the documentation issue. We will then adjust the documentation as soon as possible. Thank you!Additional field information for CSV and API
Additional field information for CSV and APITable of contents
Additional field information for S2S API
Author group, Author and Coauthor
When the values for Author Group, Author and Coauthor have been left out in the json file, the default values for Author group, Author and Coauthor will be used automatically.
In order to create a record with the desired Author Group, Author and Coauthor, the following fields TX_AUTHOR_GR, TX_AUTHOR and TX_COAUTHOR must be added to the json file with their respective values.
Example:

Note:
The Author group, Author and Coauthor must exist and are well configured at the back-end of the system. TX_AUTHOR_GR can be a string that identifies the Author group to which this Author belongs. Commonly, the first name and last name are used to identify the TX_AUTHOR_GROUP. Be sure to avoid leading and trailing spaces when entering the Author group value.
Submitting a Record Requiring Manual Intervention in HD4DP
In order to submit a record requiring a manual intervention in HD4DP before submission, you need to add the key STATUS (all upper case) with the value "draft" to the record as follows:
"STATUS": "draft",
If the status is sent as "draft", a record is created allowing further completion and/or validation before submission. In case of a successful submission the user receives a HTTP 202 (Accepted) notification with an empty business key, e.g.:

If the status key is not sent, the default value "submit" is used. The user performs a complete submission, and in case of a successful submission the user receives a HTTP 202 (Accepted) notification with a business key, e.g.:

Note that a record with "draft" status needs to be sent, when it needs completion and approval in HD4DP. The status "submit" is not necessary when performing a complete submission.
In the HD4DP front-end, the difference is that the draft submission has the status open while the complete submission has the status submitted:

Once the draft is submitted in the front-end, the business key is generated and the process completed.
SSIN code formatting
Adding separators to a SSIN code
It is not necessary to add separators in a SSIN code when uploading a file using S2S API. You can fill out the SSIN code both with or without separators. E.g.: 85.04.02-169.32 or 85040216932.
Example:
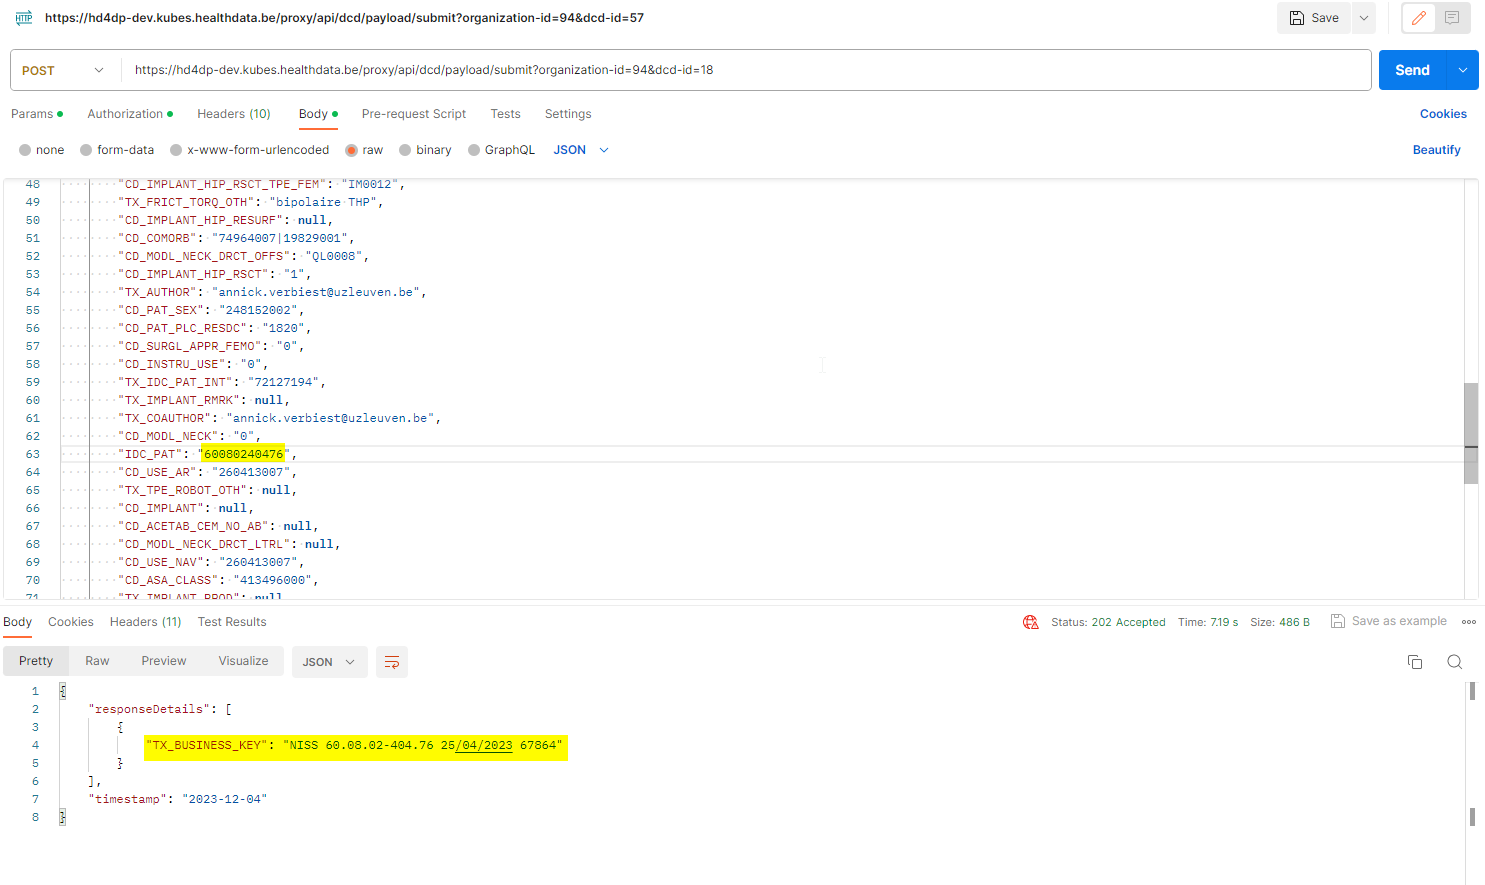
Formatting of 'Date' and 'Date:Time'
The correct format for a field reporting the Date is "dd/mm/yyyy".
Example:

The correct format for a field reporting the Date:Time is "dd/mm/yyyy:hh:mm:ss".
Example:

Formatting of repeatable fields
In the DCD specifications, some fields or block of fields may be defined as repeatable. In that case, the values have to be separated by a comma (",").
Example:
    "TX_TTL_IMPLANT_DATA": [
        {
            "CD_IMPLANT": "127909",
            "CD_PAC_SADMI_NOTIFIC": "000017811475",
            "CD_IMPLANT_CAT": "",
            "CD_IMPLANT_PRD_NM": "",
            "TX_IMPLANT_PRODUC": "",
            "TX_IMPLANT_DSTRBTR": "",
            "TX_IMPLANT_DESC": ""
        },
        {
            "CD_IMPLANT": "127910",
            "CD_PAC_SADMI_NOTIFIC": "",
            "CD_IMPLANT_CAT": "127906",
            "CD_IMPLANT_PRD_NM": "productnaam",
            "TX_IMPLANT_PRODUC": "fabrikant",
            "TX_IMPLANT_DSTRBTR": "verdeler",
            "TX_IMPLANT_DESC": "opmerking product"
        }
    ],
Formatting of multiple choice
In some DCD specifications, some fields are defined as multiple choice. In that case, multiple values can be selected and need to be separated by a pipe ("|").
Example:

Additional field information for CSV Upload
Author group, Author and Coauthor
When the values for Author Group, Author and Coauthor have been left out in the csv file, the default values for Author group, Author and Coauthor will be used automatically.
In order to create a record with the desired Author Group, Author and Coauthor, the following fields TX_AUTHOR_GR, TX_AUTHOR and TX_COAUTHOR must be added to the csv file with their respective values.
Example:TX_AUTHOR_GR;TX_AUTHOR;TX_COAUTHORTest group;test@sciensano.be;test@sciensano.be
Note:
The Author group, Author and Coauthor must exist and are well configured at the back-end of the system. TX_AUTHOR_GR can be a string that identifies the Author group to which this Author belongs. Commonly, the first name and last name are used to identify the TX_AUTHOR_GROUP. Be sure to avoid leading and trailing spaces when entering the Author group value.
Submitting a Record Requiring Manual Intervention in HD4DP
In order to submit a record requiring a manual intervention in HD4DP before submission, you need to do add the field name 'STATUS' in capitals in an additional column, and add the value 'draft'. If not, the record will be submitted without manual intervention.

SSIN code
Adding separators to a SSIN code
It is not necessary to add separators to a SSIN code when uploading a file using CSV Upload. You can fill out the SSIN code both with or without separators. E.g.: 85.04.02-169.32 or 85040216932.
Example:

Formatting of 'Date' and 'Date:Time'
The correct format for a field reporting the Date is dd/mm/yyyy.
Example:

The correct format for a field reporting the Date:Time is "dd/mm/yyyy:hh:mm:ss".
Example:

Formatting of repeatable fields
In the DCD specifications, some fields or block of fields may be defined as repeatable. In that case, manually enter the repeatable fields as shown in the following template: field_category|<index>|field.
The values have to be separated by a semi-colon (";").
Example:
- Fields:
Transplants
Repeatable 1:
transplant_status
Repeatable 2:
transplant_status
- Formatting:
transplants|0|transplant_status;transplants|1|transplant_status

4;6- as presented in the DCD:

- as presented in the form:

Formatting of a multiple choice
In some DCD specifications, some fields are defined as multiple choice. In that case, the selected values can be reported separately by means of the pipe symbol (|), e.g. 68452|68453|68454.
- Example:
cftr_modulating_therapy_1
1|2|3|4|5|6- as presented in the DCD:

- as presented in the form:

Other formatting
- Boolean: true / false
- Codes: the value of the code (not the translation)
- CSV file name: HD_DCD_submcsv_HDBPnumber_HDBPabbreviation_versionnumber_versionreleasedate
This documentation is being updated regularly. We try to provide as correct, complete and clear as possible information on these pages. Nevertheless, if you see anything in the documentation that is not correct, does not match your experience or requires further clarification, please create support ticket via our portal (https://healthdatabe.atlassian.net/servicedesk/customer/portals) or send us an e-mail via support.healthdata@sciensano.be to report this documentation issue. Please, do not forget to mention the URL or web address of the page with the documentation issue. We will then adjust the documentation as soon as possible. Thank you!HD4DP v2 MyCareNet
HD4DP v2 MyCareNetHD4DP v.2 permits the administrative obligation of reporting to the insurance institutions. The limited necessary data are sent via HD4DP v2 to the MyCarenet interface of the National Intermutualistic College (NIC). This transmission of nominative data occurs in parallel with the transmission of pseudonymized data to the healthdata.be platform.
Two options are available to enable the transmission of data from HD4DP v.2 to the National Intermutualistic College (NIC):
Only for the following DCDs a message will be sent to MyCareNet:
- 'DEFIB_ELECT',
- 'DEFIB_PRIM_IMPLT',
- 'DEFIB_REPL',
- 'MVO_IMP',
- 'OP_HIP_PRIM_IMPLT',
- 'OP_HIP_RESEC',
- 'OP_HIP_REVIS',
- 'OP_KNEE_PRIM_IMPLT',
- 'OP_KNEE_RESEC',
- 'OP_KNEE_REVIS',
- 'OP_MP_PRIM_IMPLT',
- 'OP_MP_RESEC',
- 'OP_MP_REVIS',
- 'PITTER',
- 'QERMID_Pacemaker_ Remplacement',
- 'QERMID_Pacemaker_Ajout_remplacement_electrode',
- 'QERMID_Pacemaker_Primo_implantation',
- 'SPIN_SURG',
- 'TAVI_IMPLT',
- 'ZEPHYR_PRIM_IMPLT',
- 'ZEPHYR_REPLAC',
This documentation is being updated regularly. We try to provide as correct, complete and clear as possible information on these pages. Nevertheless, if you see anything in the documentation that is not correct, does not match your experience or requires further clarification, please create a support ticket via our portal (https://healthdatabe.atlassian.net/servicedesk/customer/portals) or send us an e-mail via support.healthdata@sciensano.be to report this documentation issue. Please, do not forget to mention the URL or web address of the page with the documentation issue. We will then adjust the documentation as soon as possible. Thank you!Option 1: XML export for MyCareNet component of HCO
Option 1: XML export for MyCareNet component of HCOThis configuration is by default active in HD4DP v.2. The XML files can be downloaded with an SFTP client of your choice. The XML files you download can be sent with the MyCareNet component available in your organization. You can attach the XML files to the Web Service call to MyCareNet and sign the message with your eHealth P12 certificate. The XML files are ready for use, thus contain the required fields. There is no additional edit required.
SFTP Connection
The server name and the SFTP credentials can be requested via our Service Portal
- Server: IP of HD4DP v.2 server
- Port: 22
- Username: (your SFTP credentials)
- Password: (your SFTP credentials)
- Path: /data/localsftp/upload/nippin (Upload is the home directory of the sftp user)

Deze documentatie wordt regelmatig bijgewerkt. We proberen de informatie zo correct, volledig en zo duidelijk mogelijk weer te geven. Als u desondanks iets in de documentatie ziet dat niet correct is, niet overeenkomt met uw ervaring, of verdere verduidelijking vereist, maak dan een support ticket via ons portaal Jira Service Management of stuur ons een e-mail via support.hd@hda.fgov.be om dit documentatieprobleem te melden. Vergeet niet de URL van de pagina te vermelden. Wij zullen de documentatie dan aanpassen. Bedankt!Option 2: MyCareNet integration in HD4DP v2
Option 2: MyCareNet integration in HD4DP v2Three major actions are required in order to setup MyCareNet in HD4DP v.2:
- Whitelisting URLs
- Upload eHealth certificate in HD4DP v.2
- Provide eHealth password to make the interface work with NIC/CIN.
Whitelist URL
The following URLs must be whitelisted to communicate with MyCareNet and E-health. Without a direct connection from HD4DP v.2 server to these URLs, a registration to MyCareNet will not work.
https://prod.mycarenet.be:9443/*
https://services.ehealth.fgov.be/*
Create certificate with labels
This part requires your organization's eHealth certificate. Create a certificate that has the name ehealth_certificate.p12 using the open source GUI KeyStore Explorer. Download and install the tool from https://keystore-explorer.org/
- Open KeyStore Explorer, and create a new KeyStore

2. Select the type of the new KeyStore: PKCS#12

3. In the menu bar go to Tools -> Import Key Pair
4. Select the type of key pair import required:
5. Browse the Ehealth NIHII-HOSPITAL P12 certificate and fill in the Decryption Password

6. mport the PKCS #12 Key Pair and give it the NIHII number as alias, ex 71001129
7. Click OK and give it a password that needs to be same for all imported certs in the P12 KeyStore
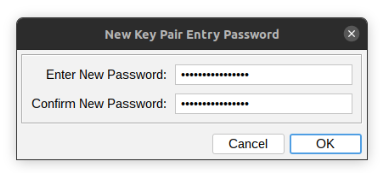
8. The Key Pair is imported successfully

9. Repeat step 3 to 8 to add more NIHII-HOSPITAL P12 certificates to this KeyStore
10. In the menu bar go to File -> Save All
11. Set the KeyStore Password and give it a password that needs to be same for all certs
12. Click OK and save the KeyStore as ehealth_certificate.p12

13. Click save and the P12 for HD4DP is created
Upload certificate
The filename of your P12 certificate must be ehealth_certificate.p12
Server: IP of HD4DP v. 2 server
Username: (your SFTP credentials)
Password: (your SFTP credentials)
Path: /data/localsftp/upload (home directory of thesftpuser)
File: ehealth_certificate.p12
The server name and the sftp credentials can be requested via our Service Portal. The password of your P12 certificate can be delivered to Healthdata either via a secure password sharing tool of your choice or via Belnet Filesender to hd-architecture-2@sciensano.be. You can request a Belnet Filesender voucher via our Service Portal as well.
Deze documentatie wordt regelmatig bijgewerkt. We proberen de informatie zo correct, volledig en zo duidelijk mogelijk weer te geven. Als u desondanks iets in de documentatie ziet dat niet correct is, niet overeenkomt met uw ervaring, of verdere verduidelijking vereist, maak dan een support ticket via ons portaal Jira Service Management of stuur ons een e-mail via support.hd@hda.fgov.be om dit documentatieprobleem te melden. Vergeet niet de URL van de pagina te vermelden. Wij zullen de documentatie dan aanpassen. Bedankt!Nippin validation
Nippin validationScope
To support the Data Provider with the validation of the MyCarenet message, every night a CSV file is generated with the latest MyCareNet message information.
NexuzHealth hospitals are not able to validate this.
Requirements
The data provider needs access to the sftp folder of HD4DP2.0.
Request the credentials if you did not receive this in our support portal: Jira Service Management
Server: IP of HD4DP v. 2 server
Username: (your SFTP credentials)
Password: (your SFTP credentials)
Path: /data/localsftp/upload (home directory of the user)
Output
Example output CSV file:
head -n2 output.csv
localdwh_id,localdwh_created_on,localdwh_registration_code,localdwh_register,nippin_message,nippin_interface_type,nippin_status,nippin_created_on,nippin_payload_after_validation,nippin_postresponse_tack_reference,result
16686,2024-06-18T06:38:01.449820+00:00,206.24.000214.88,OP_KNEE_PRIM_IMPLT,208f3aab-c97a-4ea0-aa70-6cba5e23ce72,REST,SENT,2024-06-18T06:38:01.938909+00:00,,11b7aeb0-4e41-496c-a9f0-8e506744b064,urn:nip:tack:result:major:success,valid
Interface type
| Interface type | Info |
| FILE_SYSTEM | HD4DP2.0 is configured with option 1 (DP will deliver the xml files to mycarenet) |
| REST | HD4DP2.0 is configured with option 2 (HD4DP2.0 will deliver the xml files to mycarenet) |
Status
| Status | Info |
| valid | A valid status means the payload looks okay and the nippin_status is SENT or TO_SEND. |
| invalid | An invalid status means the payload is wrong and the nippin_status is INVALID or ARCHIVED. The issue needs to be investigated by healthdata.be. Please create a ticket in our support portal. |
| not_found | No nippin message was created for the localdwh message. The issue needs to be investigated by healthdata.be. Please create a ticket in our support portal. |
| not_sent | This status is used when a payload is not able to be delivered to MyCareNet. The communication problem needs to be resolved and the messages need to be resend to MyCareNet. Please create a ticket in our support portal. |
Architectuur 2.5
Architectuur 2.5 Bart.Servaes do, 11/16/2023 - 16:37Uniformed naming convention
Uniformed naming conventionDe inhoud van deze pagina is enkel beschikbaar in het Engels. Selecteer de EN knop in de rechterbovenhoek van het scherm om de pagina te openen.
Sending code values instead of code IDs in S2S requests
Sending code values instead of code IDs in S2S requestsDe inhoud van deze pagina is enkel beschikbaar in het Engels. Selecteer de EN knop in de rechterbovenhoek van het scherm om de pagina te openen.
MDM Mapping of billing codes for MyCareNet
MDM Mapping of billing codes for MyCareNetDe inhoud van deze pagina is enkel beschikbaar in het Engels. Selecteer de EN knop in de rechterbovenhoek van het scherm om de pagina te openen.
Databases
Databases Bart.Servaes vr, 05/24/2024 - 17:23Project data ophalen uit de lokale database van HD4DP v2
Project data ophalen uit de lokale database van HD4DP v2De inhoud van deze pagina is enkel beschikbaar in het Engels. Selecteer de EN knop in de rechterbovenhoek van het scherm om de pagina te openen.
Nippin database
Nippin databaseDe inhoud van deze pagina is enkel beschikbaar in het Engels. Selecteer de EN knop in de rechterbovenhoek van het scherm om de pagina te openen.
Online Acceptance Environment (OACC) voor HD4DP v2
Online Acceptance Environment (OACC) voor HD4DP v2De inhoud van deze pagina is enkel beschikbaar in het Engels. Selecteer de EN knop in de rechterbovenhoek van het scherm om de pagina te openen.
Toegang aanvragen
Toegang aanvragenDe inhoud van deze pagina is enkel beschikbaar in het Engels. Selecteer de EN knop in de rechterbovenhoek van het scherm om de pagina te openen.
Support service HD4DP v2
Support service HD4DP v2De Service Desk van healthdata.be (Sciensano) helpt gebruikers van onze applicaties en diensten en behandelt verzoeken en problemen wanneer deze zich voordoen.
De Service Desk richt zich op de diensten van onze IT Services (HD4DP, HD4RES, healthstat.be,…) en helpt u met accounts en wachtwoorden. Voor vragen over de inhoud en doelstelling(en) van de projecten verwijzen we graag naar de beherende onderzoeksorganisaties.
Voor een zo efficiënt mogelijke afhandeling van uw aanvraag adviseren wij u gebruik te maken van ons supportportaal: Jira Service Management (JSM)
Hieronder vindt u onze openingstijden van onze servicedienst:
Support ticket aanmaken
Support ticket aanmakenDe dienst healthdata.be (Sciensano) behandelt elke melding van een incident volgens een Standard Operating Procedure (SOP). Een publieke versie van deze SOP "HD Incident Management Process" is ook beschikbaar op deze docs.healthdata.be portaal.
Om een incident te melden met betrekking tot de registers en applicaties die in productie zijn, en gefaciliteerd of beheerd worden door de service healthdata.be van Sciensano, dient u eerst in te loggen op het HD Service- en Supportportaal: Jira Service management (JSM).
Meer informatie over het aanvragen van een account vindt u hier.
Na de inlogstap komt u op de hoofdpagina van het portaal.
Om een ticket te starten, selecteer "Create a Support ticket"

U ziet dan de onderstaande pagina. Zodra u alle verplichte velden hebt ingevuld, klikt u op “Send”.

Suggest improvement
Suggest improvementTo suggest improvement about the healthdata.be platform, you first need to log in to the HD Service and Support portal: Jira Service Management (JSM).
More info concerning how to request an account is available here.
After the login step, you will arrive at the main page of the portal.
If you have questions, remarks or if you would like to submit a complaint, you can do so by clicking on the "Suggest improvement" button on the main page of the Jira Service Management portal.

On this page you need to fill in all the mandatory fields and click on "Send".

Release notes
Release notes9 april 2024
Pacemaker fix voor nippin in productie gezet
- De status van de ongeldige berichten (INVALID) in de Nippin database bijwerken naar archief (ARCHIVED), omdat er nieuwe berichten worden aangemaakt
- Voor elke ongeldige (INVALID), of nu gearchiveerde (ARCHIVED) Pacemaker-gegevensset in de database moet een nieuwe record met de status TO_SEND of SENT worden aangemaakt
29 februari 2024
Whitelisting van URL om problemen met de registratiecode te voorkomen
- URL toegevoegd voor whitelisting: https://*.npmjs.org/*
18 oktober 2023
Uniforme naamgevingsconventie
- Naar aanleiding van de release van Architectuur 2.5 is een Uniform naming convention ingevoerd.
Codewaarden in plaats van code-ID's verzenden
- Naar aanleiding van de release van Architectuur 2.5 worden Code values verzonden in plaats van code-ID's.
MDM mapping van facturatiecodes voor MyCarenet
- Naar aanleiding van de release van Architecture 2.5 is een MDM Mapping van Billing codes for MyCarenet met 13 karakters geïmplementeerd
27 juli 2023
Whitelisting van URL om werking EAM mogelijk te maken
- URL toegevoegd voor whitelisting: https://eam-production.servicebus.windows.net/*
Aanpassing poort om werking EAM mogelijk te maken
- TCP 5671, 5672 en 443: eam-production.servicebus.windows.net: HTTPS en AMQP 1.0
Aanpassing poort om werking HERA mogelijk te maken
- TCP 2222: hera-dc.healthdata.be