HD4DP v.1 (Health Data for Data Providers)
HD4DP v.1 (Health Data for Data Providers)HD4DP v1 is een lokale applicatie die door healthdata.be (Sciensano) werd ontwikkeld en op de infrastructuur van uw organisatie of op deze van uw partnerorganisatie is geïnstalleerd. De applicatie laat toe gegevens te extraheren uit het primaire systeem en deze aan een of meer gegevensverzamelingen toe te wijzen.
De lokale HD4DP v1 applicatie is toegankelijk via een webbrowser zoals Internet Explorer of Chrome. De link is specifiek in elke organisatie en bevindt zich op de server waarop de applicatie draait.
Vragen die niet kunnen worden beantwoord met de data uit de primaire systemen, kunnen handmatig worden beantwoord in ‘vooraf ingevulde’ formulieren. Het doel is om zoveel mogelijk vooraf ingevulde elementen in zoveel mogelijk documenten te plaatsen.
Zodra de registraties volledig zijn, kunnen de gegevens worden overgedragen naar het centrale dataplatform healthdata.be. Voor deze overdracht maakt HD4DP v1 verbinding met de eHealth messaging software van de gegevensverstrekker. De documenten worden centraal beheerd via metadata.
De toegang tot de HD4DP v1 applicatie wordt hier beschreven.
Algemene beschrijving van de applicatie HD4DP v1
Algemene beschrijving van de applicatie HD4DP v1De applicatie HD4DP stelt gegevensverstrekkers in staat gegevens te verzamelen.
Het medisch beroepsgeheim wordt beschermd op verschillende niveaus en door middel van principes als codering, versleuteling en beheer van de toegang van gebruikers. De combinatie van deze elementen garandeert een zogenaamde 'end-to-end beveiliging'.
Tijdens het verzamelen van data, wat door deze applicatie gebeurt, worden alle gegevens veilig (=geanonimiseerd) doorgegeven aan Sciensano, met gebruik van e-health box:
- De gegevensverstrekker ontvangt nooit de gecodeerde identificatiegegevens
- eHealth heeft nooit toegang tot medische gegevens of metadata
- Healthdata.be ontvangt nooit de originele identificatiegegevens, maar kan wel verschillende registraties bij elkaar brengen
Beschrijving van de dataflow in HD4DP v1
Beschrijving van de dataflow in HD4DP v1Below we describe (high level) the dataflow between the data provider and the healthdata.be platform.
Step 1. (Automatic) data export from systems of data provider towards HD4DP v1 and prefill of forms if not complete.

Step 2. Manual registration (de novo or completion) of data in form component of HD4DP v1.

Step 3. Transfer of patient identifiers and registry data from HD4DP v1 towards eHBox messaging client of HCO (HCO UM/EM)
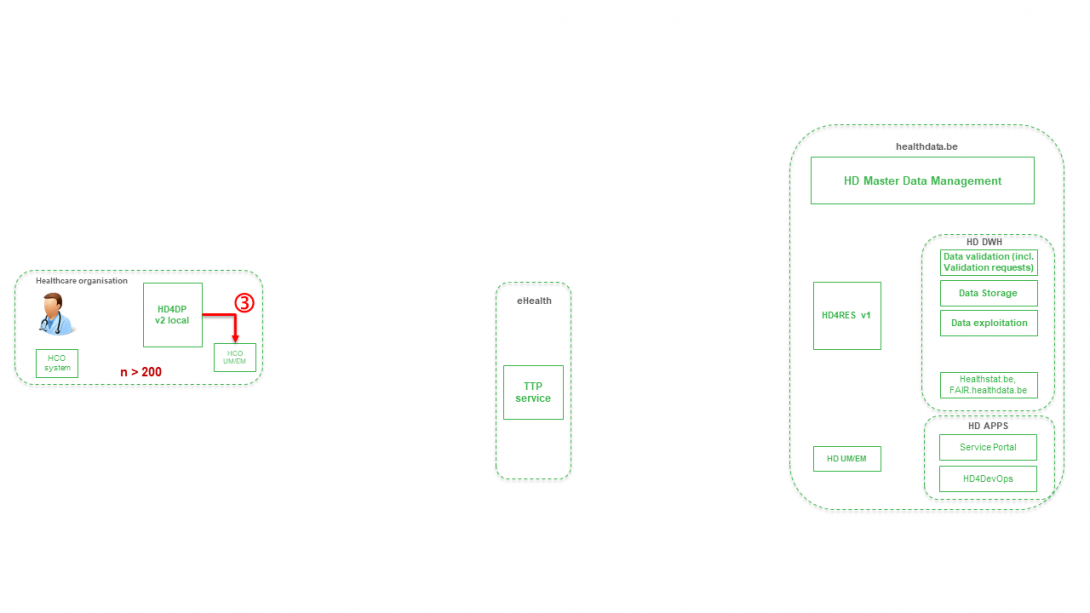
Step 4. Transfer of patient identifiers and registry data from eHBox messaging client of HCO (HCO UM/EM) towards TTP service of eHealth.

Step 5. Transfer of pseudonymized patient identifiers and registry data from TTP service of eHealth towards eHBox messaging client of HD (HD UM/EM)

Step 6. Transfer of pseudonymized patient identifiers and registry data from eHBox messaging client of HD (HD UM/EM) to HDRES v1

Step 7. Transfer of pseudonymized patient IDs and registry variables from HD4RES v1 towards Data Validation environment on HD DHW.

Hoofdmenu van de HD4DP v1 applicatie
Hoofdmenu van de HD4DP v1 applicatieIn de volgende bookpagina's vindt u een gedetailleerde beschrijving van de HD4DP v1 gebruikersinterface.
Het tabblad Deelname
Het tabblad DeelnameHet is mogelijk dat de vragen die in een register worden gesteld, na verloop van tijd veranderen: nieuwe vragen worden toegevoegd, andere vragen raken verouderd. Maar ook de lijst van mogelijke antwoorden voor een bepaalde vraag kan veranderen.
Om met deze veranderingen rekening te houden, werkt de applicatie HD4DP met versies voor een registratieformulier. Per datacollectie (bijv. die van 2015) kan slechts één versie actief zijn.
Het tabblad Deelname geeft meer informatie over de verschillende versies die bestaan voor een bepaald register en laat u toe te beheren aan welke versie(s) u werkt.
- Selecteer 'Deelname' in het hoofdmenu om naar het tabblad Deelname van het register te gaan
- Selecteer het gewenste register in het keuzemenu. In het linkervenster zijn de meest recente versies van het registratieformulier voor elke datacollectie zichtbaar:
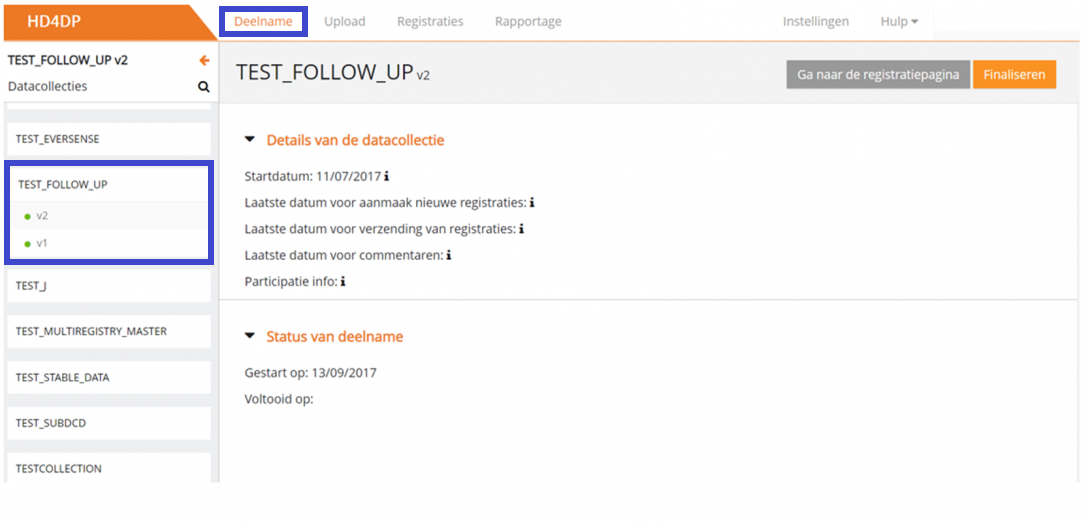
Na het selecteren van een versie krijgt de gebruiker in het rechtervenster een overzicht van de geschiedenis en de huidige status van het register aan de hand van secties en kerndata. De gebruiker heeft de mogelijkheid om het verslag te bekijken of het verzamelen van de data af te ronden met behulp van de actieknoppen.
Secties
De verschillende versies zijn opgesplitst in 3 secties:
- Deelnemend: toont de versies van de registratieformulieren waaraan een gebruiker momenteel actief deelneemt. Normaal gesproken zou dit slechts één versie mogen zijn
- Beschikbaar voor deelname: andere beschikbare versies voor een gebruiker
- Om te beginnen met deelnemen aan deze versie, zie het artikel Deelnemen aan een datacollectie
- Voltooid: alle versies voor het register waarin uw organisatie heeft aangegeven dat u klaar bent met datacollectie voor een bepaalde datacollectiesronde (Datacollectie afronden)
Kerndata
Met het selecteren van een versie door erop te klikken, krijgt een gebruiker meer informatie over bepaalde kerndata zoals bepaald door de registerverantwoordelijke:
- Startdatum: vanaf deze datum is dit registratieformulier beschikbaar voor activering door de gegevensverstrekkers. Na activering kunnen nieuwe registraties worden aangemaakt
- Laatste datum voor aanmaak nieuwe registraties: vanaf deze datum is het niet meer mogelijk om nieuwe registraties aan te maken met dit registratieformulier. Het indienen en/of corrigeren van bestaande registraties blijft wel mogelijk
- Laatste datum voor verzending van registraties: vanaf deze datum is het niet meer mogelijk om registraties in te dienen. Het is alleen nog mogelijk om bestaande registraties te corrigeren en deze registraties in te dienen
- Laatste datum voor commentaren: de datacollectie is niet meer actief en er kunnen geen correcties meer worden aangebracht
Actieknoppen
Merk op dat er twee knoppen zijn:

- Ga naar de registratiepagina
- Finaliseren
Het tabblad Upload
Het tabblad UploadHet uploadcenter heeft als doel het uploaden van meerdere registraties performanter en gebruiksvriendelijker te maken. Het uploadcentrum is beschikbaar onder het tabblad Upload.
Bij het uploaden van registraties worden
- de naam van het geüploade bestand,
- de status en de visuele weergave van de status,
- het aantal verwerkte records,
- de wijze van uploaden,
- de naam van de gebruiker, en
- de datum van uploaden
op het hoofdscherm van het uploadcentrum weergegeven. Dit moet de gebruiker een snel en visueel overzicht bieden van de gegevens die in bulk zijn geüpload via het uploadcentrum.

Het integrale uploadproces van het uploadcentrum vindt u hier hier.
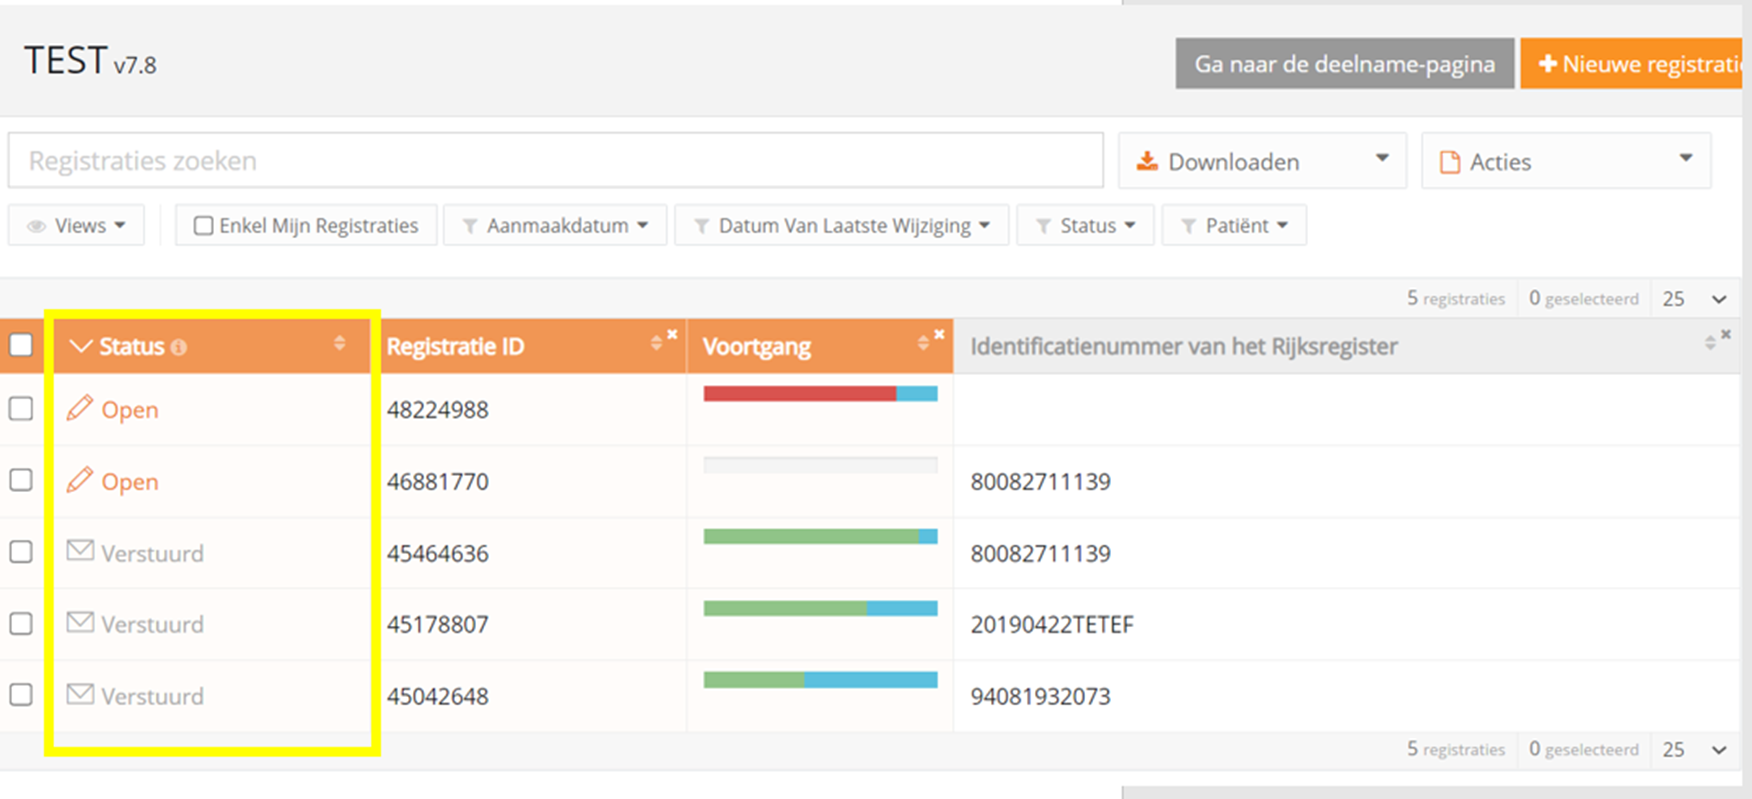
Het tabblad Registraties
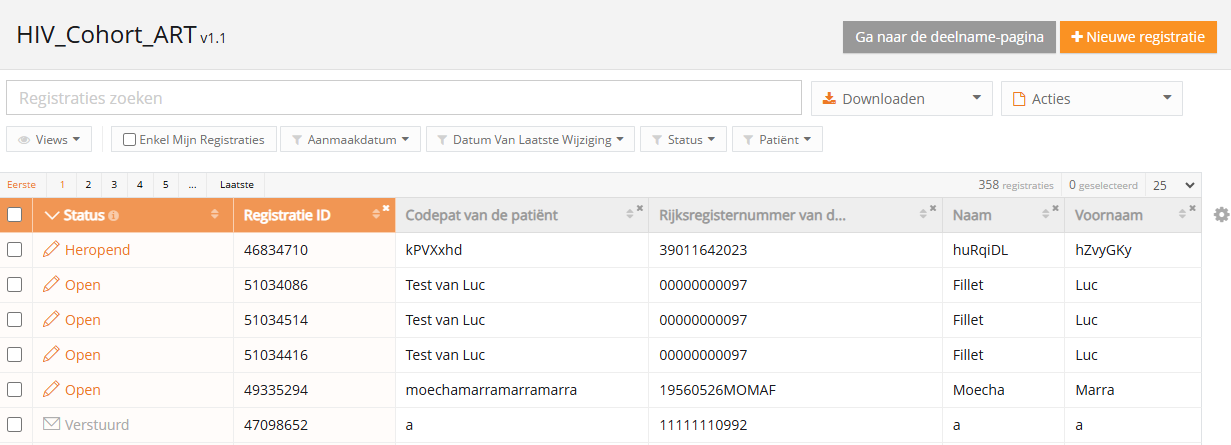
Het tabblad RegistratiesHet tabblad Registraties leidt een gebruiker naar de bestaande registers. Een gebruiker kan vanuit deze weergave beginnen met het verzamelen van data.

Zie ook 'Een registratie creëren en indienen'.
Lijstweergave aanpassen
Lijstweergave aanpassenDit artikel legt uit hoe een gebruiker de lijstweergave in HD4DP kan aanpassen. De lijst wordt getoond in de standaard lijstweergave. De lijstweergave kan eenvoudig worden aangepast aan de behoeften van de gebruiker. Dit zijn de belangrijkste acties om de lijstweergave aan te passen:
- Sorteren
- Filteren
- Weergegeven kolommen
- Aantal registraties per pagina
Sorteren
Door eenvoudigweg op een kolomkop te klikken, worden alle registraties oplopend of aflopend gesorteerd op basis van deze kolom.

Filteren
Er zijn voorgedefinieerde filters om te filteren op de meest gebruikte kolommen.
Klik op 'Verwijder filters' om alle registraties opnieuw weer te geven.

Weergegeven kolommen
Voor elk register heeft de onderzoeker een standaard-view gedefinieerd die uit een reeks kolommen bestaat. Om deze set kolommen weer te geven, klikt u op 'Herstel standaard-view', zoals hieronder geïllustreerd.

U kunt alle kolommen toevoegen en verwijderen. Terwijl kolommen kunnen worden verwijderd door op de 'x' rechtsboven elke kolom te klikken, gebeurt het toevoegen van kolommen via het 'tandwielpictogram' rechts van de tabel.

Een interessante kolom om aan het overzicht toe te voegen is de Voortgangsbalk waar u de status van elke registratie kunt zien. De balk geeft de status van de velden weer, d.w.z. geldig, ongeldig of optioneel.

Aantal registraties per pagina
Het aantal registraties dat per pagina wordt weergegeven, kan 10, 25, 50 of 100 bedragen.

Deelnemen aan een datacollectie
Deelnemen aan een datacollectie- Ga naar het tabblad Registraties en selecteer de versie waaraan u wilt deelnemen

- Klik op de knop "Ga naar de deelname-pagina":

Klik op de knop Neem deel:

- Klik op vervolgens op Ga naar de registratiepagina

Het tabblad Rapportage
Het tabblad RapportageHet tabblad 'Rapportage' van het menu leidt naar de website healthstat.be. Klik hier voor de betreffende documentatie op het HD documentatieportaal.

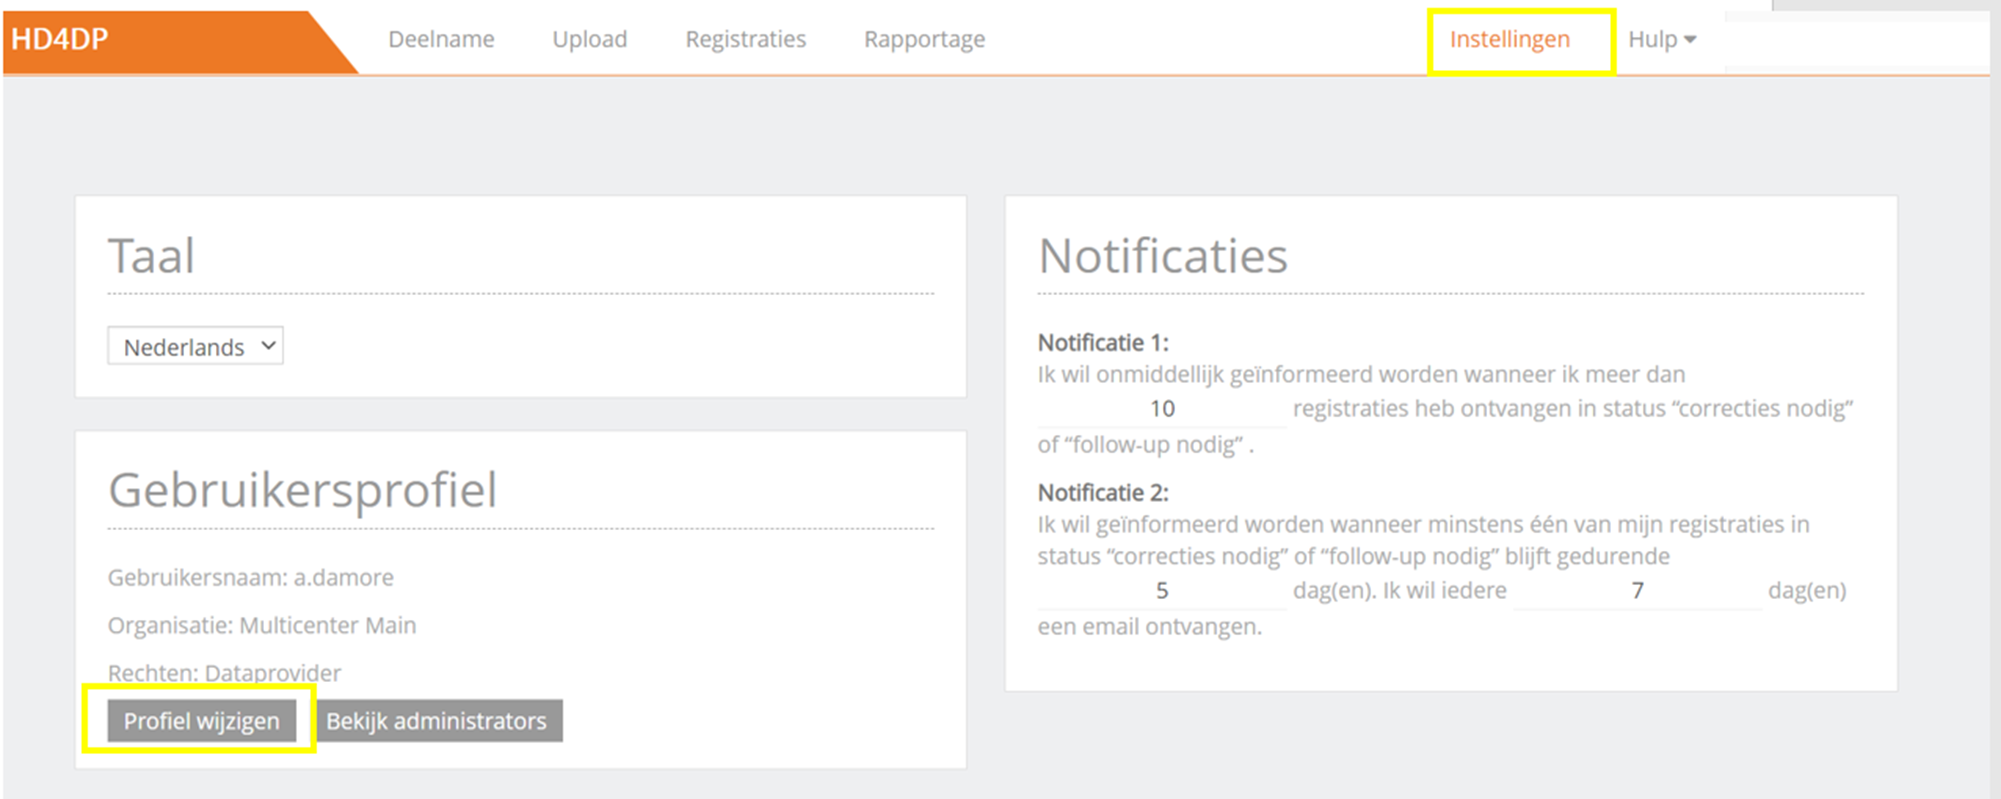
Het tabblad Instellingen
Het tabblad InstellingenUw wachtwoord wijzigen
Het wachtwoord van een gebruikersaccount kan door de gebruiker worden gewijzigd in de accountinstellingen:
- Selecteer Instellingen in de rechterbovenhoek
- Selecteer Profiel wijzigen

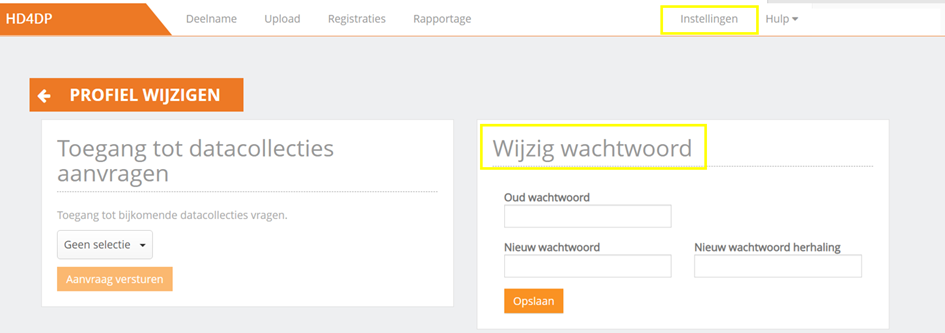
- Wijzig het wachtwoord in het pop-upvenster Wijzig wachtwoord
- Druk op de knop Opslaan

Taal wijzigen
De taalinstellingen kunnen worden gewijzigd voor HD4DP:
- Log in met uw account en wachtwoord
- Selecteer Instellingen in de rechterbovenhoek
- Selecteer de gewenste taal in de keuzelijst:
- Engels
- Frans
- Nederlands

Het Hulpmenu
Het HulpmenuHet menu 'Hulp' in de rechterbovenhoek kan u helpen bij het gebruik van de applicatie HD4DP.

Het menu 'Hulp'
In het menu 'Hulp' kunt u kiezen uit de volgende onderwerpen: 'Paginagids', 'Support' en 'Contact support'.
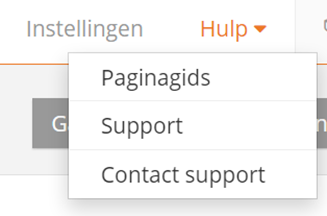
Paginagids
Deze wizard helpt bij het verkennen van de applicatie. Het geeft meer informatie over de mogelijkheden binnen de applicatie. Klik op 'volgende' om naar de volgende functie te gaan.

Support
Kies 'Support' om te worden doorverwezen naar de ondersteuningspagina van Healthdata. Artikelen over het gebruik van HD4DP vindt u hier.
Gebruik de zoekbalk voor een specifiek artikel. Voer een sleutelwoord in en de gerelateerde artikelen worden getoond.

Contact support
Als u in het menu 'Contact' selecteert, wordt u eerst verzocht om uw vraag te stellen, om tna te gaan of het antwoord nog niet in onze ondersteuningsartikelen staat.

U kunt natuurlijk altijd een e-mail met uw vragen rechtstreeks naar support.healthdata@sciensano.be sturen.
Gebruikershandleiding van de applicatie HD4DP v1
Gebruikershandleiding van de applicatie HD4DP v1 Adelaide.DAmore di, 11/22/2022 - 09:43Toegang tot de applicatie HD4DP v1
Toegang tot de applicatie HD4DP v1Om toegang te krijgen tot de applicatie HD4DP v1 hebt u een account, een gebruikersnaam en een wachtwoord nodig. Als u geen account hebt, kunt u er een aanvragen door de onderstaande stappen te volgen. Als u een account hebt, volg dan de instructies vanaf 'Aanmelden' aan het einde van deze pagina.
- Open de link voor de applicatie HD4DP v1. Het volgende scherm wordt geopend:
Neem contact op met uw IT-afdeling om de link naar de HD4DP v1-applicatie op de server van uw organisatie te verkrijgen. Mocht u daar geen hulp kunnen krijgen, dan kunt u contact opnemen met healthdata.be via support.hd@hda.fgov.be om de link te verkrijgen. De link is voor elke organisatie uniek en hangt af van de server waarop de HD4DP-applicatie draait.
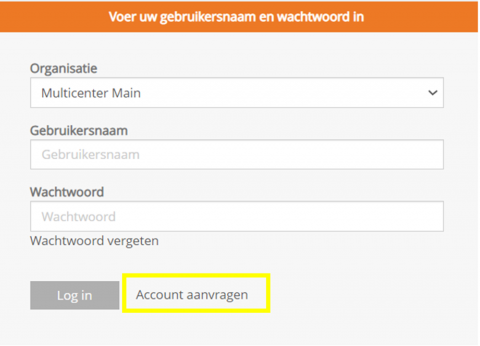
- Klik op de link Account aanvragen op de inlogpagina
- Vul het aanvraagformulier in:
○ Vul een gebruikersnaam, voornaam, familienaam en e-mailadres in
○ Selecteer de organisatie en de datacollectie(s)
○ Vul het veld Email van aanvrager in als een persoon een account aanvraagt voor een derde persoon
○ Druk op de knop Aanvraag om de aanvraag in te dienen
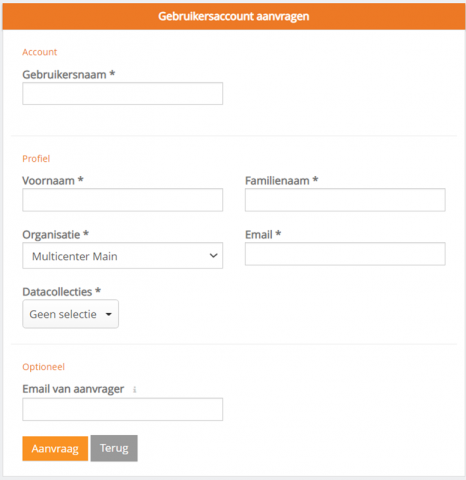
- Bevestigingsmails worden gestuurd naar de persoon voor wie de account is aangevraagd, alsook naar de aanvrager, indien het veld 'Email van aanvrager' is ingevuld
- De goedkeuring of afwijzing van de gebruikersaccount wordt per e-mail bevestigd. Afhankelijk van uw organisatie kan dit een paar uur duren.
- Deze actie wordt uitgevoerd door een HD4DP v1 beheerder in uw organisatie
- De bevestigingsmail zal alle nodige informatie bevatten om in te loggen
Aanmelden
Aanmelden bij de HD4DP v1 applicatie gaat in 3 stappen:
- Vul uw gebruikersnaam en wachtwoord in de daarvoor bestemde velden in
- Selecteer de juiste organisatie
- Klik op "Log in"

Toegang tot een datacollectie aanvragen
Toegang tot een datacollectie aanvragen- Ga naar uw Instellingen in de rechterbovenhoek van het scherm
- Selecteer Profiel wijzigen
- Open het keuzemenu in de sectie Toegang tot datacollecties aanvragen
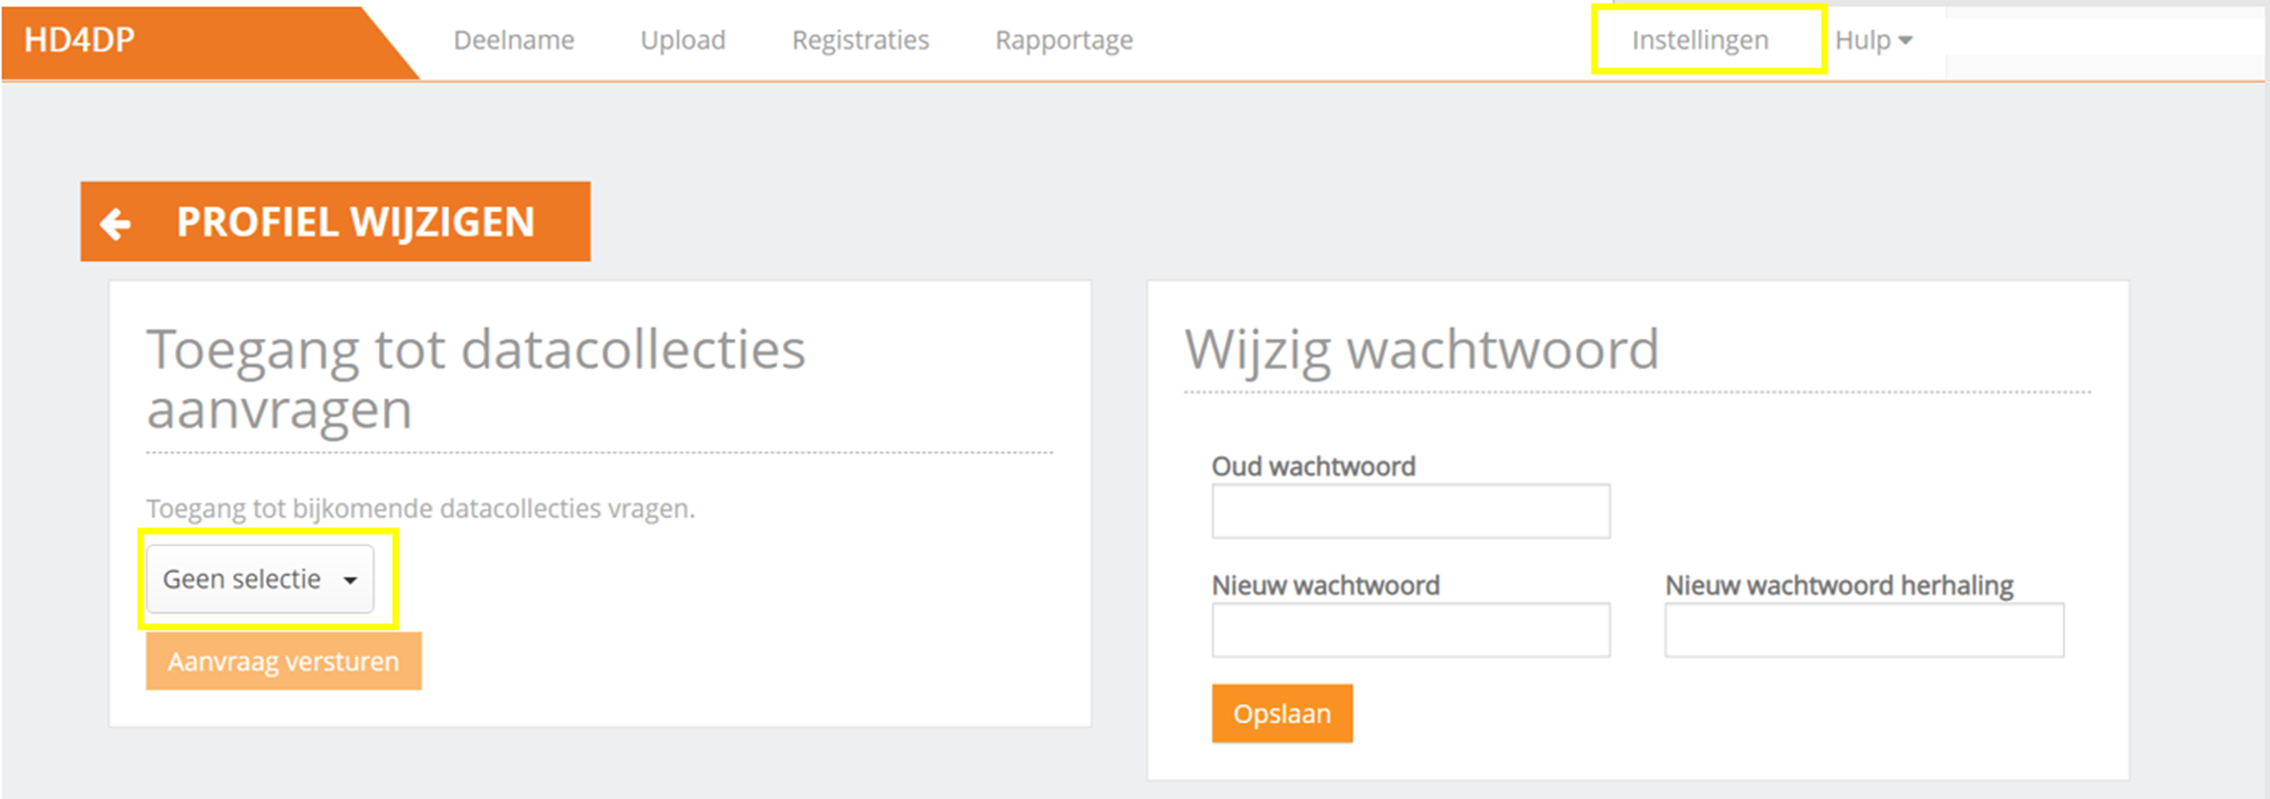
- Selecteer de gewenste datacollectie
- Verstuur de aanvraag
- Er wordt een e-mail gestuurd naar de verantwoordelijke HD4DP beheerder om uw verzoek te behandelen
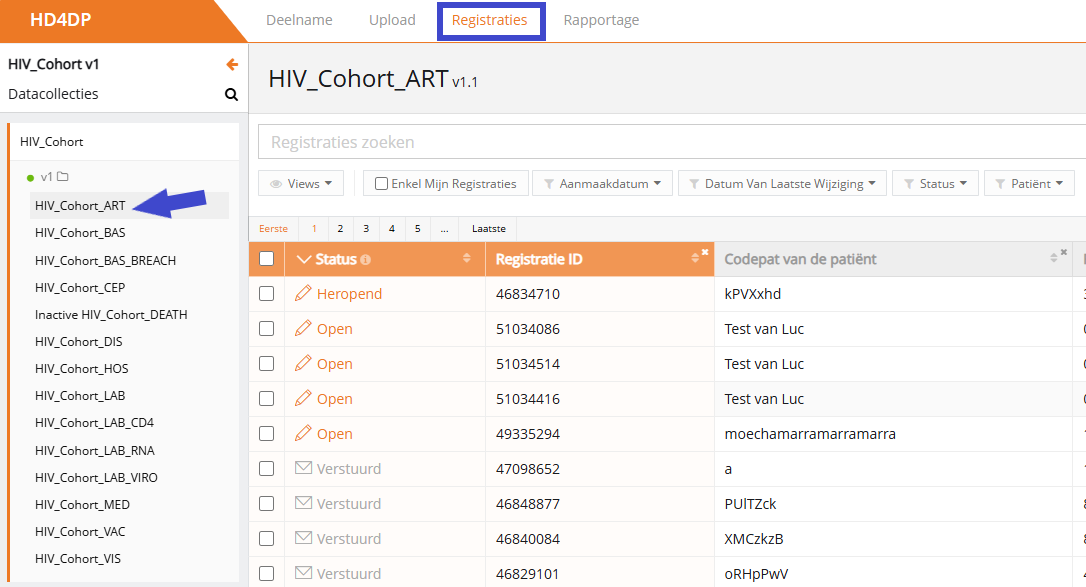
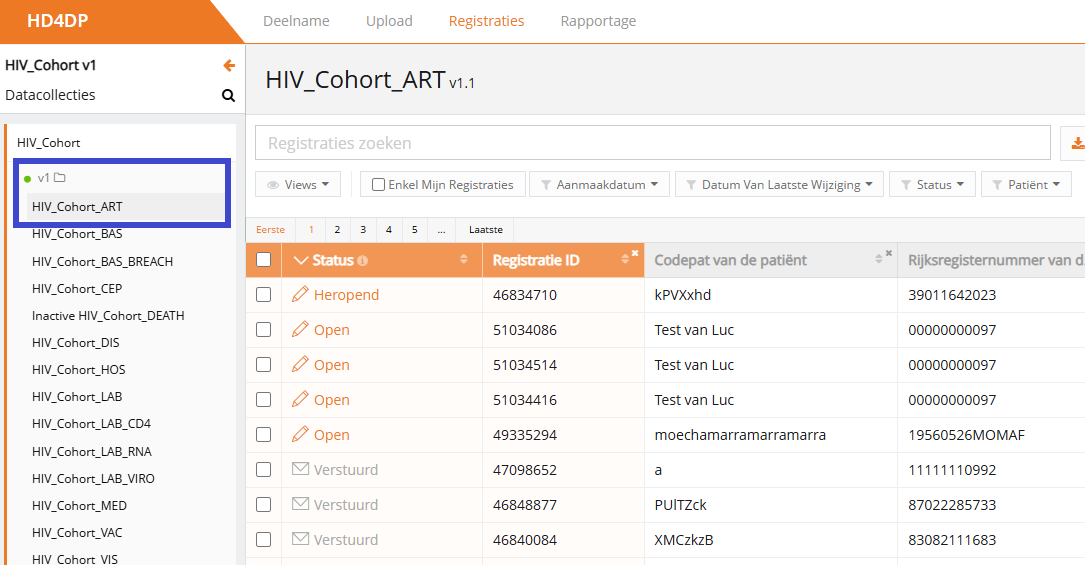
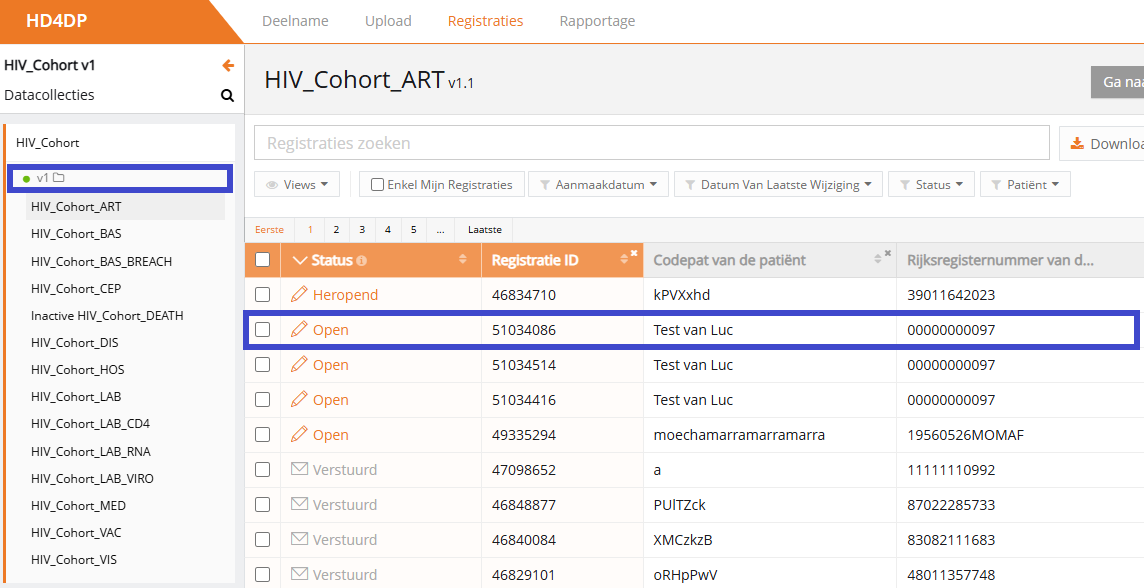
Een register selecteren
Een register selecteren- Selecteer het register om registraties te maken of te wijzigen. Klik op de linkerbovenhoek om een uitklapmenu weer te geven. U krijgt een lijst van beschikbare registers: Datacollecties (in dit artikel hebben we willekeurig het TEST v7 register geselecteerd)
- Selecteer de juiste versie van het register. In geval van verschillende versies/periodes selecteert u deze met het groene bolletje

Een registratie creëren en indienen
Een registratie creëren en indienenIn het tabblad Registraties ziet de gebruiker de beschikbare registers. Vanuit dit scherm kan een gebruiker dan een datacollectie starten.
Het creëren en verzenden van een registratie bestaat uit vier stappen:
- Selecteer het register waarvoor u een registratie wenst te creëren.
(De onderstaande documentatie bevat generieke schermafdrukken die enkel zijn bedoeld om het proces te beschrijven, ongeacht het betrokken register.)
- Klik op de knop Nieuwe registratie
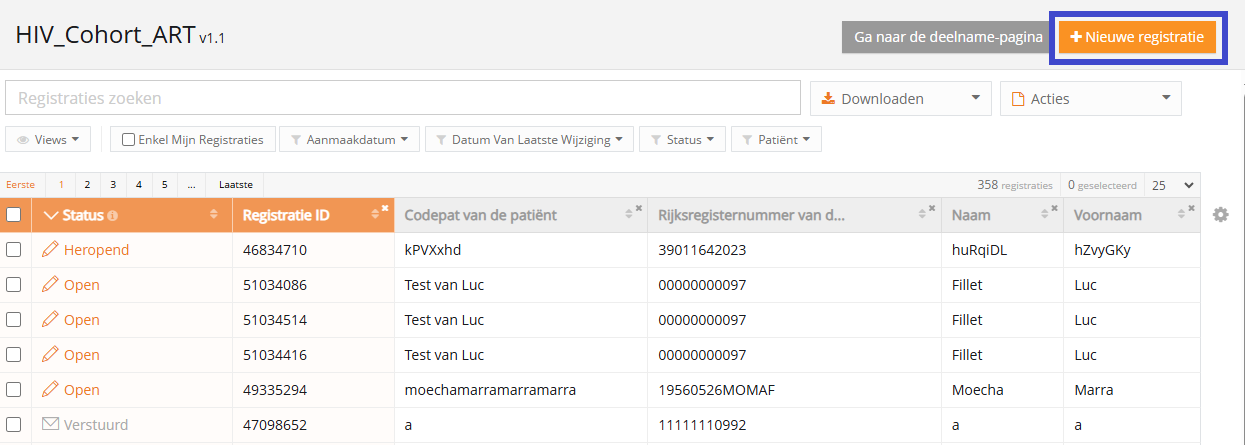
- Vul het registratieformulier in en gebruik volgende knoppen om de registratie op te slaan of te versturen

- Sla de registratie zo nodig tijdelijk op. De status van de record is Open voor opgeslagen registraties

- Verstuur de registratie indien er geen validatiefouten meer zijn. De status van de registratie verandert in In transit

- Wanneer de record is verwerkt, verandert de status in Verstuurd

Zodra een registratie verzonden is, verschijnt in de kolom van de bevestigingsstatus de melding Pending.
- Bij ontvangst van de registratie verschijnt de melding OK; als de registratie niet binnen de 48 uur is ontvangen, verschijnt de melding NOK. Bij de status 'NOK' zal de software tot 10 dagen na de initiële verzending automatisch proberen om de registratie te verzenden
- Voor de statussen In transit, Correcties nodig en Goedgekeurd is de statusbevestiging leeg, omdat de registratie nog niet is verzonden
- Een registratie kan eventueel Opnieuw geopend worden, zolang de status van de registratie 'Verstuurd' is
En registratie wijzigen of aanvullen
En registratie wijzigen of aanvullenEen gebruiker kan een registratie wijzigen en voltooien in vier stappen:
- Selecteer het register waarvan u een of meer registraties wenst te wijzigen
(De onderstaande documentatie bevat generieke schermafdrukken die enkel zijn bedoeld om het proces te beschrijven, ongeacht het betrokken register.)
- Klik op de registratie die moet worden gewijzigd, en vul het formulier volledig in. De status van de record is dan:
- Open voor registraties die handmatig werden opgeslagen of door een csv-bestand up te loaden
- Correcties nodig voor registraties met fouten
- Sla de registratie tijdelijk op indien nodig. De status van de record wordt Open voor opgeslagen registraties
- Verzend de registratie als er geen validatiefouten meer zijn
- De status van de registratie verandert in Verzenden bezig
- Wanneer de record is verwerkt, verandert de status in Verzonden
Zodra een registratie verzonden is, verschijnt in de kolom van de statusbevestiging de melding In behandeling.
- Bij ontvangst van de registratie verschijnt de melding OK; als de registratie niet binnen de 48 uur is ontvangen, verschijnt de melding NOK. Bij de status 'NOK' zal de software tot 10 dagen na de initiële verzending automatisch proberen om de registratie te verzenden
- Voor de statussen Verzenden bezig, Correcties noodzakelijk en Goedgekeurd is de statusbevestiging leeg, omdat de registratie nog niet is verzonden
- Een registratie kan eventueel Opnieuw geopend worden, zolang de status van de registratie 'Verzonden'
Een registratie verwijderen
Een registratie verwijderenAlleen registraties met de status 'open' en 'correcties nodig' kunnen worden verwijderd.
De volgende stappen zijn nodig om de registratie te verwijderen:
- Selecteer het register en de versie waarvoor u een registratie wilt verwijderen.
(De onderstaande documentatie bevat generieke schermafdrukken die enkel zijn bedoeld om het proces te beschrijven, ongeacht het betrokken register.)
- Selecteer de registratie(s) die u wilt verwijderen
- Selecteer de knop 'Acties' en kies de optie 'Registraties verwijderen'
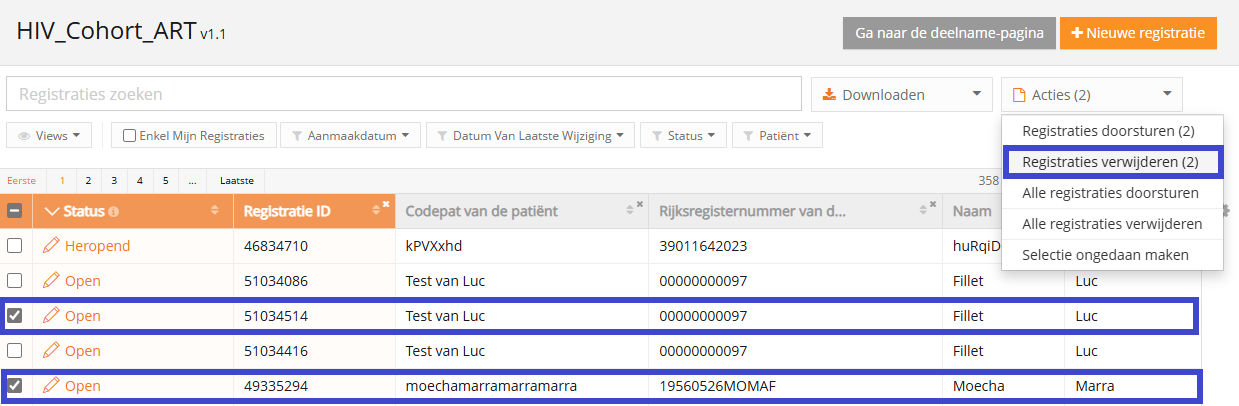
- Selecteer 'ja' om te bevestigen

Vertaald met https://www.deepl.com/Translator. Heeft u een fout opgemerkt? Neem dan contact met ons op via https://docs.healthdata.be/nl/contact
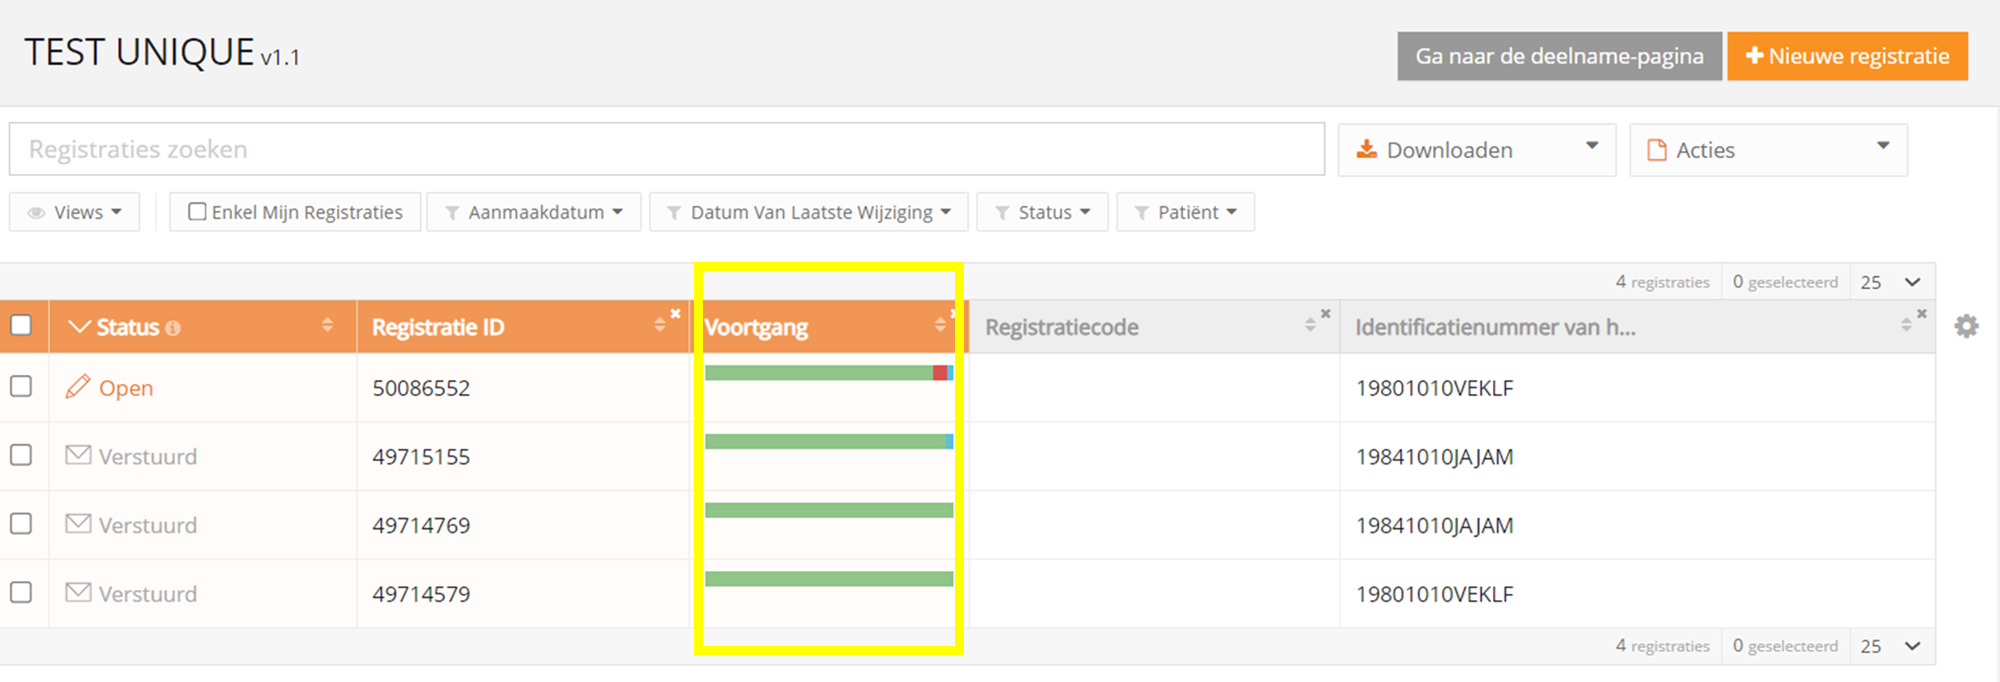
De voortgangsbalk
De voortgangsbalkDe voortgangsbalk toont de voortgang van de datacollectie en kan worden gevonden in:
- De lijstweergave van een register
- De detailweergave van een record
Lijstweergave
Detailweergave
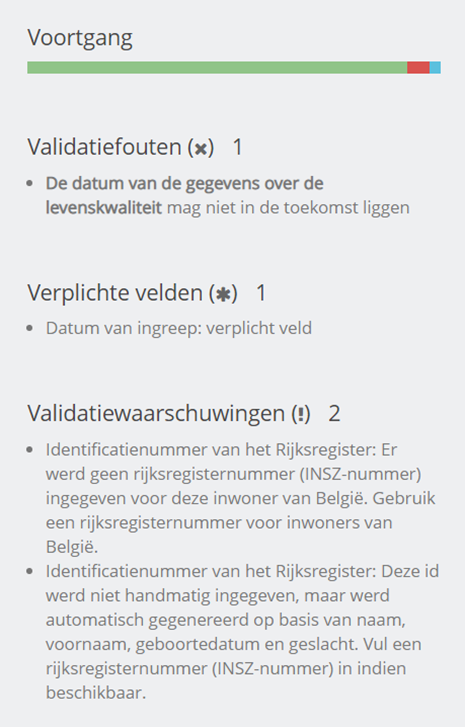
De voortgangsbalk kan worden verdeeld in drie secties, waarmee het aantal fouten, opmerkingen en correcte velden in een registratie wordt weergegeven.
Elke sectie zijn eigen kleur en betekenis heeft:
- Rood: Verplichte velden en velden met een fout. Deze moeten worden gecorrigeerd, voordat de registratie kan worden ingediend.
- Blauw: Lege optionele velden. De registratie kan worden ingediend met lege optionele velden.
- Groen: Correct ingevulde velden.
Beweeg met de muis over de voortgangsbalk om het aantal velden per sectie weer te geven.

Validatiefouten en validatiewaarschuwingen
Validatiefouten en validatiewaarschuwingenData die handmatig zijn ingevuld of die in het geüploade bestand staan, zijn onderhevig aan fouten.
Deze fouten worden weergegeven als validatiefouten, (het ontbreken van) verplichte velden en validatiewaarschuwingen onder het validatiegedeelte dat in het rechterpanel van het scherm staat. De fout wordt inhoudelijk toegelicht.
Door op de validatiefout of validatiewaarschuwing te klikken, navigeert u naar het betreffende veld.

Deze data moeten eerst worden gecorrigeerd en vervolgens voor registratie worden ingediend.
Overzicht van de registratiestatussen
Overzicht van de registratiestatussenDit artikel legt de verschillende registratiestatussen uit in HD4DP v1 vanaf v1.8.
Waar kan ik de status van een registratie vinden?
Statussen worden weergegeven in de kolom 'Status', die standaard de eerste kolom in het overzicht is:
Wat is een Bevestigingsstatus?
De bevestigingsstatus geeft informatie over de aankomst van de data in HD4DP. De bevestigingsstatus, die eigenlijk een substatus van een registratie is, wordt weergegeven in de kolom 'Bevestigingsstatus'.
Om de 'Bevestigingsstatus' te zien, wijzigt u de lijstweergave door de kolom 'Bevestigingsstatus' toe te voegen:

Zodra een registratie is verzonden en de status 'Verstuurd' heeft, zal de bevestigingskolom de volgende substatus tonen:
- Pending
- OK: de registratie is aangekomen
- NOK: de registratie is niet binnen de 48 uur aangekomen
De verschillende registratiestatussen
- Open*: een registratie is aangemaakt en opgeslagen. Ze is niet ingediend
- In transit: de registratie wordt verzonden naar HD4RES
- Verstuurd: de registratie is verzonden naar HD4RES. Dit betekent niet noodzakelijkerwijs dat de registratie is aangekomen bij HD4RES
- Registraties met de status 'Correcties nodig'*: de onderzoeker heeft de registratie geverifieerd en commentaar toegevoegd. Bekijk de opmerkingen en corrigeer waar nodig
- Goedgekeurd: de onderzoeker heeft de registratie geverifieerd en goedgekeurd
- Registraties met status 'Follow-up nodig'*: voor deze registratie is een follow-up registratie nodig. Vul de nieuwe beschikbare velden in
- Fout: uw account is niet gemachtigd om een registratie voor dit register aan te maken en in te dienen. Neem contact op met support.
* actie is vereist van de gebruiker
Het onderstaande schema geeft een overzicht van de verschillende registratiestatussen in HD4DP en Gegevensverwerking en hun relatie tot elkaar:

Registraties in status 'Correcties nodig'
Registraties in status 'Correcties nodig'Registraties met status 'Correcties nodig' moeten worden herzien. De onderzoeker heeft commentaren die moeten worden bijgewerkt of herzien.
- Selecteer het dossier met de status 'Correcties nodig'

- Verifieer en reageer op de commentaren van de onderzoeker door het tabblad 'Commentaren' te selecteren

- Beantwoord de commentaren en wijzig de registratie en sla het commentaar op

- Klik op 'Opnieuw versturen' om de correcties naar de onderzoeker te sturen. Alle validatiefouten moeten worden opgelost voordat de knop 'Opnieuw versturen' beschikbaar komt.
Registraties met status 'Follow-up nodig'
Registraties met status 'Follow-up nodig'Sommige registraties vereisen een follow-up, bv. om meerdere raadplegingen van een patiënt te controleren. Daarom zal er op vooraf bepaalde mijlpalen, welke in de opzetfase van het register worden gedefinieerd, aanvullende informatie worden gevraagd.
Follow-up registraties kunnen worden gestart door:
- Timing bijv. x tijd na de eerste registratie
- Antwoorden bij de eerste registratie, bijv. alleen als de patiënt X medicatie heeft gebruikt
- Een combinatie van beide, bijv. als de patiënt X medicatie heeft genomen, vraag dan 3 maanden later om follow-up informatie
Indien in de kolom Status 'Follow-up nodig' staat en de kolom 'Follow-up' actief is, kan de gebruiker de nodige extra informatie toevoegen in de details van de registratie.

Opmerking: Het proces van validatie en het terugsturen van de registratie(s) voor de follow-up data neemt minimaal 4 uur in beslag.
Selecteer 'Follow-up' in de instellingen van de weergave:

De kolom Follow-up wordt nu in de weergave getoond:


Wanneer follow-up nodig is, geeft de kolom 'Follow-up' in de lijstweergave aan of follow-up nodig is door aan te geven:
- Gepland: follow-up zal in de toekomst nodig zijn, aangegeven door de datumaanduiding
- Statuskolom: toont 'Verstuurd', er is op dit moment geen actie nodig
- Actief: de vragen voor deze follow-up zijn nu zichtbaar en kunnen worden ingevuld
- Statuskolom: toont 'Follow-up nodig', actie is nodig
- Verstuurd: de follow-up kolom zal veranderen in ingediend nadat de aanvullende informatie is gegeven
- 'Status kolom' toont 'Verstuurd', geen actie meer nodig
Afhankelijk van het aantal keren dat follow-up nodig is, wordt een rij aan de kolom toegevoegd. De mijlpalen worden aangeduid met followup1, followup2, enz.

Registraties in bulk indienen
Registraties in bulk indienen- De registraties die moeten worden gestuurd, moeten worden gecontroleerd om de registratie in bulk te kunnen voortzetten
- Klik op de knop 'Acties' en selecteer 'Registraties doorsturen'. Het aantal geselecteerde registraties wordt tussen haakjes weergegeven

- Bevestig de indiening in het venster dat verschijnt

- Er wordt een overzicht getoond van de registraties die zijn ingediend en mislukt. De registraties die fouten bevatten, worden niet verstuurd

Vertaald met https://www.deepl.com/Translator. Heeft u een fout opgemerkt? Neem dan contact met ons op via https://docs.healthdata.be/nl/contact
Datacollectie afronden
Datacollectie afrondenDe onderzoeker moet worden ingelicht als de datacollectie klaar is.
Er zijn 2 manieren om de datacollectie af te ronden:
1. Via het gebruik van de link in het tabblad Registraties:

2. Via de knop op het tabblad Deelname:

- Bevestig de afronding van de datacollectie:

Soms wordt door de onderzoeker om aanvullende data gevraagd. Deze moeten eerst worden ingevuld voordat u de knop of link Finaliseren gebruikt.
Nadat u de knop Finaliseren hebt geselecteerd, wordt de onderzoeker op de hoogte gebracht.
Vertaald met https://www.deepl.com/Translator. Heeft u een fout opgemerkt? Neem dan contact met ons op via https://docs.healthdata.be/nl/contact
HD4DP v1 Acceptance Environment
HD4DP v1 Acceptance Environment Bart.Servaes di, 12/03/2024 - 11:22Toegang tot Acceptance Environment en CSV file upload
Toegang tot Acceptance Environment en CSV file uploadBelow we describe the procedure of logging in to the acceptance environment of the HD4DP v1 application in order to upload a csv file.
1. Go to the URL https://hd4dp-acc.healthdata.be/.
2. Select your organization.
3. Enter the correct credentials (username and password) and click on the Log in button.

4. Click on the Upload center tab on top.

5. In the left Data collections panel scroll down and select the active version of the desired register.
6. Next, click on the "New upload" button at the top-right corner.

7. Drag and drop the file to upload, or browse for it on your device; and click on the Start upload button.

Gebruikersbeheer (enkel door admin)
Gebruikersbeheer (enkel door admin)Om gebruikers toegang te geven tot de applicatie en de gegevens, worden machtigingen verleend door middel van gebruikersaccounts.
Het gebruikersbeheer is alleen mogelijk voor administratorsaccounts in de HD4DP-toepassing. Gebruikersaccounts met Data Provider rechten zijn niet in staat om de gebruikersaccounts of instellingen te wijzigen.
Gebruikersbeheer voor de HD4DP applicatie kan op twee manieren worden gedaan:
- in de HD4DP applicatie
- via een lokale LDAP
LDAP is een open (niet aan eigendomsrechten gebonden) standaard voor het opslaan en ophalen van namen, adressen, telefoonnummers en andere geregistreerde informatie uit een online gids. Of uw HD4DP is verbonden met een lokale LDAP-server kunt u vinden in de instellingen van de HD4DP applicatie (vgl. artikel Hoe weet u of uw HD4DP LDAP gebruikt voor gebruikersbeheer).
Vertaald met https://www.deepl.com/Translator. Heeft u een fout opgemerkt? Neem dan contact met ons op via https://docs.healthdata.be/nl/contact
Gebruikersbeheer in de HD4DP v1 applicatie
Gebruikersbeheer in de HD4DP v1 applicatieVertaald met https://www.deepl.com/Translator. Heeft u een fout opgemerkt? Neem dan contact met ons op via https://docs.healthdata.be/nl/contact
Gebruikersaccount aanmaken in HD4DP v1
Gebruikersaccount aanmaken in HD4DP v1Er moeten nieuwe accounts worden aangemaakt om gebruikers toegang te geven tot de applicatie en de gegevens:
- Log in met een administratorsaccount
- Ga naar het Dashboard in het menu

- Onder 'Gebruikersbeheer', klik op 'Gebruikers'

Het formulier om een gebruiker aan te maken wordt getoond:

- Voer een gebruikersnaam in en creëer een wachtwoord in de velden 'Nieuw wachtwoord'
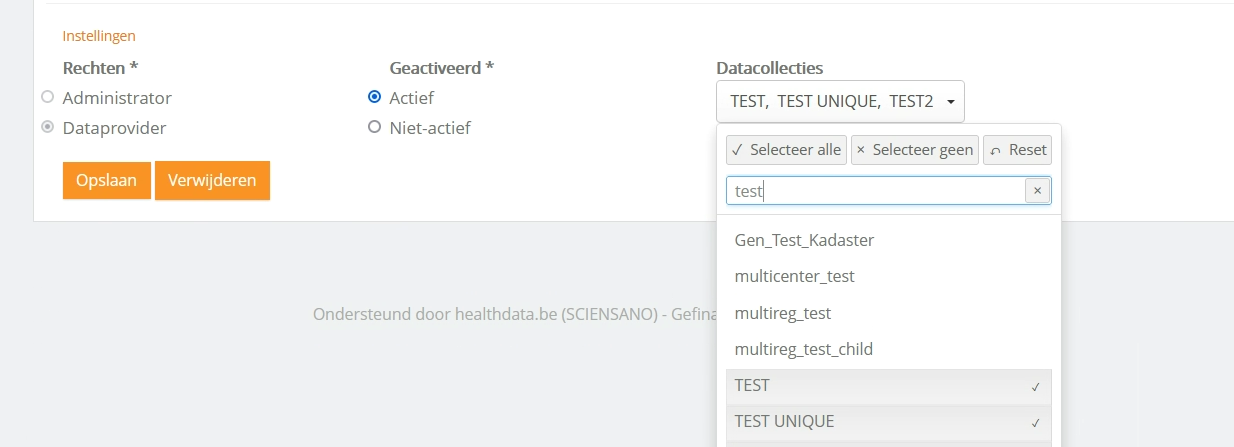
- Selecteer de Gebruikersrechten voor de gebruiker
- een 'data provider'-account kan data invoeren en versturen
- een 'administrator'-account kan gebruikers aanmaken en de configuratie-instellingen wijzigen
- Kies 'Actief'
- Indien de gebruiker een 'data provider' is, selecteer dan de datacollecties waartoe de gebruiker toegang moet hebben
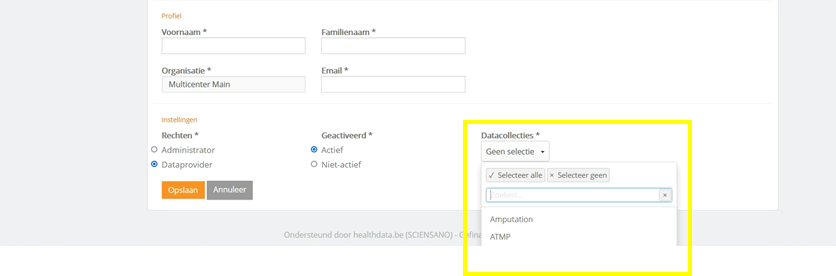
- Bevestig de creatie van een nieuwe rekening door op 'Opslaan' te klikken
Hoe een gebruikersaanvraag goedkeuren in HD4DP1
Hoe een gebruikersaanvraag goedkeuren in HD4DP1- Log in als admin en selecteer "Gebruikersaanvragen"

- U ziet een overzicht van alle verzoeken

- Selecteer de aanvraag dat u wilt goedkeuren

- Bevestig de goedkeuring door op "yes" te klikken

- De gebruiker ontvangt een e-mail dat zijn of haar account is geaccepteerd. Deze e-mail bevat de benodigde informatie om in te loggen, zoals gebruikersnaam en wachtwoord.
Hoe een paswoord te resetten
Hoe een paswoord te resetten- Log in als admin
- Selecteer "Dashboard"

- In "User management" selecteer "User list"

- Selecteer de pen naast de gebruiker waarvoor een paswoord moet gecreëerd worden

- Selecteer "Reset password"

- Vul een paswoord in het veld "New Password" en herhaal it in "New password repeat" (bij voorkeur te genereren door een veilige generator bvb. https://passwordsgenerator.net/)

- Bewaar dit paswoord door "save" te drukken en deel het nieuwe paswoord met de gebruiker (bvb. door ze een link te e-mailen die is gemaakt met https://password.arxus.eu/)
Gebruikersbeheer met een lokale LDAP
Gebruikersbeheer met een lokale LDAPVertaald met https://www.deepl.com/Translator. Heeft u een fout opgemerkt? Neem dan contact met ons op via https://docs.healthdata.be/nl/contact
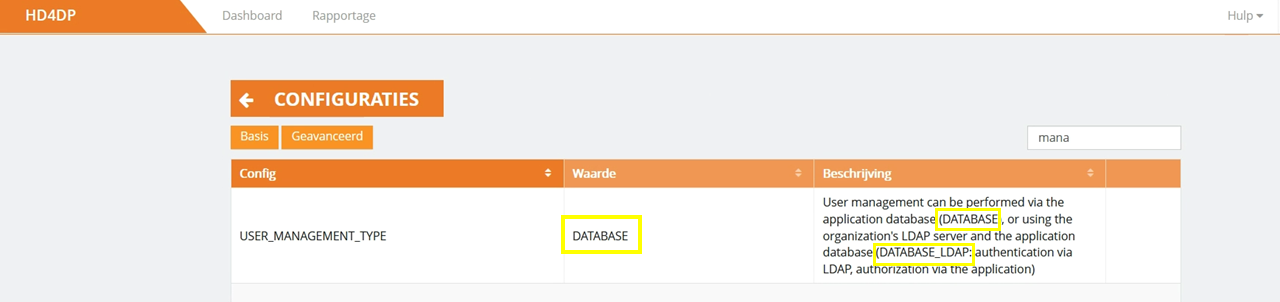
Hoe weet u of uw HD4DP v1 LDAP gebruikt voor gebruikersbeheer
Hoe weet u of uw HD4DP v1 LDAP gebruikt voor gebruikersbeheerZo kunt u controleren of uw HD4DP is verbonden met een LDAP-server:
- Ga naar de knop 'Configuraties' in het rechter panel 'Configuraties'

- Controleer de configuratieparameter 'USER_MANAGEMENT_TYPE'
- Als deze is ingesteld op 'DATABASE_LDAP', wordt HD4DP verbonden met uw lokale LDAP voor zijn authenticatie.
Als deze is ingesteld op 'DATABASE', wordt de HD4DP gebruikt voor gebruikersbeheer.
Vertaald met https://www.deepl.com/Translator. Heeft u een fout opgemerkt? Neem dan contact met ons op via https://docs.healthdata.be/nl/contact
HD4DP v1 account aanmaken voor LDAP gebruikers
HD4DP v1 account aanmaken voor LDAP gebruikersEr moeten nieuwe accounts worden aangemaakt om gebruikers toegang te geven tot de applicatie en de gegevens:
- Log in met een administratorsaccount
- Ga naar het Dashboard in het menu

- Onder 'Gebruikersbeheer', klik op 'Gebruikers'

- Zoek een gebruiker in de LDAP-lijst onder 'Gebruikersnaam'
- Selecteer de niet-gemigreerde gebruiker door op de naam te klikken
- Selecteer de Gebruikersrechten voor deze gebruiker
- een account 'data provider' kan data invoeren en verzenden
- een 'administrator' account kan gebruikers aanmaken en de configuratie-instellingen wijzigen
- Kies 'Actief'
- Indien de gebruiker een 'data provider' is, selecteer de datacollecties waartoe de gebruiker toegang moet hebben
- Bevestig de creatie van een nieuwe rekening door op 'Opslaan' te klikken
Vertaald met https://www.deepl.com/Translator. Heeft u een fout opgemerkt? Neem dan contact met ons op via https://docs.healthdata.be/nl/contact
Gebruikersaanvragen goedkeuren wanneer uw HD4DP v1 is verbonden met LDAP
Gebruikersaanvragen goedkeuren wanneer uw HD4DP v1 is verbonden met LDAPGebruikersaanvragen goedkeuren wanneer uw HD4DP is verbonden met LDAP
- Log in als admin en selecteer 'Gebruikersaanvragen'

- U ziet een overzicht van alle verzoeken:

- Selecteer het verzoek dat u wilt goedkeuren
- Voordat u de gebruikersaanvraag goedkeurt, moeten een aantal zaken worden gecontroleerd:
- Overeenkomende gebruikersnaam: In HD4DP moet de gebruikersnaam gelijk zijn aan de gebruikersnaam van de persoon in het LDAP-systeem. Als dit niet het geval is, verander dan de gevraagde gebruikersnaam in HD4DP in de LDAP-gebruikersnaam
- Zoekbasis voor gebruikers: In het LDAP-systeem moet de gebruiker lid zijn van de organisatorische eenheid (OU) waarin HD4DP naar accounts zoekt. Om de LDAP_USER_SEARCH_BASE voor uw organisatie te achterhalen, gaat u terug naar het dashboard, klikt u op 'configuraties' en zoekt u naar LDAP_USER_SEARCH

- Controleer de data in de aanvraag
- Klik gewoon op 'Goedkeuren' en de gebruikersaccount is actief

- Als u zou proberen een gebruikersaanvraag te accepteren waarvan de gebruikersnaam niet in het LDAP-systeem wordt gevonden, verschijnt er een foutmelding
- De gebruiker zal een email ontvangen dat zijn of haar account is aanvaard. Deze email bevat de nodige informatie om in te loggen, d.w.z. gebruikersnaam, wachtwoord
Vertaald met https://www.deepl.com/Translator. Heeft u een fout opgemerkt? Neem dan contact met ons op via https://docs.healthdata.be/nl/contact
Gebruikersaccount wijzigen in HD4DP v1 met LDAP
Gebruikersaccount wijzigen in HD4DP v1 met LDAPRekeningen kunnen worden gewijzigd door de verantwoordelijke van de HD4DP applicatie van een organisatie:
- Log in met een administratorsaccount
- Ga naar het Dashboard in het menu

- Klik op 'Gebruikers' onder Gebruikersbeheer om een lijst te krijgen van de geregistreerde accounts

- Klik op de knop 'Bewerken' in de lijstweergave die overeenkomt met uw account

De gebruikersaccount kan worden gewijzigd:
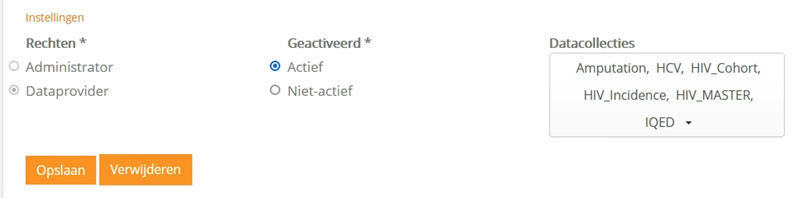
- Rechten voor de gebruiker
- een 'data provider' account kan data invoeren en indienen
- een 'administrator' account kan gebruikers aanmaken en de configuratie instellingen wijzigen
- Kies 'Actief' of 'Niet-actief', afhankelijk van de vereisten
- Selecteer de datacollecties waartoe de gebruiker toegang moet hebben
- Bevestig de wijzigingen door op 'Opslaan' te klikken
Vertaald met https://www.deepl.com/Translator. Heeft u een fout opgemerkt? Neem dan contact met ons op via https://docs.healthdata.be/nl/contact
Technische handleiding van de applicatie HD4DP v1
Technische handleiding van de applicatie HD4DP v1 Bart.Servaes di, 11/26/2024 - 13:08HD4DP v1 csv upload
HD4DP v1 csv uploadDe inhoud van deze pagina is enkel beschikbaar in het Engels. Selecteer de EN knop in de rechterbovenhoek van het scherm om de pagina te openen.
Maak een CSV-bestand
Maak een CSV-bestandDe inhoud van deze pagina is enkel beschikbaar in het Engels. Selecteer de EN knop in de rechterbovenhoek van het scherm om de pagina te openen.
Een CSV-bestand uploaden
Een CSV-bestand uploadenDe inhoud van deze pagina is enkel beschikbaar in het Engels. Selecteer de EN knop in de rechterbovenhoek van het scherm om de pagina te openen.
Een CSV-bestand gebruiken: tips en trucs
Een CSV-bestand gebruiken: tips en trucsDe inhoud van deze pagina is enkel beschikbaar in het Engels. Selecteer de EN knop in de rechterbovenhoek van het scherm om de pagina te openen.
'Stabiele' data hergebruiken
'Stabiele' data hergebruikenDe inhoud van deze pagina is enkel beschikbaar in het Engels. Selecteer de EN knop in de rechterbovenhoek van het scherm om de pagina te openen.
CSV voor stabiele data downloaden en uploaden
CSV voor stabiele data downloaden en uploadenDe inhoud van deze pagina is enkel beschikbaar in het Engels. Selecteer de EN knop in de rechterbovenhoek van het scherm om de pagina te openen.
Registratie API
Registratie APIDe inhoud van deze pagina is enkel beschikbaar in het Engels. Selecteer de EN knop in de rechterbovenhoek van het scherm om de pagina te openen.
Technical onboarding
Technical onboardingThe HD4DP software is used for facilitating the data collection of health registers in Belgium. Most registers capture data related to individual patients. To protect the patient’s privacy, encoding of the patient's identifier, in each registration, is required before the data arrives.

The HD4DP software allows to capture data, either from manual data entry or from primary systems from the data provider. In order to send data to healthdata, it needs to be encrypted before it can be transferred via eHealthBox.

These are the following steps for Technical Onboarding:
Prepare the HD4DP-installation
The IT department of hospitals and laboratories have to prepare the installation by providing healthdata with the information needed. The HD4DP installation sheet is a form that contains all the information that Healthdata.be needs, in order to start, the installation of the HD4DP software.
An eHealth certificate is needed to complete the installation and therefor it is a section in the form. When sending information to the HD4DP installation, the data must be encrypted by healthdata using the public key of the certificate of an organization.
The form will be adjusted to the needs of the requesting organization and send by mail. The basis for this adjusted form can be found in the HD4DP installation form template.
Install HD4DP
The software is remotely installed by healthdata.be.
Install encryption module
The encryption module encrypts registrations before they are sent to the registry via the eHealth platform. This module is not part of the HD4DP software.
Each data provider has the choice to either:
- develop and implement this module
- to make use of third party client software
More information is available in the article about the Encryption module.
HD4DP needs to be configured (cf. article "How to configure HD4DP for an encryption module") for the encryption module used by an organization.
Submit test registration
To verify the installation, a number of registrations are submitted belonging to a test registry.
Confirm installation
Once the submitted data of the test registry are received correctly by healthdata, you will get a confirmation that the installation was successful.
Configure Mail Server Settings
The HD4DP application can notify users concerning necessary actions for their registers and to inform admins about changes or requests for user accounts. Mail Server settings need to be configured (cf. article "Configure Mail Server Settings") to make this functionality possible.
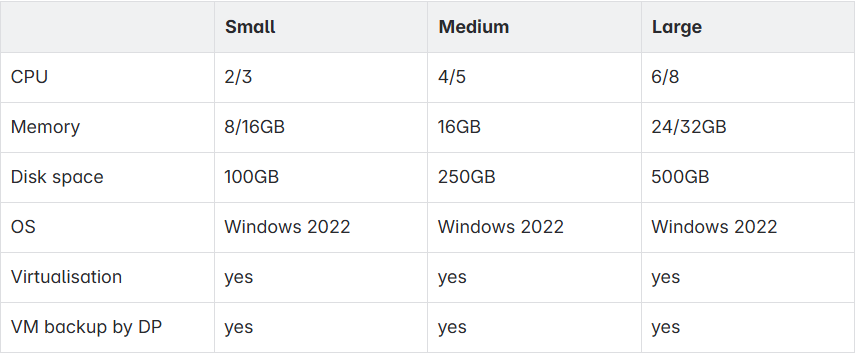
Technical requirements
Technical requirementsThis article describes how to fill in the web form for carrying out the installation of HD4DP (consult article about technical onboarding of organizations for further details) within Healthdata.be. It contains the following points:
- Contact details
- Server information
- Teamviewer: ID, password, link, username, token, password
- VPN: connection details, link, username, token, password
- Other: connection details, link, username, token, password
- Server information
- Server name or IP address
- Operating System: Windows, Linux, other + version
- System requirements:
- Username (including domain if applicable)
- Password Server
- User is local admin Y/N
- Installation directory (optional)
- Installation directory (optional)
- Database information
- Connect to existing database server Y/N
- Database System (Microsoft SQL Server or Oracle)
- Database Server name or IP adress
- Database Server port (e.g. default, 1433)
- Database Name (e.g. HD4DP)
- Database Scheme (e.g. dbo)
- Database Username
- Database Password
- User can read/write/create tables Y/N
- Connect to Microsoft SQL Server using Windows Authentication Y/N
- User management
- Combination Database (authorisation) and LDAP user management (authentication)
- Database only (no integration with LDAP)
- External links: links should be accessible from the server, for the installation and operation of HD4DP. Please verify these URLs from the server’s web browser
- https://catalogue.healthdata.be: required for the operation of HD4DP: new IP adress end 2016 (!) 94.143.186.20
- https://download.healthdata.be: Required for downloading the software during installation
- Proxy Server
- Software configuration / eHealth Public Key
- Identification Type: NIHII-HOSPITAL, NIHII-LABO, CBE
- Identification value: typically the organization’s RIZIV/INAMI number
- Application ID
- Software configuration / Encription module
- REST web service / File system
- Prefilling demographic info: choose the service you want to connect to for retrieving patient information
- None
- RRN Connector
- Custom Rest NRC
- ADT-interface (e.g. Oazis)
- Mail server information
- Mail SMTP Host
- Mail "From" adress
- Mail Security protocol
- Mail SMTP Username (Optional)
- Controle - Captcha
- Review page (see below)
1. CONTACT DETAILS
View below the first page of the web form.
Save (recommended) each page before going to the 'Next Page' by clicking on 'Save my progressandresume later'.
Consult (recommended) the saved from by clicking on 'Resume a previously saved form'.
2. SERVER INFO
This part requires 2 kinds of parameter : (1) Server Connection and (2) Server Machine.
- Server Connection
Fill in all the fields in the screenshot below to give access to the future HD4DP server.
- Server Machine
Fill in all the fields to identify the HD4DP server in the screenshot below.
3. DATABASE INFO
Fill in 'Yes' or 'No' on the screen below and fill in all fields.
If you select 'Yes', you should obtain the screen below.
If you click on 'No', Healthdata will install a new database (Oracle Express) on your server.
4. USER MANAGEMENT
You should see the screen below and fill in (make your choise).
If you choose the first option 'Combination Database (authorisation) and LDAP user management (authentification)' consult this article.
If you choise the second option 'Database only (no integration with LDAP)' that implies using the application to handle the customer account management.
5. EXTERNAL LINKS
Select in the screen below for confirming the :
- the access to website required for running the application HD4DP
- the access to website required for installing the application HD4DP
- the identification of a proxy server in front of the HD4DP server in the screen below .
6. SOFTWARE CONFIGURATION / EHEALTH PUBLIC KEY
Fill in the info about your eHealth certificate data in the screen below.
7. SOFTWARE CONFIGURATION / ENCRYPTION MODULE
Select the encryption module interface in the screen below.
If you select 'REST web service' you have to fill in the info in the screenshot below.
If you select 'File system' you have to fill in additional in the screenshot see below
8. PREFILLING DEMOGRAPHIC INFO
Select the different options for prefilling demographic info in the screen below ( consult this article for further details).
9. MAIL SERVER INFORMATION
Fill the info about the mail server in order to enable the email notification of the HD4DP users.
10 CONTROL
Please enter the characters you see in this picture below
11. REVIEW PAGE
- Make sure your identification is correct by consulting the screenshot below.
- Click on 'Confirm' to submit the form.
PLEASE CONFIRM TO SEND US the FORM
see at the end of the review page :
Architecture of HD4DP v1
Architecture of HD4DP v1
Enable HD4DP v1 auto-upgrade functionality
Enable HD4DP v1 auto-upgrade functionalityWhen healthdata.be pushes a new version, you will receive a mail to inform you about the new version that has been set ready for your organisation. When having enabled the auto_upgrade, your HD4DP v1 will detect overnight that a new version is pushed for your organization. The auto-update will execute the necessary checks and download the new version. If one of the steps or checks gives an error, the auto-update will not take place. In that case, you will receive an email the next day to warn you that a planned update has not been installed yet. You can decide to trigger the update manually (see article "Manage auto-upgrades of HD4DP") or to contact support via support.healthdata@sciensano.be.be
The article shows how to enable the HD4DP auto-upgrade functionality.
- Login in HD4DP as administrator, you should get the screen below
- Go in the 'Configurations' panel (highlighted in the screen below)

- Click on the 'Configurations' button
- Type 'AUT' in the search bar, you should get the screen below

- Select 'True' to enable the auto-upgrade functionality of HD4DP
- Click on the green V to save the change, if the saving is successful, you should get the below

Manage auto-upgrades of HD4DP v1
Manage auto-upgrades of HD4DP v1This article describes the auto-upgrade procedure of HD4DP. The procedure includes 3 executable steps using 3 dedicated buttons which should be visible in the 'Upgrade software' panel (emphasized in the screen below) when you Login as administrator :
1. Enable the auto-upgrade functionality
2. Check the settings of HD4DP for supporting the auto-upgrade functionality : 'Test software upgrade' button
3. Check that an upgrade is not already ongoing : 'Check upgrade status' button
4. Perform the auto-upgrade : 'Update HD4DP software' button

1. Enable the auto-upgrade functionality
Read the article "Enable HD4DP auto-upgrade functionality".
2. Check the settings of HD4DP for supporting the auto-upgrade functionality
- Click on the 'Test software upgrade' button, you should get a confirmation pop-up window as the below

- Click on 'Continue', you should get a 'Success' pop-up window as the below (if not, please contact healthdata@sciensano.be)

3. Check that an upgrade is not already ongoing
- Click on 'Check upgrade status' on the top-right corner of the screen, you should see message mentioning 'No upgrade in progress' as shown in the below

4. Perform the auto-upgrade
- Click on 'Upgrade HD4DP software' for launching the auto-upgrade
- Check the success of the auto-upgrade by :
- Checking the HD4DP version, you should got the latest version number of HD4DP (e.g. v1.11.3 in the screen below)
- Checking the status items at the bottom of the screen as shown in the below (except the 'mail-server' status, every status item should be in green)

- Email healthdata@sciensano.be if these 2 requirements (i.e. expected HD4DP version number and status items all in green) are not met.
Encryption module
Encryption moduleNote: the procedure for the Encryption module is the same for HD4DP v1 and v2.
While HD4DP is developed by healthdata.be, the EM module is not. It can be developed by data providers or third party vendors.
The architecture workgroup of the eHealth platform have strict rules concerning the encoding. Encryption and decryption from the HD4DP software are kept separate.
A new component, whose main functionality, is the encryption of the data before it leaves the organization. Since “data encryption” is the main purpose of this module, it will be referred to as Encryption Module (or EM).
Development by Data Providers
A cookbook containing detailed instructions onhow to implement the module are attached.
HD4DP needs to be configured for the encryption module (cf "How to configure HD4DP for an encryption module").
Finally, validation (cf. article "Encryption module validation scenario") the encryption module implementations is done by healthdata.
Development by Third Parties
The two main functionalities of the encryption module are:
- Encryption and decryption data
- Sending and receiving data
HD4DP needs to be configured for the encryption module (cf. article "How to configure HD4DP for an encryption module").
Encryption and decryption
Healthdata.be has validated (cf. Encryption module validation scenario) the encryption module implementations, developed by the following parties:
- Amaron (Amaron)
- HealthConnect (Hector/Unified Messaging)
- Hôpital Erasme (custom)
- NexuzHealth (NexuzHealth)
- Réseau Santé Wallon (XConnect)
Sending and receiving data
In Belgium, different eHealthBox client softwareapplications are available.
An eHealthBox client application provides an interface to use the eHealthBox service. The eHealth-platform communicates medical files, lab results or other sensible information.
The use of an eHealthBox client application is required for sending data to healthdata.
The main vendors are:
Encryption module validation scenario
Encryption module validation scenarioParties that developed their own implementation of the encryption module:
Validating different implementations of the encryption module by different parties, healthdata recommends to execute the test scenario below. Encryption module implementations that successfully pass this test scenario are approved by healthdata and will be published as such on the healthdata website.
Test scenario:
- Log in to HD4DP with an admin account and create an account with user rights for the TEST registry (refer to article on support.healthdata.be)
- Log in to HD4DP with the newly created user account, and fill and submit a registration for the TEST registry
- Verify that the status of your registration changes from 'In progress' to 'Sending' (for a few minutes) and finally to 'Submitted'
- Verify that registration created a message that was successfully processed by the encryption module and the eHealthBox client software
- Send an email to healthdata@sciensano.be to confirm that a test message was sent
- If your message is successfully received by healthdata, you will receive a confirmation email from healthdata@sciensano.be
- Between 6 to12 hours after registration has been submitted, a status message from healthdata (via eHealth ) should be received in the eHealthBox, In version 1.5 or older that status will change to 'review in progress'.
In version 1.6, the status is 'Submitted' but the confirmation field will change to OK. - Send a screenshot to healthdata@sciensano.be to confirm that the status changed to 'Review in progress' or confirmation 'OK'.
How to configure HD4DP v1 for an encryption module
How to configure HD4DP v1 for an encryption moduleHow to configure HD4DP for communication with the encryption module - it is assumed that both HD4DP and the encryption module are installed.
Log in to HD4DP as admin and go to the configurations panel:

To configure HD4DP for communication with an encryption module, parameters need to be set regarding the organizations system.
The parameters 'EM_INTERFACE_OUT' and 'EM_INTERFACE_IN' the type of communication between HD4DP and the encryption module
- REST: if communication is via REST-interface
- FILE_SYSTEM: if communication is file based

Depending on the type of interaction (REST or FILE_SYSTEM), different parameters have to be configured.
REST
Specify the URL for incoming and outgoing messages via the parameters 'EM_REST_URL_OUT' and 'EM_REST_URL_IN':

FILE_SYSTEM
Specify the different directories as shown in the example below:

HD4DP v1 integration with a Patient Identifier Service
HD4DP v1 integration with a Patient Identifier ServiceIntegrating HD4DP with a patient identifier service allows basic demographic information such as date of birth, gender, place of residence. HD4DP is based on the national registry number or an internal reference number.
The NATIONAL_REGISTRY_CONNECTOR configuration allows to select one option among the different connectors supported by HD4DP.

Supported integrations
This section provides a brief description of different options, along with the different configuration keys that must be filled in properly.
NIN Connector
If your organization uses the NIN (National Insurance Number)Connector from HealthConnect, integration can be done out-of-the box by configuring the Server URL, Application Token and User ID in HD4DP.
Configuration
- Select the RRNCONNECTOR option in the dropdown list
- Fill in the RRNCONNECTOR_URL, RRNCONNECTOR_APPLICATION_TOKEN and RRNCONNECTOR_USER_ID configurations
ADT-interface
If your organization uses a patient administration system that is able to accept ADTqueries (v2), it is possible to integrate this with HD4DP as from v1.4.0. This ADT query can be done based on either a national registry number or an internal reference number.
Configuration
- Select the ADT option in the dropdown list
- Fill in the ADT_SERVICE_HOST and ADT_SERVICE_PORT configurations with the host and the port of your ADT service
Customization of the National Registry Connector
For developing your own web service for retrieving patient information from another system, this service must comply with a few set requirements. The service proposes an API respecting the request pattern below, and answers with an XML formatted response similar to the one provided in the example.
Request
| URL | http://host:port/.../patientinss{?user,password} |
| Header | Accept : Application/xml |
URL Example: http://localhost:8080/identifierservice/patient/87120406775?user=restUser&password=restPassword
Response

HD4DP requires this layout without namespaces. Make sure that no namespaces are specified since this will prevent the completion of demographic information.
The correct Content-Type in the HTTP header of the response should be filled in. The application/xml is expected as other values will most likely cause error.
Configuration
- Select the CUSTOM_REST_NRC option in the dropdown list.
- Fill in the CUSTOM_REST_NRC_URL configuration.
- If authentication is required for using the rest service, fill in the CUSTOM_REST_NRC_USER and CUSTOM_REST_NRC_PASSWORD configurations.
Example of usage
Once a connector has been chosen and correctly configured, the HD4DP application will fill in demographic information about a patient, based on a manually filled in identifier. For example, a valid National Insurance number has been manually entered in the "Patient ID" field. The application has updated other fields automatically with (test-) data it received from the national registry connector.

Configure Mail Server Settings
Configure Mail Server SettingsThis article explains how to configure an organization's mail server settings in HD4DP so, that the application can notify users concerning necessary actions for their registers and to inform admins about changes or requests for user accounts.
In case mail server settings are not yet configured, you will see in the status bar of your application that the mail server is offline as is shown in the image below:

If the status shows that the mail server is down, perform the following steps to configure them:
- Login as admin in the application
- Click on 'Configurations' in the Configuration-panel. You will see a list of parameters.
- Above the table on the right, enter 'mail' as search parameter. The list of displayed configuration parameters will change to those containing the 'mail' keyword.
- Please fill in the necessary values to configure the mail server: (do not forget to click the green mark to save entered values)
- MAIL_FROM_ADDRESS: You can fill in a fictional email address e.g. noreply.hd4dp@yourdomain.be. You can also choose to use your organization's helpdesk email so, that users are able to reply to the mails they receive in case they have questions
- MAIL_SMTP_HOST: The hostname of your organization's mail server
- MAIL_SMTP_PORT: The standard port is 25
- MAIL_SECURITY_PROTOCOL: Most of the time, this should be none, but you can choose from the dropdown
- MAIL_SMTP_USERNAME: If authentication is required, fill in the username (empty if no authentication must be performed)
- MAIL_SMTP_PASSWORD: If authentication is required, fill in the password of the user you filled in or leave it empty if no authentication must be performed
If all is configured correctly, you can refresh the status bar to recalculate the status and check if it works:

In case a mail security protocol is used or authentication via user/password was filled in, please verify the settings are working by going to the login page and click 'request new account'. Create a test account with your email and click 'Request'. You should receive an email for the account you requested. You can then login as admin and reject the account.
Oracle to Microsoft Database Migration
Oracle to Microsoft Database Migration0. INTRODUCTION
This article shows how to carry out a database migration from ORACLE (ORCL) to Microsoft SQL (MS SQL) on a Microsoft computer or environment.This procedure contains three parts :
- the database migration from ORCL to MS SQL
- the connection of HD4DP to the MS SQL database
- the further action to perform while performing such database migration
1. DATABASE MIGRATION FROM ORCL TO MS SQL
1.1.The database migration tool
Microsoft provides a free migration tool named Microsoft SQL Server Migration Assistant (SSMA).
- Download it by clicking on this link, then follow the installation procedure of the application
- Launch it, you should obtain the below.
1.2. Set up a migration project
Create a project.
Select the MS SQL version within the dropdown list (e.g. SQL Server 2012 in the screenshot below)
Define the database migration type :
- Client Side Data Migration (the laptop where SSMA software is installed will bridge the SQL and the ORACLE servers, i.e. act as third party),
- Server side Data Migration (the database migration will take place directly between the SQL and the ORACLE servers).
1.3. Connect to the ORACLE and MICROSOFT SQL database
1.3.1. ORACLE
Fill out the credentials of the 2 database servers:
- Click 'Connect to Oracle'
- Fill out the pop-up window named 'Connect to Oracle'
You should get the Output : 'Connection to Oracle established successfully' as illustrated below. If not, make sure you are using the right credentials.The loading of the ORCL database objects can take several minutes.
Wait until the Output 'Done' is displayed within the console (bottom of the screen).
1.3.2. MS SQL Server
Fill out the Micosoft SQL Server
- Click 'Connect to SQL Server'
- Fill out the pop-up window named 'Connect to SQL Server'
You could get a warning windows as below which explains that you do not have rights to perfom a 'Server side Migration'. Therefore, you have to select the option 'Client side migration' in the second step.
You can ignore this warning by clicking on 'Continue'.
You should get the Output : 'Connection to SQL Server established successfully' as illustrated below. If not, make sure :
- the right credentials are used
- the database server is up and correctly working by ping it using Windows command line
- the connection string is correct (use another SQL Client for this purpose)
The loading of the ORCL database objects can take several minutes.
Wait until the Output 'Done.' is displayed within the console ( bottom of the screen).
1.4. Convert the ORACLE database schema to MICROSOFT SQL Server
1.4.1. Launch the schema conversion on ORACLE
Migrate the database schema of ORCL database to MSSQL database (below, the final screen obtained after completing the 4 following actions) :
- Go towards 'Oracle Metadata Explorer'
- Click on the '+' sign (the left of database server IP address or domain name, i.e 10.0.10.11 in the screen below )
- Select the schema name of HD4DP database, i.e. 'HEALTHDATA' in the example below
- Right click on the schema name, i.e. 'HEALTHDATA'
- Select and Click on 'Convert Schema' to launch the Schema Conversion
Display the HD4DP tables as displayed in the screen below
- Go on 'Tables'
- Click on '+' sign on the left the word 'Tables' to display the schema tables
- Compare the HD4DP tables present initially in the ORCL schema
1.4.2. Make sur the schema conversion succeeded on MS SQL
Make sure the schema conversion succeded by checking if the ORCL schema has been created with the MS SQL database.
- Go towards 'SQL Server Metadata Explorer'
- Click on the '+' sign (the left of database server IP address or domain name, i.e 'oraclemigtest.cvbniieywa3j.us-east-1.rds.amazonaws.com:1433' in the screen below )
- Select the right database (i.e. 'test' in the screen below)
- Retrieve the ORCL schema, i.e. 'HEALTHDATA' in that case
- Click on '+' sign on the left of the schema name (i.e. 'HEALTHDATA' on the screen below)
- Go on 'Tables'
- Click on '+' sign on the left the word 'Tables' to display the tables of the schema
- Compare the HD4DP tables present intially in the ORCL schema
1.5. Migrate the data from ORACLE database to MICROSOFT SQL database
1.5.1. Launch the data migration from ORACLE database server
Migrate the data from ORCL database to MS SQL database (! make sure the ORCL schema has been successfully performed !) :
- Follow the steps presented in section 1.4.1.
- Select and click on 'Migrate Data' to launch the data migration towards MS SQL
1.5.1. Make sure the data migration succeed
Once the migration will be done, you should received a report about the migration of each table.
It displays a for each table these useful fields:
- 'From' : with table name on ORCL
- 'To' : with table name on MS SQL
- 'Total Rows' : number of rows of each table
- 'Success Rate' : migration success assessment of the table
1.5.2. Compare the data content of the same tables on ORCL and MS SQL
Compare the data content of the tables on ORCL and MS SQL (e.g. for the WORKFLOWS table in the screen below):
- make sure the amount of rows is the same,
- make sure the content of each field is the same.
2. THE CONNECTION OF HD4DP TO THE MS SQL DATABASE
The connection of HD4DP to the MS SQL database has to be done via the configuration of the 'context.xml' file of the Apache Tomcat Server.
- Consult the HD4DP installation manual for doing this setting,
- Restart Tomcat after change,
- Login into HD4DP and make sure the registrations within the TEST register are still visible,
- Perform a registration test as explained in the installation manual.
3. THE FURTHER ACTION TO TAKE WHILE PERFORMING THE DATABASE MIGRATION
You should list all the HD4DP tables within the ORCL database. For instance, for the HD4DP Version 1.10.0, here are the 54 tables to migrate :
- MESSAGES
- ATTACHMENTS
- PARTICIPATION_WORKFLOWS
- ELASTICSEARCH_INFO
- DCD_REPLICATIONS
- AUTHORITIES
- AUDIT_LOGS
- ATTACHMENT_CONTENTS
- USER_REQUEST_DATA_COLLECTIONS
- STATUS_MESSAGES
- STABLE_DATA_UPLOADS
- REGISTRATIONS
- NOTES
- GUEST_USERS
- DOCUMENTS
- ABOUT
- USER_CONFIGURATIONS
- USERS
- STABLE_DATA
- PARTICIPATION_WF_HIST
- EVENTS_NOTIFICATION_USERS
- WORKFLOW_HISTORIES
- VIEWS
- USER_REQUESTS
- USER_DATA_COLLECTIONS
- TASKS
- REGISTRATION_OPTIONS
- ORGANIZATIONS
- INSTALLATION_DETAILS
- FOLLOW_UP_CONDITIONS
- FOLLOW_UPS
- FAST_TRACK_RECORD
- EVENTS_NOTIFICATION_TIMES
- EVENTS_DATA_COLLECTION_DEF
- DOCUMENTS_ATTACHMENTS
- WORKFLOWS_TO_MIGRATE_COMMENTS
- WORKFLOWS
- PARTICIPATION_PROGRESS
- PARTICIPATION_DOCUMENTS
- MESSAGE_METADATA
- FAST_TRACK_UPLOAD
- EVENTS_WORKFLOWS
- CODED_DOCUMENT_CONTENT
- TESTORACLE
- TECHNICAL_METADATA
- PROGRESS
- METADATA
- CONFIGURATIONS
- USER_METADATA
- UPGRADES
- UPDATED_USERS
- EVENTS
- DATE_METADATA
- COMMENTS
Regarding your version of HD4DP, the list can change, for further details about table structure, email support.healthdata.be@sciensano.be. If a table is not on the list (because the list is outdated), look at the constraints and migrate it after those from the list. Through an example with the 'WORKFLOWS' table of HD4DP, this part will show you how to take knowledge of the constraints of one table. Below, you can find the 'CREATE SQL' statement used for creating the table 'WORKFLOWS' within the schema 'HEALTHDATA.WORKFLOWS'.
CREATE TABLE HEALTHDATA.WORKFLOWS
(
WORKFLOW_ID NUMBER NOT NULL,
CREATED_ON TIMESTAMP(6) NOT NULL,
DATA_COLLECTION_NAME VARCHAR2(255),
DATA_COLLECTION_DEFINITION_ID NUMBER,
HD4DP_WORKFLOW_ID VARCHAR2(255),
READABLE_ID VARCHAR2(255),
STATUS VARCHAR2(255),
UPDATED_ON TIMESTAMP(6) NOT NULL,
ORGANIZATION_ID NUMBER,
UNIQUE_ID VARCHAR2(255),
SEND_STATUS VARCHAR2(255),
IDENTIFICATION_TYPE VARCHAR2(255),
IDENTIFICATION_VALUE VARCHAR2(255),
SUBMITTED_ON TIMESTAMP(6),
CORRECTIONS NUMBER(1, 0) DEFAULT 0 NOT NULL,
FOLLOW_UP NUMBER(1, 0) DEFAULT 0 NOT NULL,
DOCUMENT_ID NUMBER
);
ALTER TABLE HEALTHDATA.WORKFLOWS ADD CONSTRAINT SYS_C005259
UNIQUE (HD4DP_WORKFLOW_ID);
ALTER TABLE HEALTHDATA.WORKFLOWS ADD CONSTRAINT WORKFLOWS_PK
PRIMARY KEY (WORKFLOW_ID);
ALTER TABLE HEALTHDATA.WORKFLOWS ADD CONSTRAINT CSTRT_WF_DOCUMENT_ID
FOREIGN KEY (DOCUMENT_ID)
REFERENCES HEALTHDATA.DOCUMENTS (DOCUMENT_ID);
ALTER TABLE HEALTHDATA.WORKFLOWS ADD CONSTRAINT CONSTRAINT_WF_ORG_ID
FOREIGN KEY (ORGANIZATION_ID)
REFERENCES HEALTHDATA.ORGANIZATIONS (ORGANIZATION_ID);
An attention should be paid on the 'ALTER TABLE' statements (in green) at the bottom of the code. The table contains 4 constraints :
- the field 'HD4DP_WORKFLOW_ID' has be unique regarding the constraint 'SYS_C005259'
- the field 'WORKFLOW_ID' constitutes the primary key because of 'WORKFLOWS_PK PRIMARY KEY' constraint
- there are 2 foreign key constraint
- 'CONSTRAINT CSTRT_WF_DOCUMENT_ID', therefore the 'DOCUMENT_ID' field from the DOCUMENTS table has to be filled in
- 'CONSTRAINT_WF_ORG_ID', therefore the field 'ORGANIZATION_ID' from the 'ORGANIZATIONS' table has to be filled in
Hence, make sure the tables 'DOCUMENTS' and 'ORGANIZATIONS' are filled in in the right way for preventing migration failure of 'WORKFLOWS' table. Such precaution has to be taken for all the tables you want to migrate.
Support services HD4DP v1
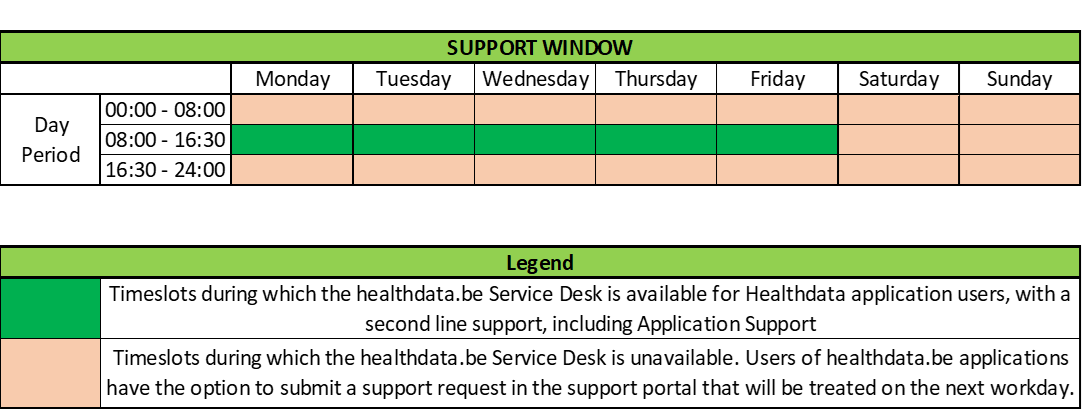
Support services HD4DP v1De Service Desk van healthdata.be (Sciensano) ondersteunt de gebruikers van onze applicaties en services, en biedt een antwoord op vragen en problemen als deze zich voordoen.
De Service Desk richt zich op de diensten van onze IT Services (HD4DP, HD4RES, healthstat.be, …) en helpt u met accounts en wachtwoorden. Voor vragen over de inhoud en doelstelling(en) van de projecten verwijzen we graag naar de beherende onderzoeksorganisaties.
Voor een zo efficiënt mogelijke afhandeling van uw verzoek adviseren wij u om gebruik te maken van ons serviceportaal: Jira Service management (JSM) portal.
Hieronder vindt u een rooster met uren waarop onze Service Desk voor ondersteuning beschikbaar is: