Azure Virtual Desktop (AVD) for Data users
Azure Virtual Desktop (AVD) for Data users gaetan.muyldermans di, 11/04/2025 - 09:52Installation of the AVD
Installation of the AVD1. Installation of the Windows app
In order to access the AVD for the first time, data users should install the AVD environment locally.
Open the Windows app via following link
Log in with your <firstname.lastname>@healthdata365.be account
Important Note for users who have worked with Citrix in the past.
Your <firstname.lastname>@healthdata365.be password is the same as your Citrix account password.

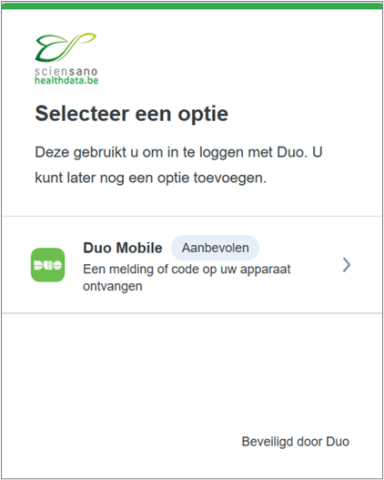
A pop-up appears to configure DUO (two factor authentication service)for your healthdata365.be account.
Since the Azure Virtual Desktop works with the Duo Security's two-factor authentication service of Duo Mobile to make logins more secure, it necessitate the installation of the DUO app on your mobile, tablet or smart watch. The application generates passcodes for login and can receive push notifications for easy, one-tap authentication on your mobile.
2. Install the DUO app on your mobile
As described in the section above, the DUO app necessitates its installation on you mobile as described below.
Download the app to your mobile device via the Apple Store or Play Store (Android)

On your mobile phone press on “+Add” in the right corner → “Use QR code”

Select Continue

3. Configure DUO
Select "Next" a number of times

Open the section "Recommended"
Provide your mobile phone number

Verify the entered number and confirm by selecting "Yes, that it is correct"

A QR code will appear on the next screen, leave it open until you have scanned it with your DUO application on your mobile phone.
SAS connection profiles
SAS connection profiles- Select the “AVD Research” workspace in the “Windows App”

2. Open SAS Enterprise Guide

3. Once SAS Enterprise Guide is open, go to the “Tools” menu at the top of the screen and select "Connections" from the dropdown menu

4. In order to add a new connection profile next to the ones already configured and listed in "servers", click on the "Add" button.

This will open the "Create Profile" wizard.

5. Complete the "Create Profile" wizard based on following information:
- Name: Enter a descriptive name for the server connection.
- Description: description of the server connection. Optional.
- SAS Server: Select Remote and fill in:
- metaaccint with port 8564 for the Acceptance environment.
- metaprdint with port 8563 for the Production environment.
- Save login in profile: You can check this one.
- Keep “Set Proxy list for metadata server” and “use Integrated Windows Authentication” unchecked.
- User: Fill in the same username you used to log into Citrix.
- firstname.lastname for the validation environment.
- firstname.lastname_a for the analysis environment.
Note: If the full name exceeds the allowed length, the first name is shortened to its initial to save space. Be sure to carefully check the email containing your credentials for the correct format.
- Password: Fill in the same password you used to log into Citrix.
- "Authentication domain”: to be ignored.
save the new profile by clicking on the "Save and connect" button
6. Start using the server
You’re all set! You can now begin using SAS functionalities provided by the server in your SAS Enterprise Guide projects.