Le reporting et la visualisation des données du projet GPBARO_DM
Le reporting et la visualisation des données du projet GPBARO_DM Bart.Servaes mar 16/01/2024 - 10:33Healthstat.be
Healthstat.beVous trouverez ici une description générale de l'application healthstat.be de HD et de sa position dans l'architecture de HD.
Cliquez ici pour apprendre à vous connecter à l'application healthstat.be de HD.
Le processus de gestion de données des projets GPBARO
Le processus de gestion de données des projets GPBARONous décrivons ci-dessous (à un niveau élevé) le processus de gestion des données des projets GPBARO entre les cabinets de médecine générale et la plateforme healthstat.be de healthdata.be.
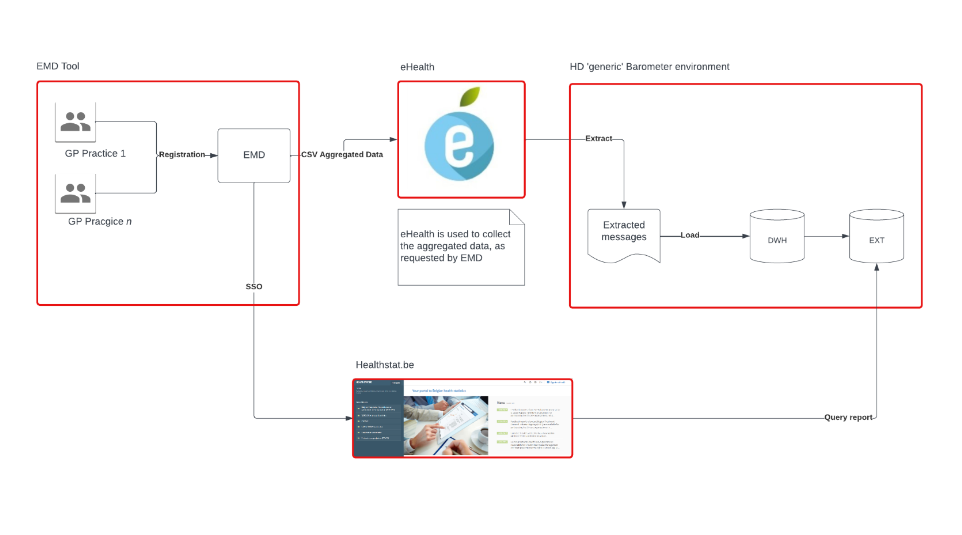
Processus de gestion des données :
- Les données sont saisies par le médecin généraliste dans son environnement habituel de gestion des soins.
- Le fournisseur du logiciel EMD transmet les données pertinentes à l'environnement eHealthbox.
- eHealthbox collecte les données dans un format générique.
- Les messages sont extraits de eHealth et téléchargés dans l'environnement DWH de HD, où les données sont traitées par le biais des data layers.
- HD extrait les données nécessaires des messages eHealth et les injecte dans l'environnement de base de données externe de DWH pour le projet GPBARO.
- Les médecins généralistes accèdent aux rapports de leur propre cabinet par le biais d'une solution SSO intégrée à leur EMD.
Demander l'accès à l'application healthstat.be en tant que médecin généraliste pour un projet spécifique dans EAM
Demander l'accès à l'application healthstat.be en tant que médecin généraliste pour un projet spécifique dans EAMGrâce au système EAM, un médecin généraliste peut accéder aux projets de healthstat.be de trois manières différentes. Suivez les liens au bas de cette page pour explorer chacune d'entre elles. Sélectionnez l'option qui correspond à vos besoins ou à votre méthode de travail.
Les trois options ont en commun la première étape, qui est décrite ci-dessous. Les options se poursuivent ensuite sur les pages correspondantes.
Pour naviguer vers la page d'accueil du système Entity Access Management (EAM) de HD, vous devez saisir l'URL https://eam.healthdata.be dans votre navigateur Internet.
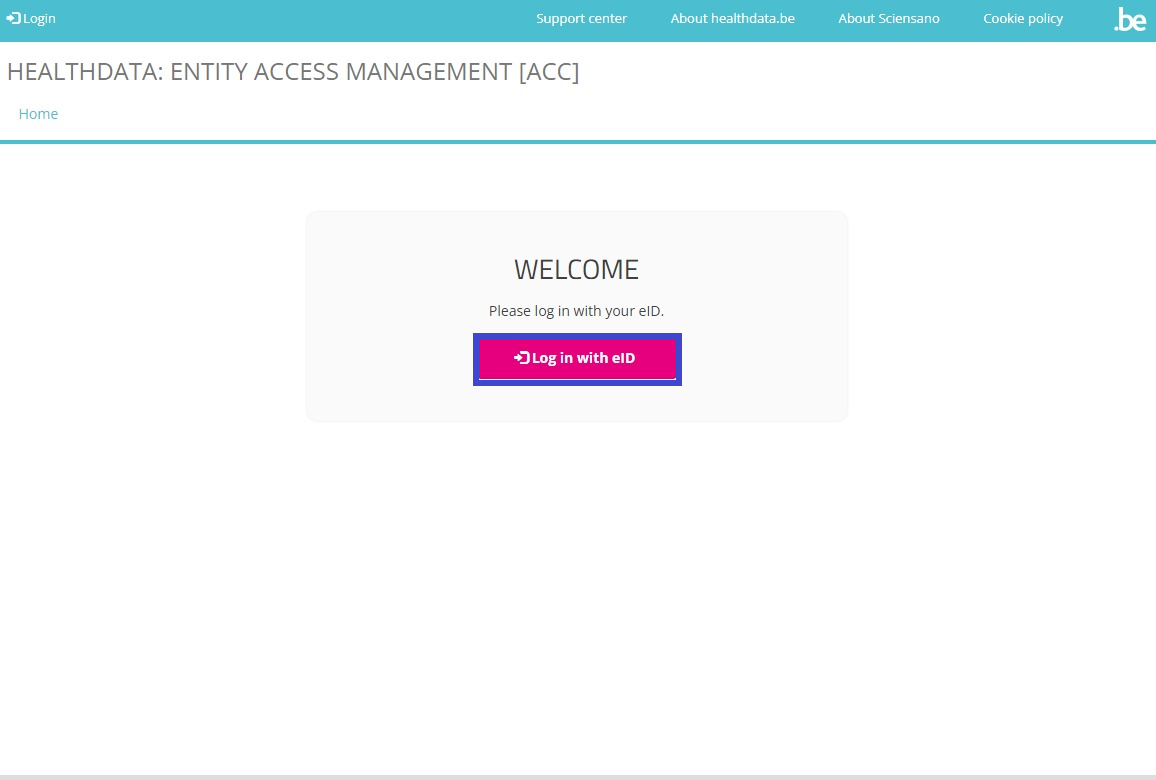
Sélectionnez Login en haut à gauche de l'écran, puis cliquez sur le bouton en rouge Log in with eID.
Vous êtes dirigé vers le Federal Authentication Service (FAS) du gouvernement, où vous pouvez vous connecter à l'aide de plusieurs clés numériques avec l'eID ou identité numérique.

Si vous avez choisi de vous connecter avec ItsMe, vous devez entrer votre numéro de téléphone portable.
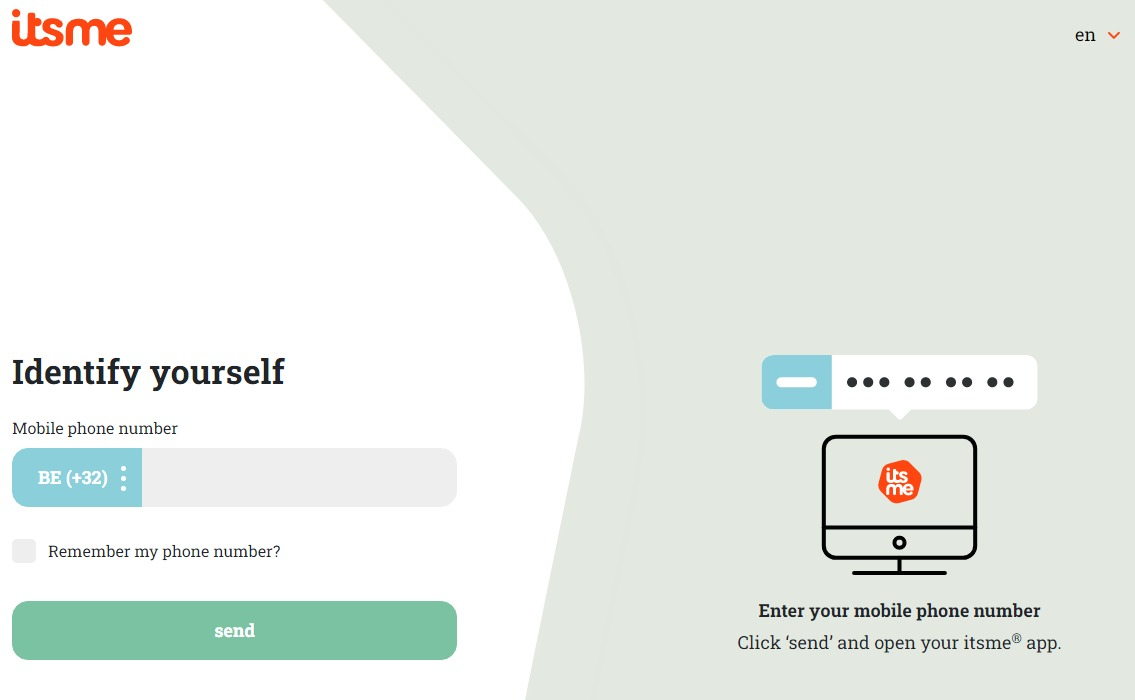
Suivez les instructions sur votre appareil mobile via l'application ItsMe.

Une fois la procédure de connexion terminée, vous sélectionnez le bouton vert de validation du profil (« Profiel bevestigen » ou « Confirmer le profil ») pour vous connecter au système EAM de HD (voir l'image ci-dessous).
| NL | FR |
 |  |
Vous avez atterri sur la page portail du système EAM (Entity Access Management) de healthdata.be, qui affiche les données que vous avez partagées par eID, itsme ou une autre clé numérique, comme dans l'écran ci-dessous :
Choisissez l'une des trois options ci-dessous pour poursuivre votre demande d'accès à healthstat.be :
Rôles d'utilisateurs dans healthstat.be
Rôles d'utilisateurs dans healthstat.beChaque organisme de soins de santé a au moins un gestionnaire d'accès qui gère les droits d'accès aux applications de sa propre organisation et qui le fait dans le système Entity Access Management (EAM) de HD. Dans le cadre de ce processus, les demandes d'accès des employés des organismes de santé sont analysées et validées si elles sont légitimes. L'étendue des accès accordés à healthstat.be peut varier, ce qui se traduit par diverses combinaisons de rôles d'utilisateurs et de niveaux de données.
Deux rôles d'utilisateurs peuvent être distingués : Fournisseur de données, qui est un utilisateur lié à une organisation existante, et Sponsor, qui est le sponsor/coordinateur de la collecte de données. Tous deux sont autorisés à consulter les rapports en fonction du niveau de données. Deux niveaux de données déterminent l'étendue de la visibilité des rapports : Hôpital, c'est-à-dire que les rapports consultés contiennent toutes les données enregistrées par le personnel de l'hôpital ; Individuel, c'est-à-dire que les rapports consultés contiennent uniquement les données qui ont été enregistrées par cet utilisateur.
Fournisseur de données / Hôpital :
Le fournisseur de données / l'hôpital peut :
- Consulter les rapports d'une collecte de données spécifique contenant des données de l'hôpital concerné
Fournisseur de données / Individu :
Le fournisseur de données / l'individu peut :
- Consulter les rapports d'une collecte de données spécifique qui contient uniquement des données personnellement enregistrées.
Sponsor / Sponsor :
Le sponsor / sponsor peut :
- Consulter tous les rapports contenant des données collectées au niveau de l'hôpital.
Sponsor / Individu :
Le sponsor / l'individu peut :
- Consulter tous les rapports qui ne contiennent uniquement que des données qui ont été personnellement enregistrées.
Remarque :
- C'est au gestionnaire d'accès qu'il incombe de modifier les rôles de ou vers les groupes suivants : Fournisseur de données / Hôpital, Fournisseur de données / Individu, Sponsor / Sponsor et Sponsor / Individu. Ces actions doivent être effectuées dans le système EAM.
Option 1 : le médecin généraliste crée et complète un compte EAM, le gestionnaire d'accès l'approuve (EN uniquement)
Option 1 : le médecin généraliste crée et complète un compte EAM, le gestionnaire d'accès l'approuve (EN uniquement)This option gives the request for access to healthstat.be mainly in the hands of the General Practitioner. The GP first completes the own user profile, then adds an EAM account to it and finally adds the grants, determining the specific registry and the role/data level requested. The General Practitioner then sends the access request for approval to the Access Manager, who fullfils the approving step.
Table of contents
The General Practitioner actions
Go back here if you want to know how to navigate to the My Profile page.
Completing the user profile and becoming an Authenticated User
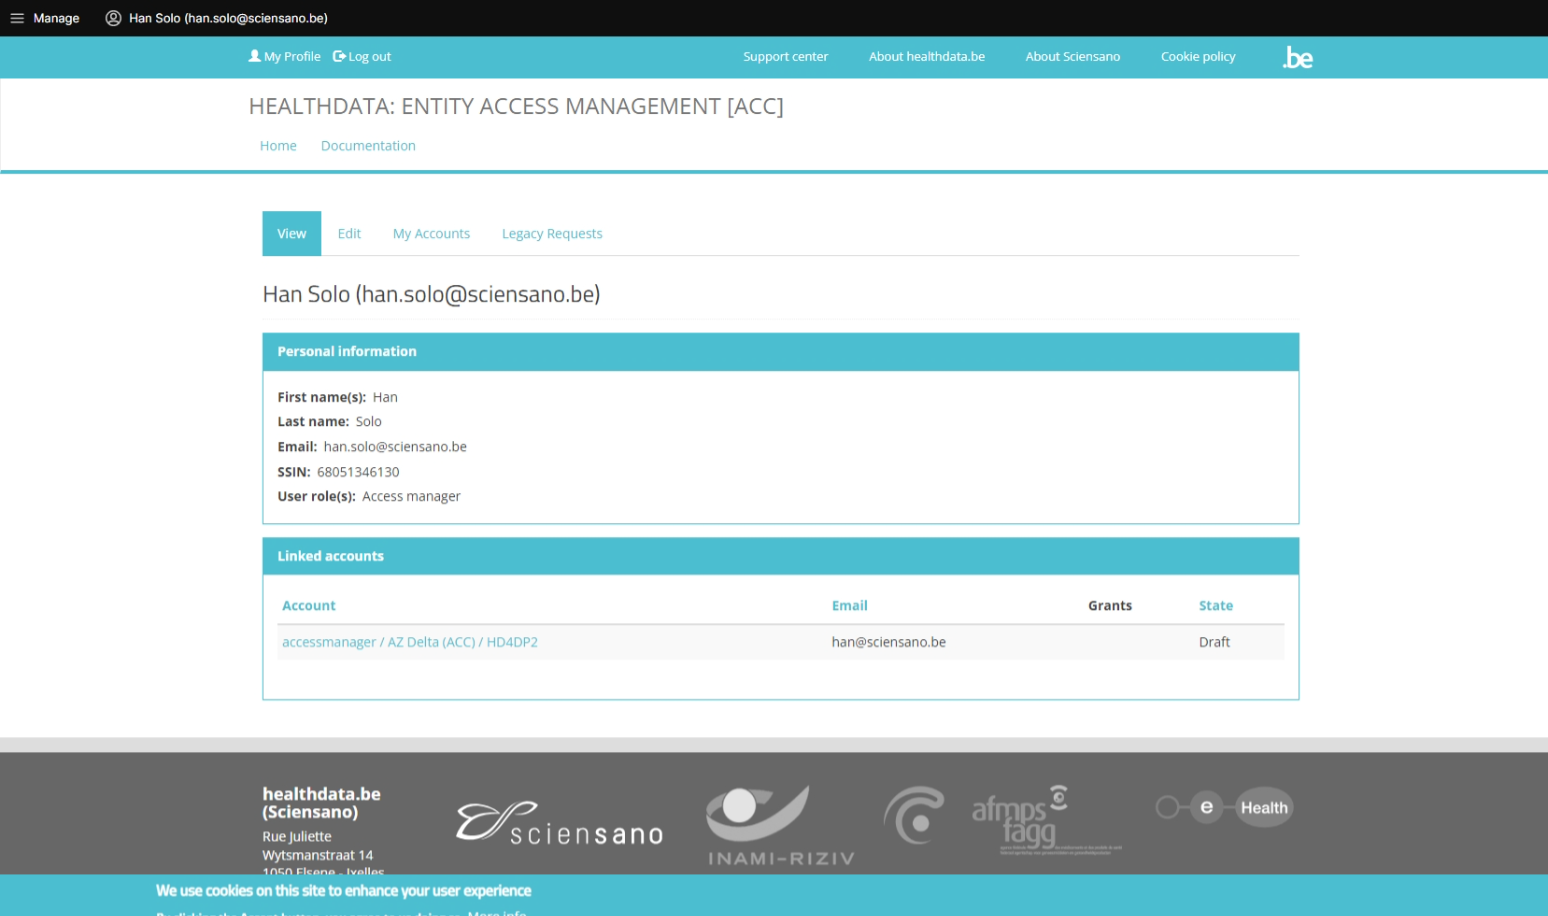
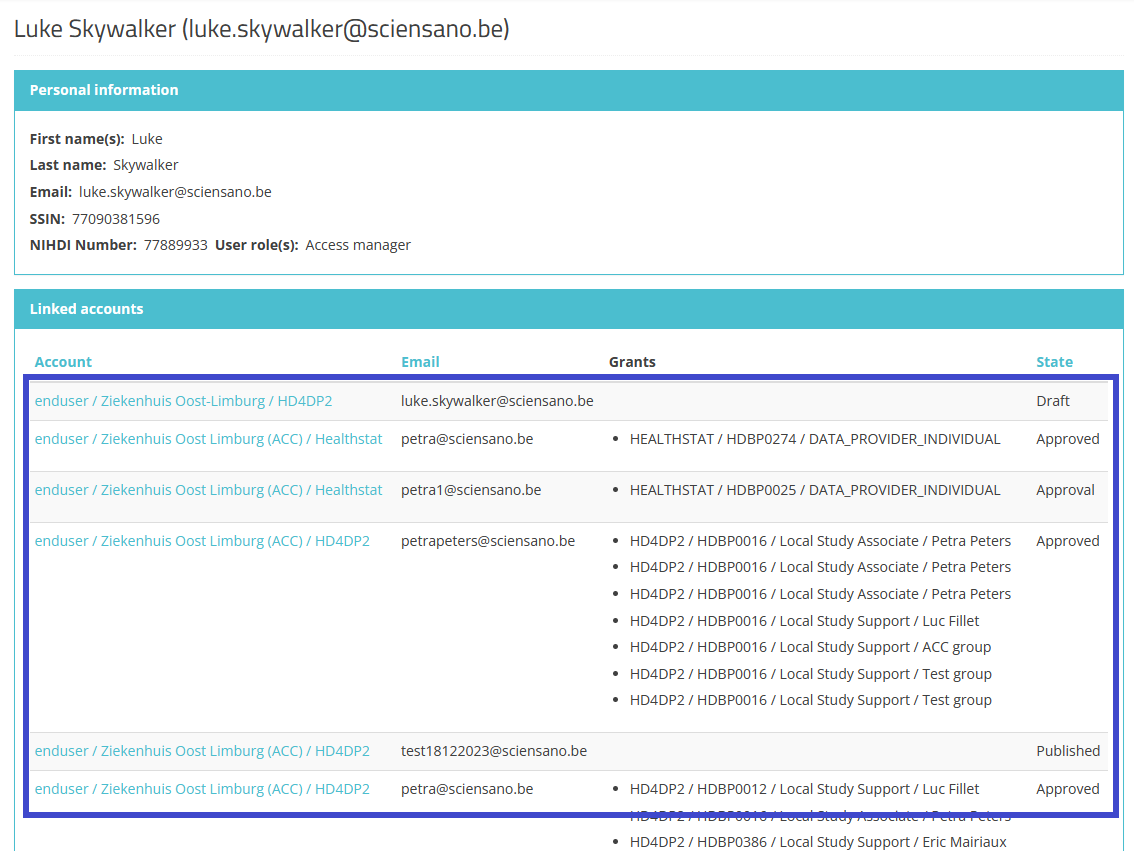
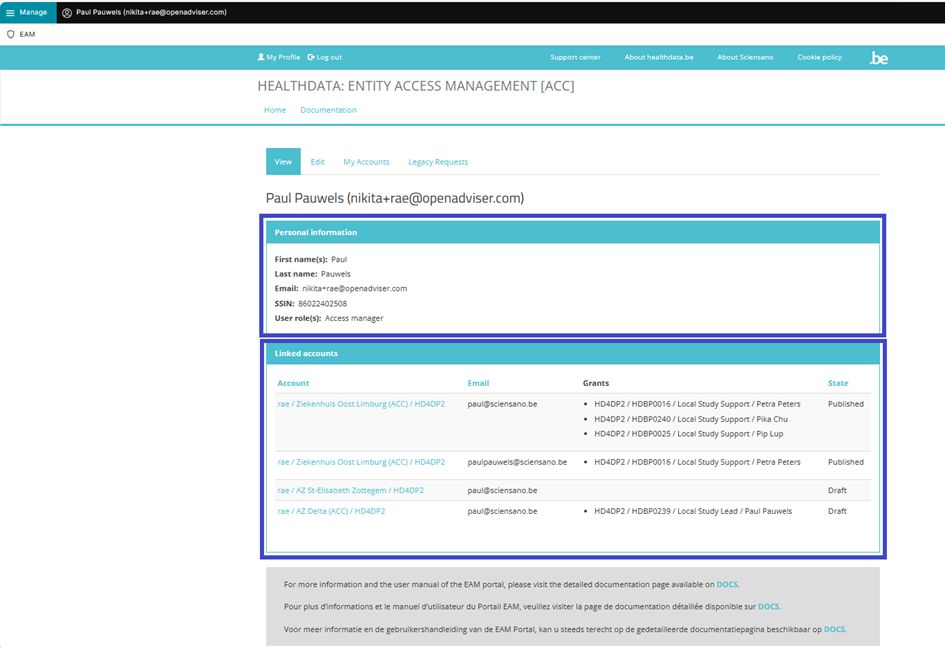
The main My profile page shows the Personal information gathered during the FAS login procedure, and the list of accounts linked to your profile (Linked accounts section).

Attention: When the General Practitioner logs in for the first time, there will be no NIHDI number and the list with linked accounts will be empty too.
Now, click on your name and e-mail address on the top left of the screen to toggle a toolbar with a series of tabs: View profile, Edit profile, My Accounts and Log out. The View profile tab directs you to the My profile screen, which is the screen you are viewing now.

To complete your profile, select the Edit profile tab. The Edit tab contains two subtabs: User settings and Personal information. The red asterisks indicate required fields.
Select the User settings tab.
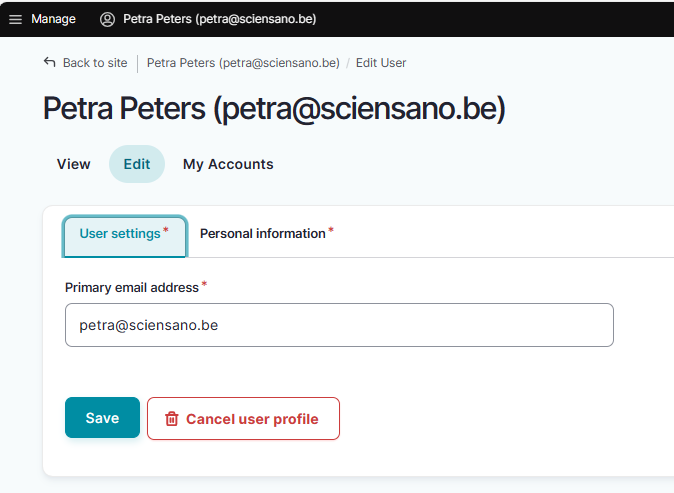
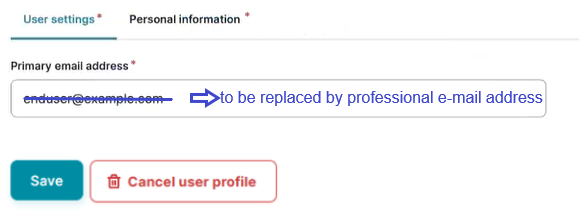
ATTENTION: When logging in for the first time, the User settings tab will feature a primary e-mail address field with a pre-filled default e-mail address, e.g.:

Replace this address with your professional e-mail address. This e-mail address is used to send necessary notifications to you. Preferably avoid the use of public e-mail addresses such as @gmail.com, @hotmail.com, @yahoo.com etc.
Confirm with the Save button.
The Personal information tab contains pre-populated information such as first name, last name and SSIN in greyed out fields. This information can't be changed. Next to this, you can provide a personal NIHDI number, or more than one, if applicable.
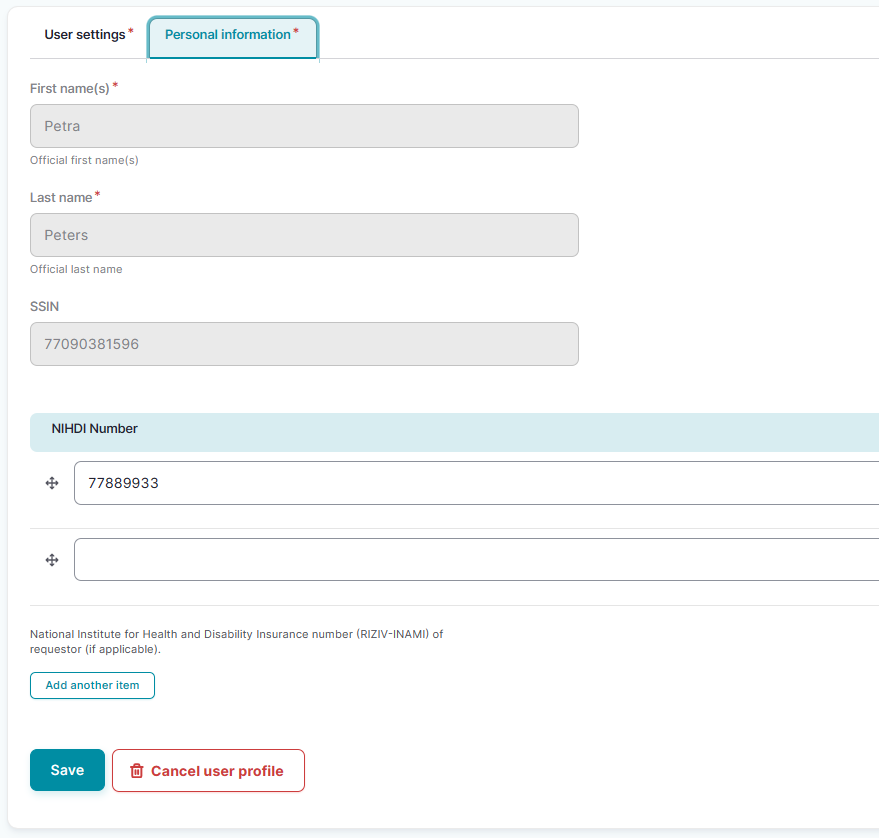
Use the Save button to confirm. You have now completed the fields in both User settings and Personal information tabs, which makes you known to the EAM system as an Authenticated User.
Adding and provisioning an EAM account
Return to the My profile page and select the My accounts tab.

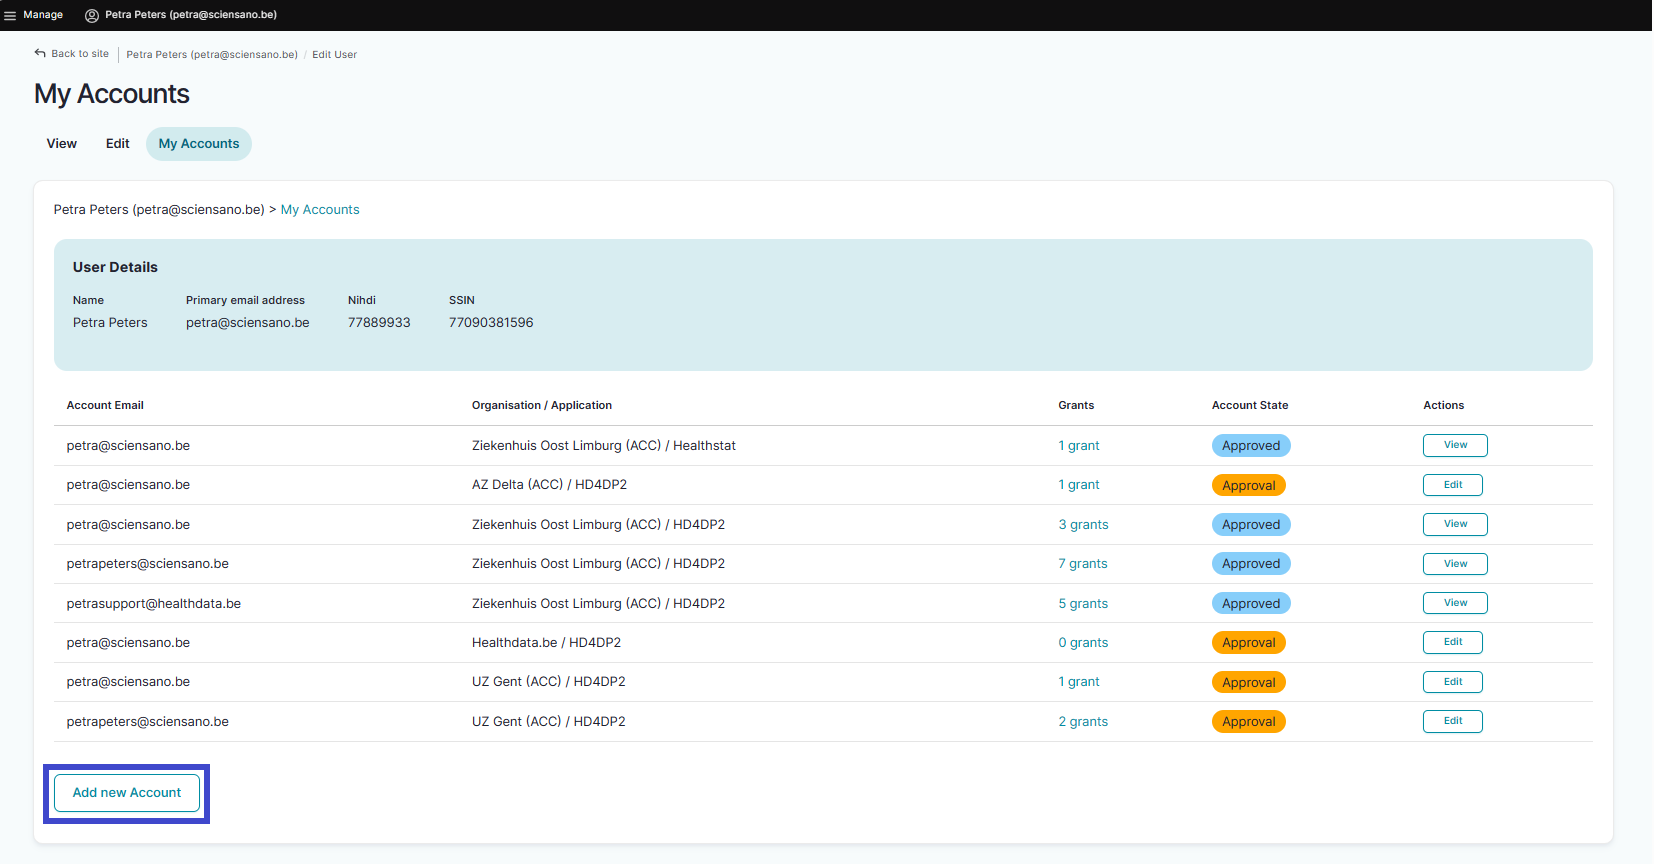
On the My accounts page your personal information is displayed in the blue User details section, followed by a list of accounts you have created.
To add a new account, click on the Add new Account button at the bottom of the page.
The Add a new account window appears.

Complete the fields in the Add a new account window with the e-mail address you use for your organization. Then select the combination of your organization (General Practitioners) and the application (healthstat.be). This is what we call provisioning of an account.
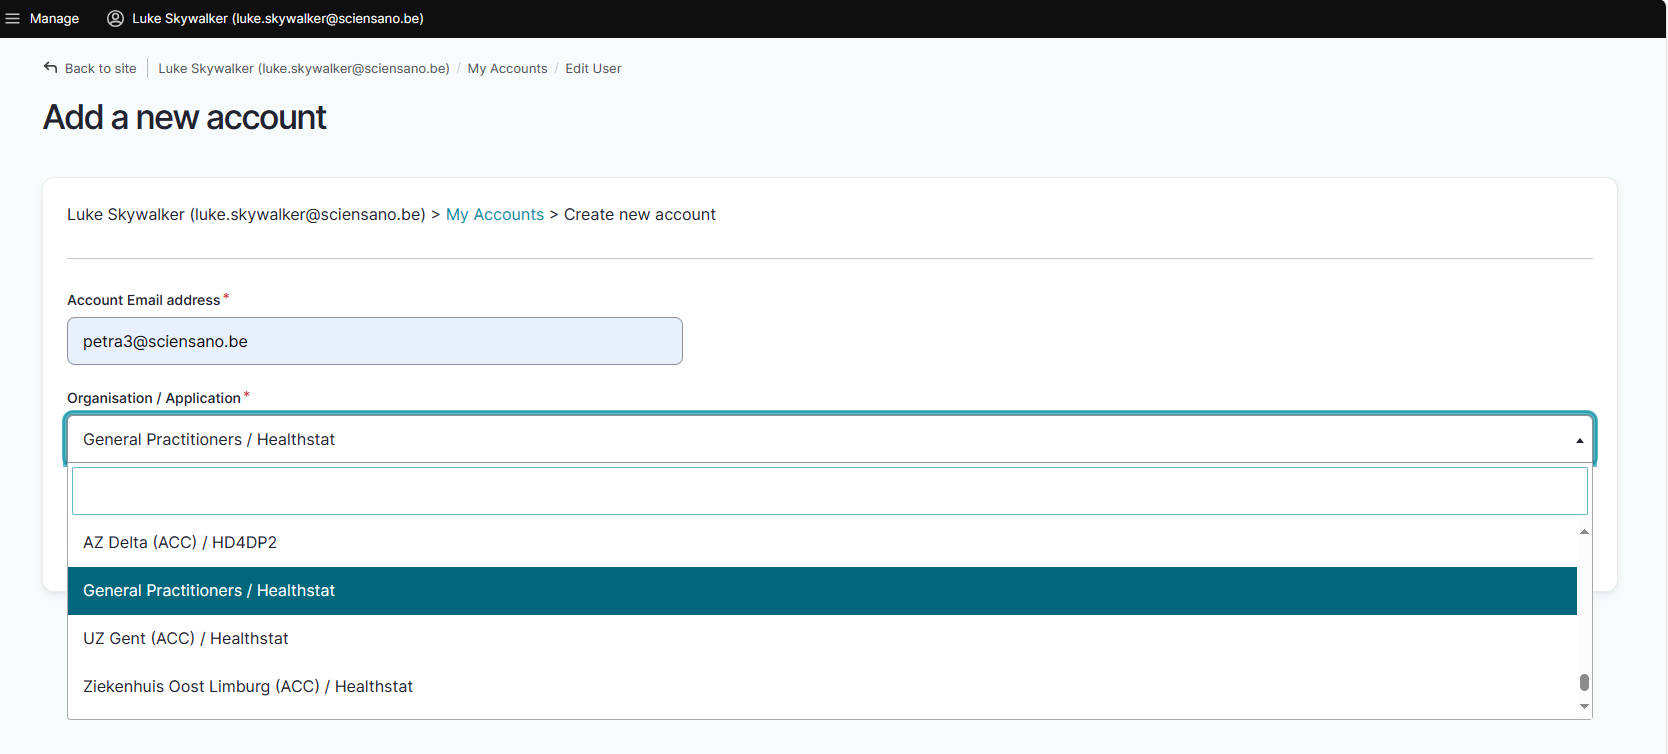
Click on the Save button.
You will be automatically redirected to the My accounts page that has now been updated with your newly created account added at the bottom of the list. The account has received the status "Draft".

Adding grants for a project in healthstat.be
At this point you can start the process of adding grants, i.e. determining roles and data level for a project in Healthstat, adapting the EAM account status and requesting for approval by the Access Manager.
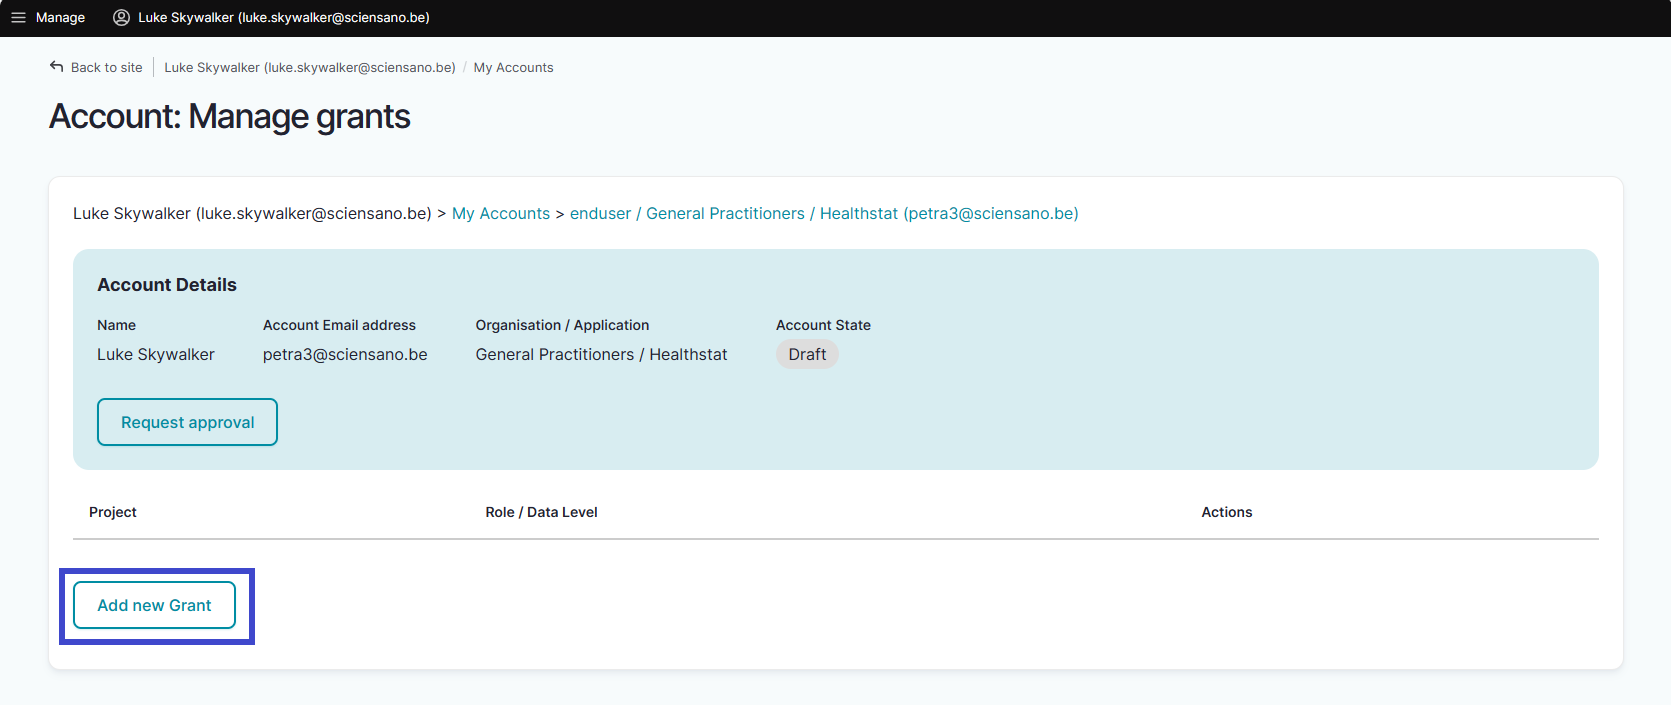
Select "n grants" in the Grants column.

The Account: Manage grants screen appears. To add new grants to an account you need to click on the Add new Grant button.
The Add a new grant window pops up. Select the desired project and the role of Data Provider / Hospital, Data Provider / Individual, Sponsor or Sponsor / Individual.

When you return to the My accounts page, you will see that the accounts list has been updated with the selected grant:

You have now created an account for a project in Healthstat.be with the role of Data Provider / Hospital, Data Provider / Individual, Sponsor / Sponsor or Sponsor / Individual.
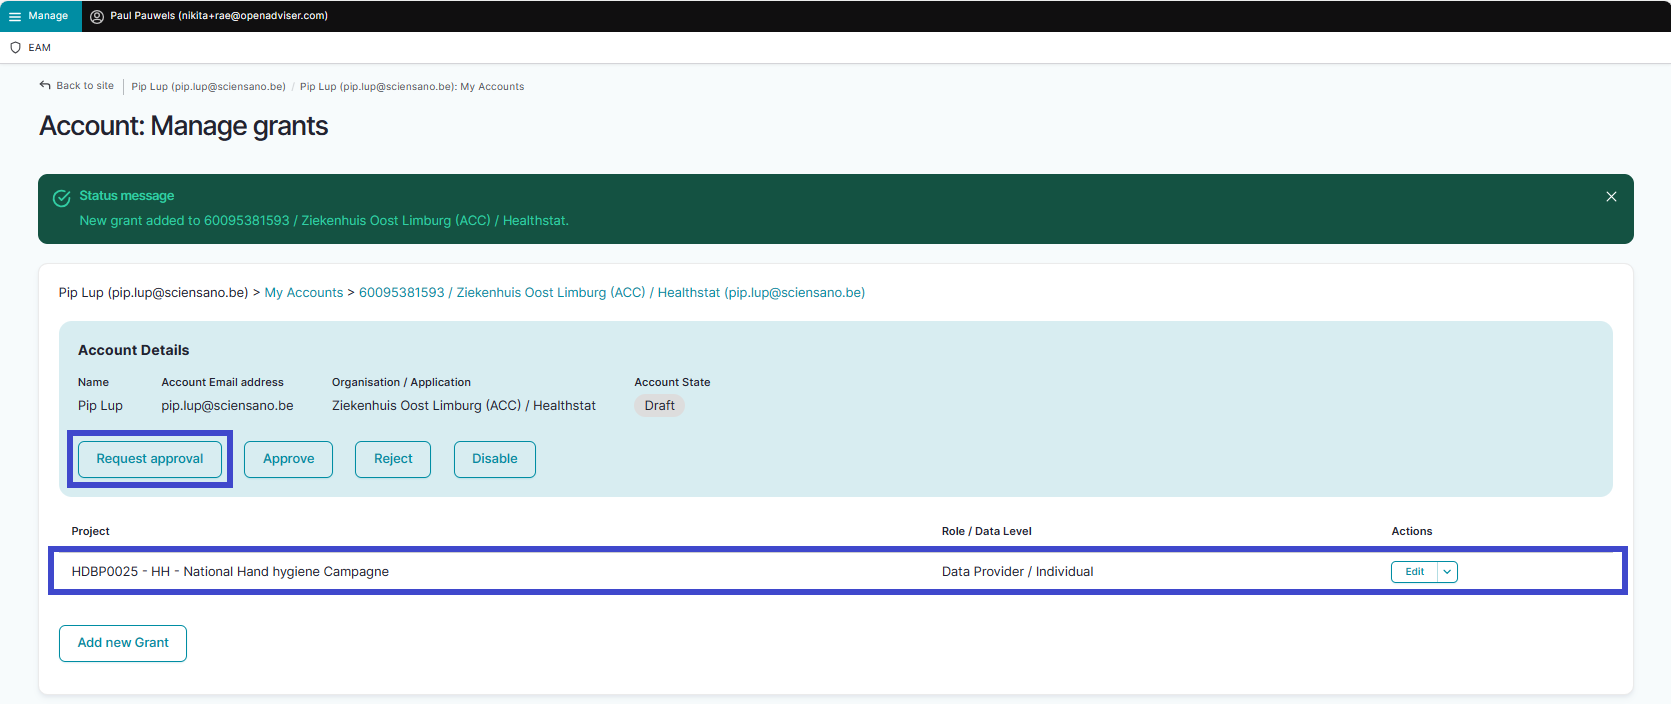
Requesting approval of EAM account with access grants for projects in healthstat.be
To request approval of this account you need to click on "n grant(s)" in the Grants column to open the Account: Manage grants page. You either can add a new grant or request for approval. To do so, click on the Request approval button.

The Account state is updated to Approval in the Account details section.
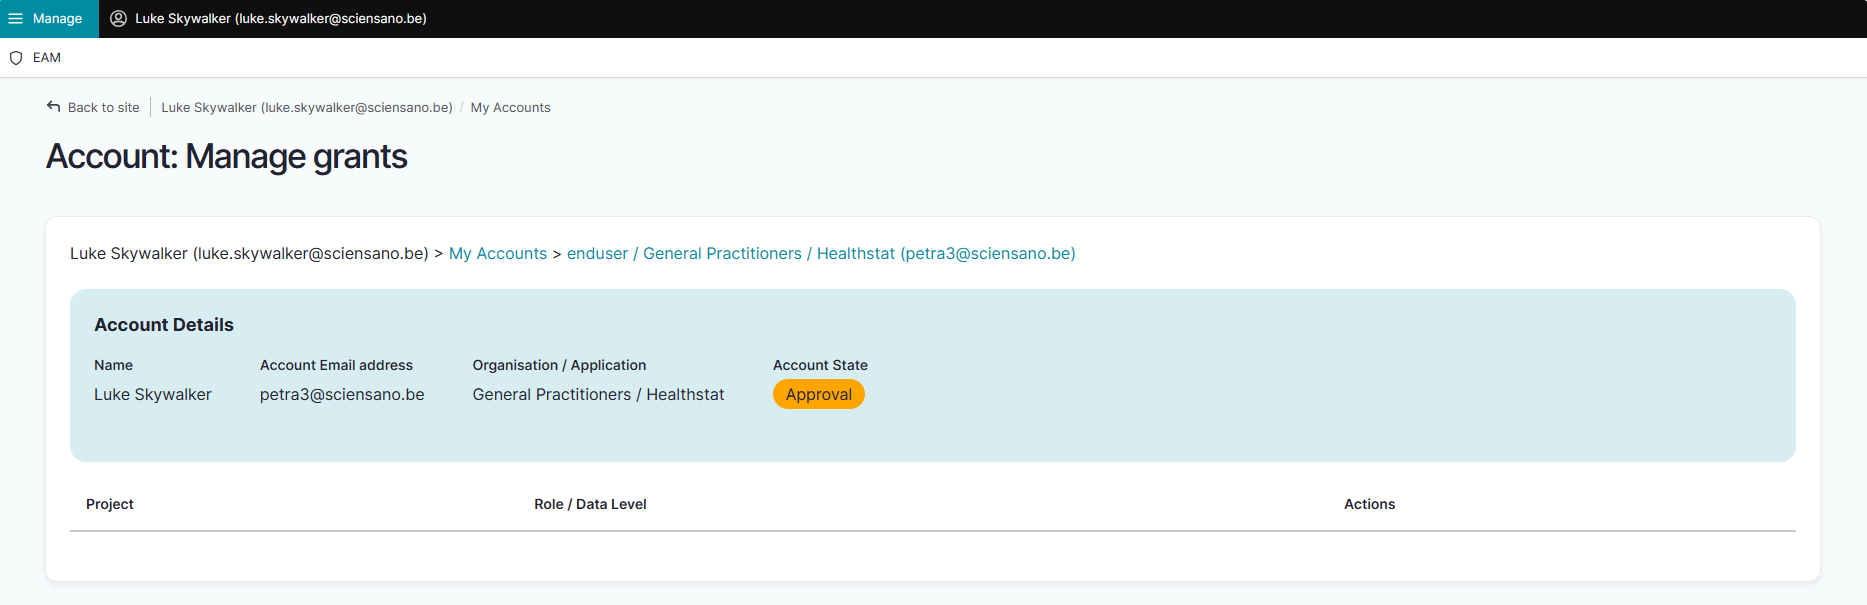
Return to the My accounts page where you notice the changed Account state to Approval.
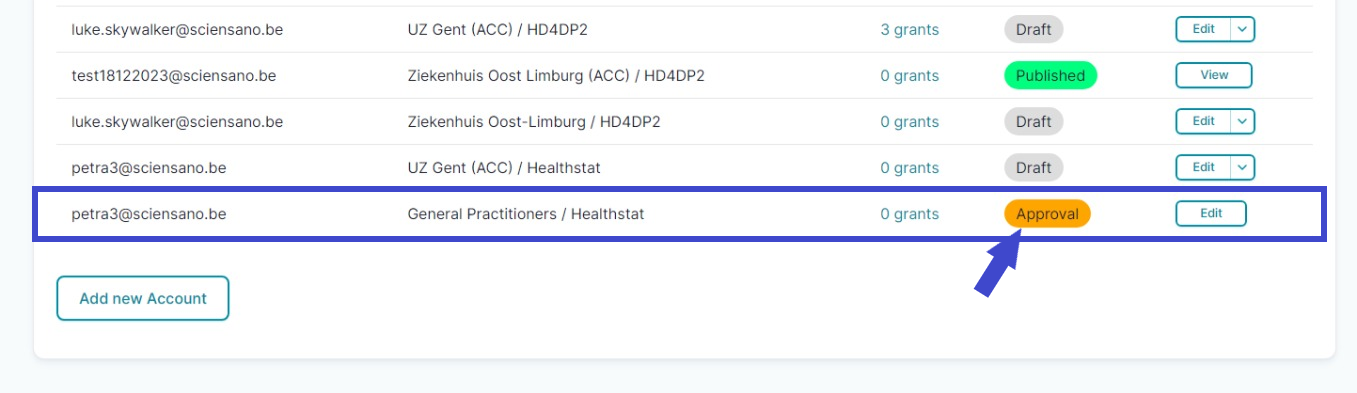
The Access Manager will be notified of your request via e-mail. You will have to wait now for the Access Manager to take action. This can take multiple hours. After approval by the Access Manager (next step), the Account state will change to Approved.
The Access Manager actions
Approving EAM account with access grants for projects in healthstat.be
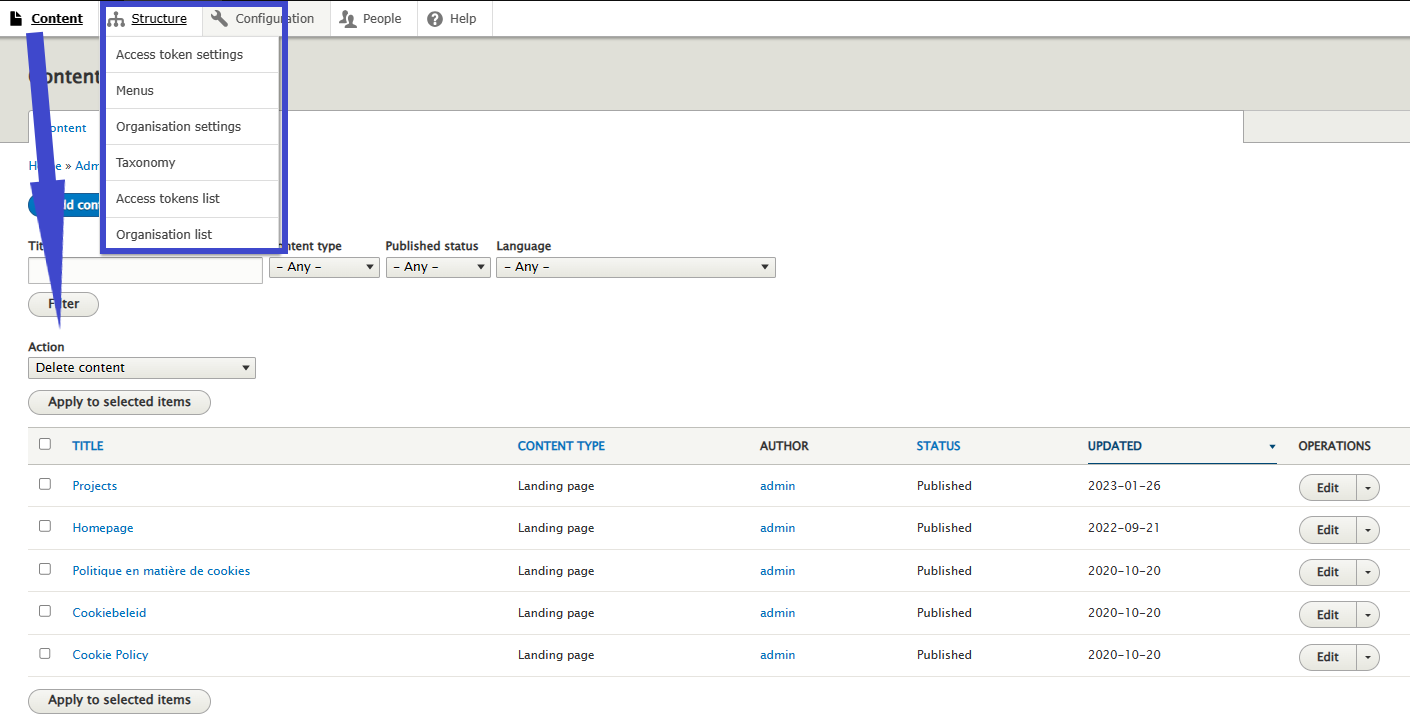
Click on Manage to the top left of the screen, so that EAM appears. When hovering over this, the items EAM Users and EAM Accounts become visible.
Select EAM Accounts and Approval successively.

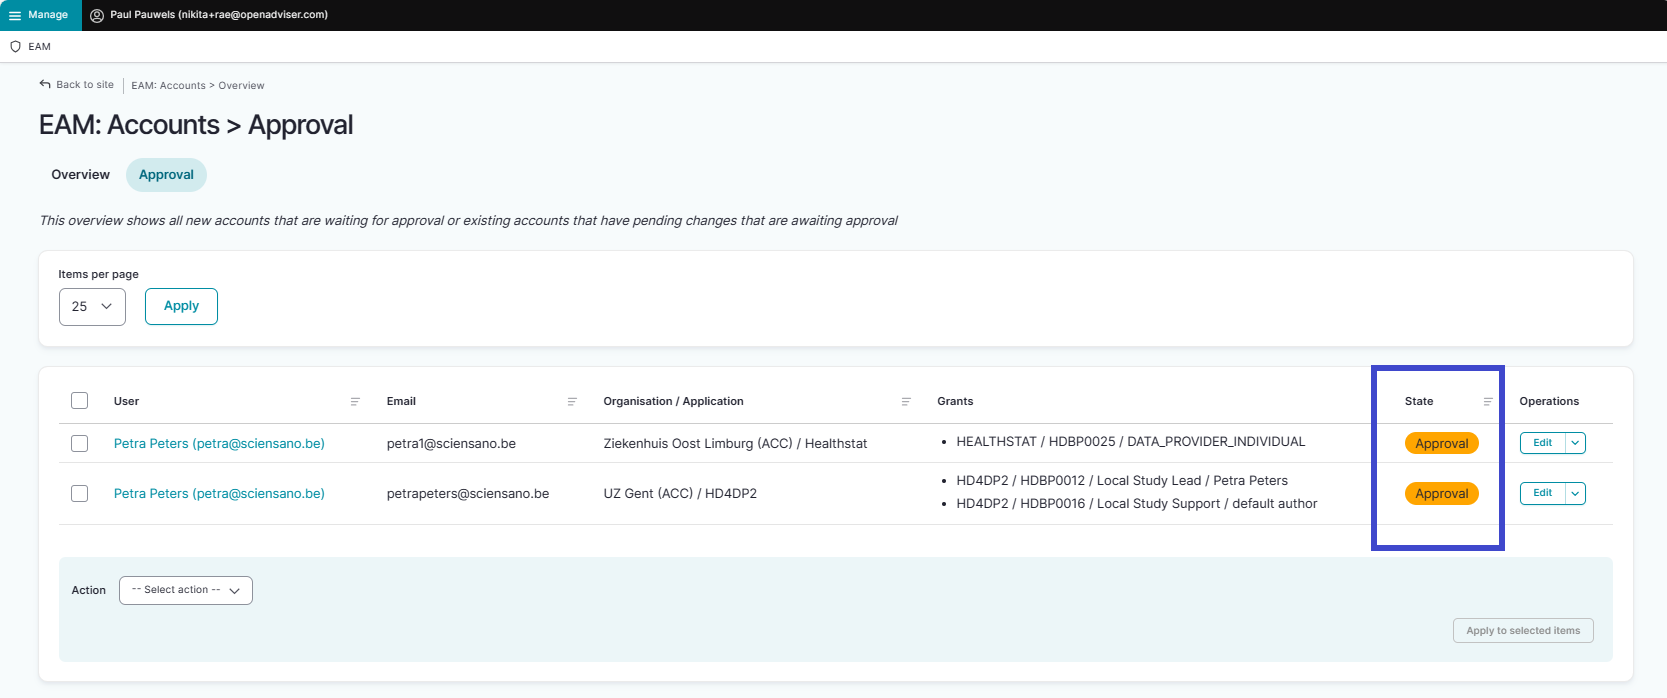
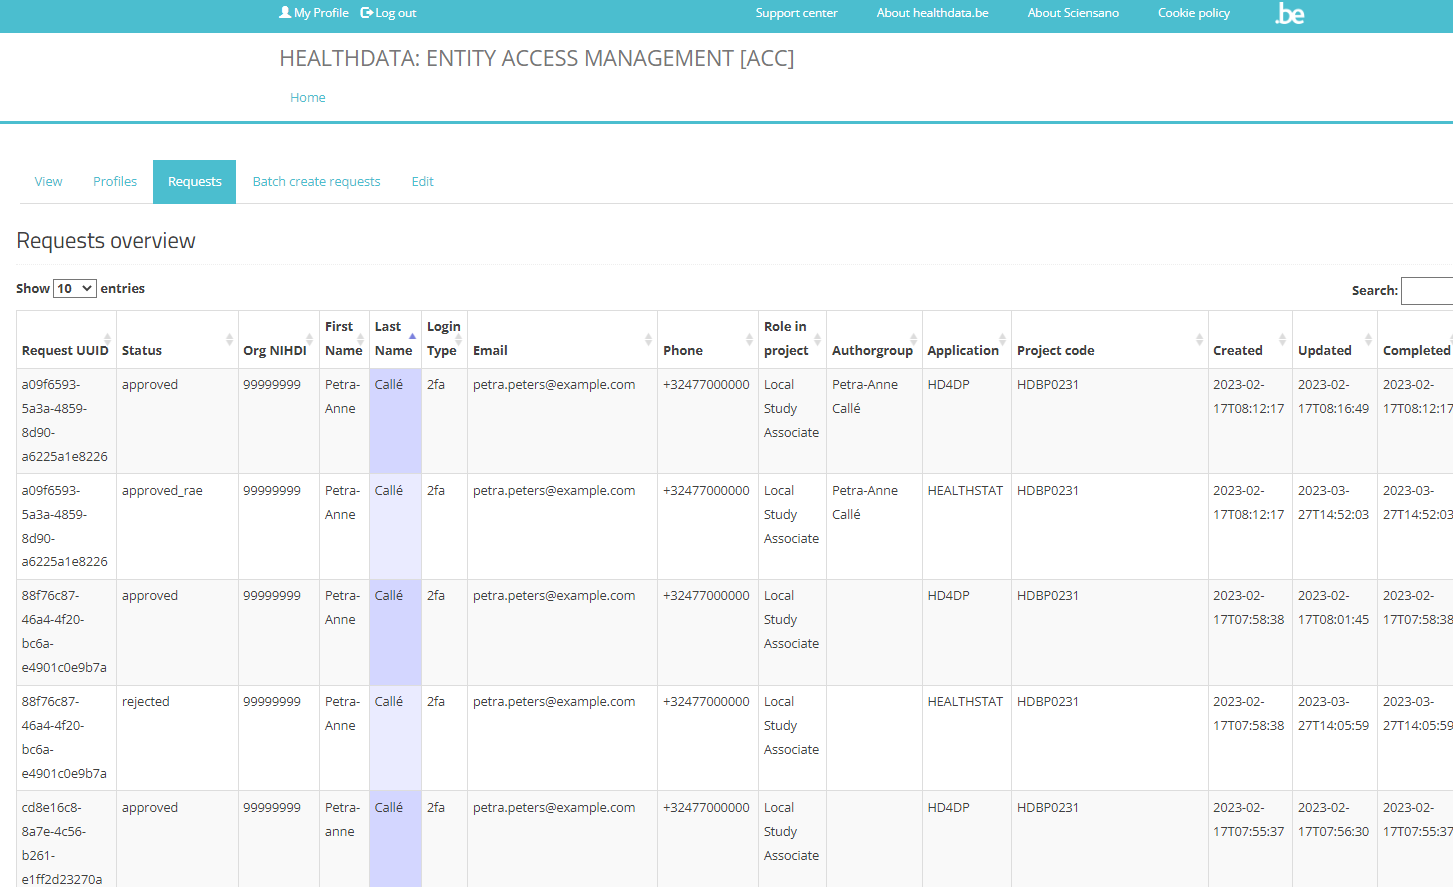
When clicking on Approval you open the page with end-user accounts that are waiting to be approved:
There are two ways to approve these account requests:
- By checking the selection box of the relevant account request and selecting the Approve action. Click on the Apply to selected item button to perform the action.

- By clicking on the Edit button in the Operations column for the relevant account ...

... and subsequently on the Approve button in the Account: Manage grants screen.

The Account state changes to Approved.

After this, a fulfilment process will start to run in the background, finally resulting in an account state change to Published. Credentials are sent to the General Practitioner by e-mail.
Performing a push action
If this change does not take place within a reasonable amount of time - usually between 15 minutes and up to three hours - the account could be updated by means of a "push".
Therefore, return to the accounts overview screen.

First, check the Approved account that needs to be pushed (1). Then, open the Action drop-down menu and select the Update account (push) option (2). Finally, validate this action by clicking on the Apply to selected items button (3).

In case the push action does not trigger the expected result, you need to contact our Support service.
Option 2 : le médecin généraliste crée un compte EAM, le gestionnaire d'accès le complète et l'approuve (EN uniquement)
Option 2 : le médecin généraliste crée un compte EAM, le gestionnaire d'accès le complète et l'approuve (EN uniquement)With this option the actions performed by the General Practitioner are restricted to the completion of the own user profile and the creation of an EAM account which is an absolute necessity to be retrieved by the Access Manager via the Users Overview. The Access Manager takes it from there and adds the grants to the EAM accounts of the General Practitioners, sends the access request for approval and finally approves this request.
Table of contents
The General Practitioner actions
Go back here if you want to know how to navigate to the My Profile page.
Completing the user profile and becoming an Authenticated User
The main My profile page shows the Personal information gathered during the FAS login procedure, and the list of accounts linked to your profile (Linked accounts section).
Attention: When the General Practitioner logs in for the first time, there will be no NIHDI number and the list with linked accounts will be empty too.
Now, click on your name and e-mail address on the top left of the screen to toggle a toolbar with a series of tabs: View profile, Edit profile, My Accounts and Log out. The View profile tab directs you to the My profile screen, which is the screen you are viewing now.
To complete your profile, select the Edit profile tab. The Edit tab contains two subtabs: User settings and Personal information. The red asterisks indicate required fields.
Select the User settings tab.
ATTENTION: When logging in for the first time, the User settings tab will feature a primary e-mail address field with a pre-filled default e-mail address, e.g.:
Replace this address with your professional e-mail address. This e-mail address is used to send necessary notifications to you.
Confirm with the Save button.
The Personal information tab contains pre-populated information such as first name, last name and SSIN in greyed out fields. This information can't be changed. Next to this, you can provide a personal NIHDI number, or more than one, if applicable.
Use the Save button to confirm. You have now completed the fields in both User settings and Personal information tabs, which makes you known to the EAM system as an Authenticated User.
Adding and provisioning an EAM account
Return to the My profile page and select the My accounts tab.
On the My accounts page your personal information is displayed in the blue User details section, followed by a list of accounts you have created.
To add a new account, click on the Add new Account button at the bottom of the page.
The Add a new account window appears.
Complete the fields in the Add a new account window with the e-mail address you use for your organization. Then select the combination of your organization (General Practitioners) and the application (healthstat.be). This is what we call provisioning of an account.
Click on the Save button.
You will be automatically redirected to the My accounts page that has now been updated with your newly created account added at the bottom of the list. The account has received the status "Draft".
Since the General Practitioner is now connected to an organization, he or she can now be found by the Access Manager via the EAM Users Overview. Underneath is explained how that exactly works.
The Access Manager actions
Retrieving the EAM account of the General Practitioner
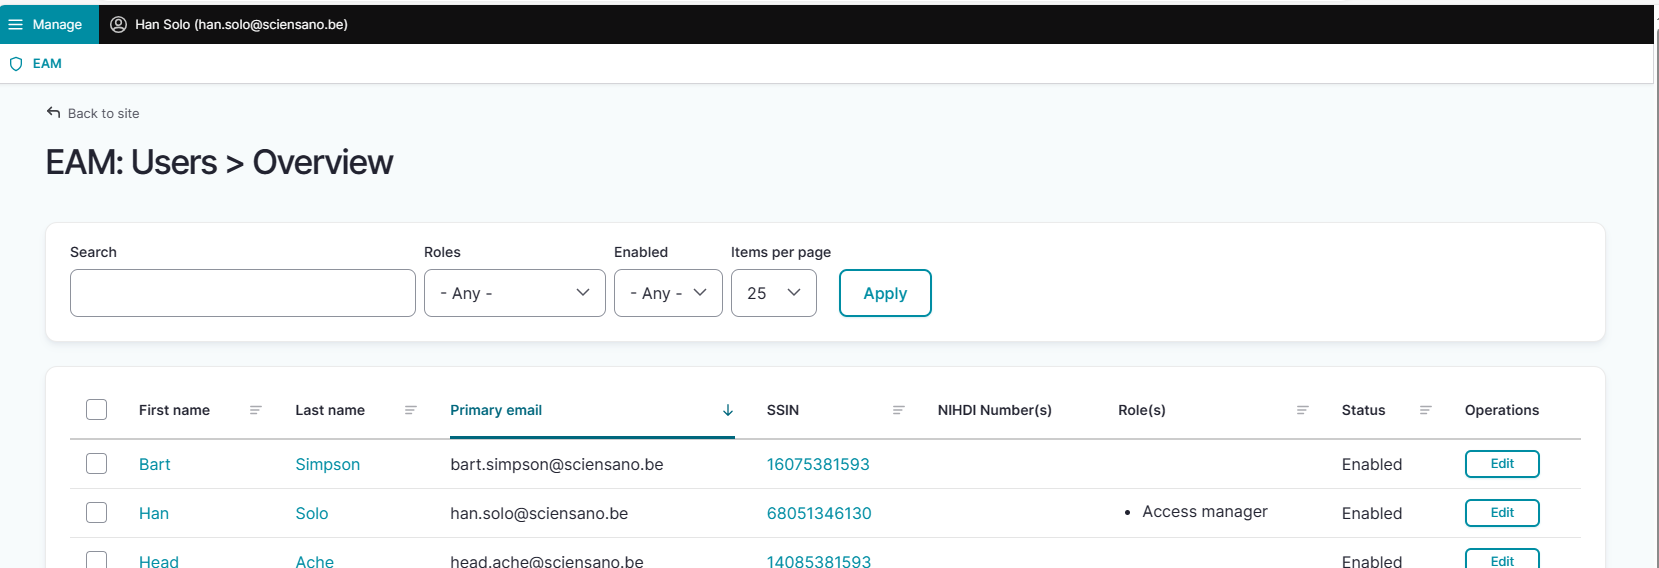
Click on Manage at the top left of the screen, so that the EAM menu appears. When hovering over this, the menu items EAM Users and EAM Accounts become visible. Select EAM Users.

The following page with an overview of the different General Practitioners appears. Select the GP for whom you want to request access to a project in healthstat.be. Click on the corresponding First name, Last name or SSIN.
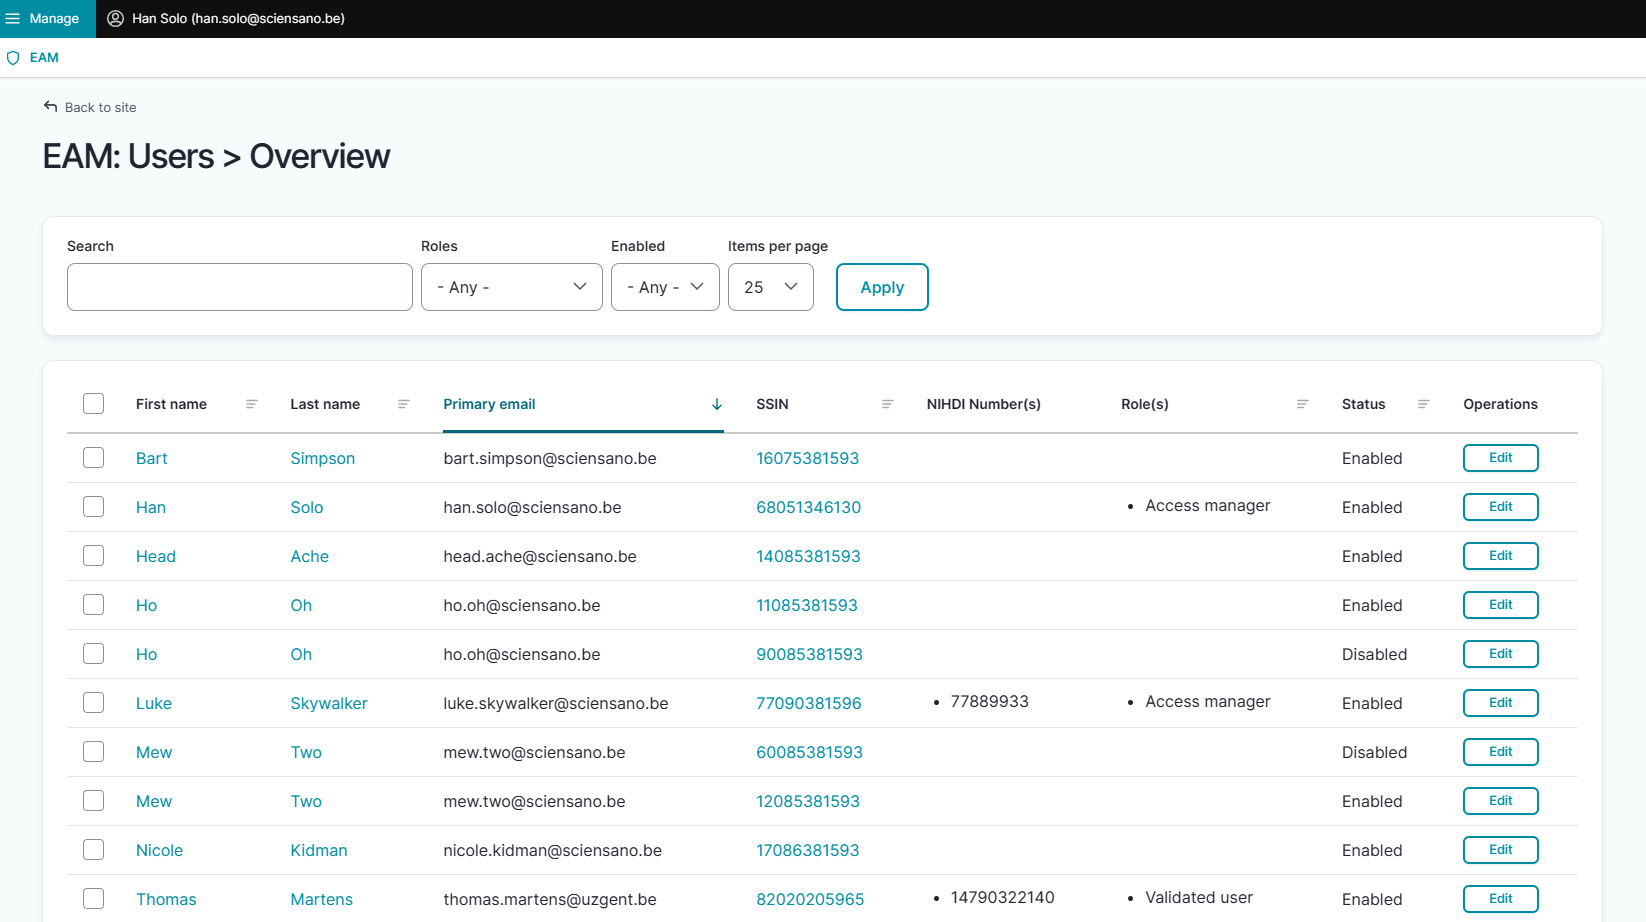
ATTENTION: General Practitioners that not yet appear in the list have either to register via the FAS procedure and create an account (see General Practitioner actions above) or have to be added via Bulk upload (Access Manager action, see Option 3) first.
The account that has been added and provisioned by the General Practitioner will be visible now and has the Draft status. Click on the Edit button at the end of the relevant account line.

Adding grants for a project in healthstat.be
Next, click on the Add new Grant button at the bottom of the Manage grants page.

The Add a new grant window with some required fields pops up. Select the Project you want to have access to from the drop-down list. Next, select the Role and the Data level that apply to your situation. Click on the Save button.

When returning to the Account: Manage grants page you will notice that the grant is added to your account, which is still in the Draft state.
Requesting approval of EAM account with access grants for projects in healthstat.be
Next step is to request approval of the newly added account with grants, thus enabling the General Practitioner to access the specified project(s) in healthstat.be. Therefore, click on the Request approval button.

The status immediately changes to Approval.

Since you are Access Manager, you will be able to follow up swiftly and to change the Account state to Approved.
Approving EAM account with access grants for projects in healthstat.be
Click on Manage to the top left of the screen, so that EAM appears. When hovering over this, the items EAM Users and EAM Accounts become visible.
Select EAM Accounts and Approval successively.
When clicking on Approval you open the page with end-user accounts that are waiting to be approved:
There are two ways to approve these account requests:
- By checking the selection box of the relevant account request and selecting the Approve action. Click on the Apply to selected item button to perform the action.
- By clicking on the Edit button in the Operations column for the relevant account ...
... and subsequently on the Approve button in the Account: Manage grants screen.
The Account state changes to Approved.
After this, a fulfilment process will start to run in the background, finally resulting in an account state change to Published.
Performing a push action
If this change does not take place within a reasonable amount of time - usually between 15 minutes and up to three hours - the account could be updated by means of a "push".
Therefore, return to the accounts overview screen.
First, check the Approved account that needs to be pushed (1). Then, open the Action drop-down menu and select the Update account (push) option (2). Finally, validate this action by clicking on the Apply to selected items button (3).
In case the push action does not trigger the expected result, you need to contact our Support service.
Option 3 : le gestionnaire d'accès crée des utilisateurs et des comptes par le biais d'un téléchargement par lots de fichiers csv (EN uniquement)
Option 3 : le gestionnaire d'accès crée des utilisateurs et des comptes par le biais d'un téléchargement par lots de fichiers csv (EN uniquement)When chosing this option, all actions are to be carried out by the Access Manager. First, the Access Manager needs to create the EAM Users (i.e. General Practitioners) by means of a bulk upload using a csv file. After succesful import of this list, the same procedure is repeated for the EAM Accounts, including access grants. Based on the required fields in the csv files, the user and account data are linked, and only need to be approved by the Access Manager.
Table of contents
The General Practitioner actions
The Access Manager actions
- Creating EAM Users in batch
- Creating EAM Accounts in batch awaiting approval using CSV upload
- Approving EAM account with access grants for projects in healthstat.be
- Performing a push action
The General Practitioner actions
No actions to be completed by the General Practitioner
The General Practitioner is an Authenticated User who does not have the rights to perform the necessary actions.
The Access Manager actions
Go back here if you want to know how to navigate to the My Profile page.
Creating EAM Users in batch
Click on Manage to the top left of the screen, so that EAM appears. When hovering over this, the items EAM Users and EAM Accounts become visible. Click on EAM Users and Bulk upload successively.
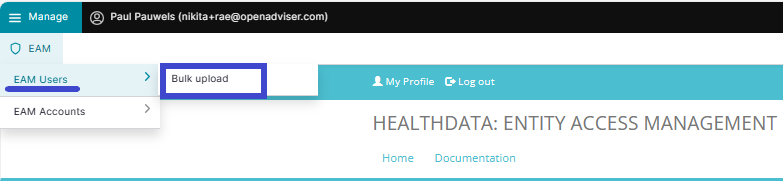
The Users Batch Creation page appears.
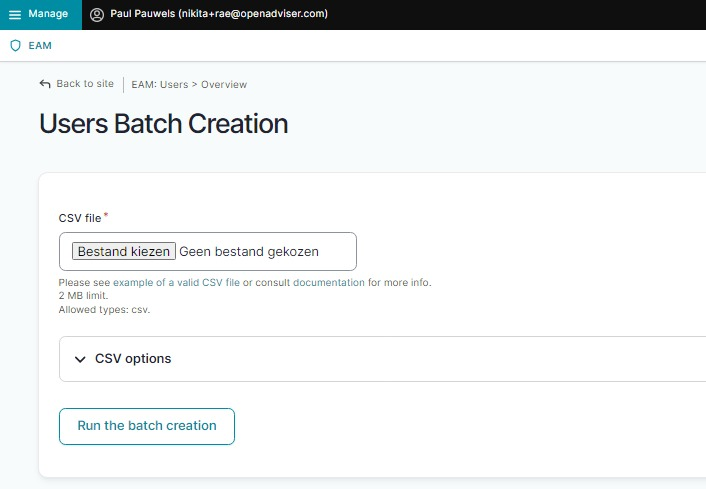
Select a valid .csv file on your system to upload or use the following example file:
Use the schema file to validate the csv example file:
ATTENTION:
Access Managers need to know the personal details of the users they are adding: first_name, last_name, email, ssin.
The NIHDI of the organization (org_nihdi) is: 333333333.
User roles and corresponding values
To complete the value for the field “role”, 2 different variables are possible:
- access_manager
- default
Additional tips:
- If the user already exists, the line will be skipped.
- Avoid using Excel as this can lead to unwanted formatting.
- First_name and Last_name need to be capitalized.
- Make sure that you have placed the quotes correctly. If the values have no comma, you can also leave out quotes.
Abbreviations used in csv bulk upload files
- ssin: Social Security Identification Number - Numéro d’identification de la sécurité sociale (NISS) - IdentificatieNummer Sociale Zekerheid (INSZ)
- org_nihdi: National Institute for Health and Disability Insurance number of your organization (RIZIV/INAMI number)
- nihdi: your personal National Institute for Health and Disability Insurance number (RIZIV/INAMI number)
- app: application such as HD4DP, Healthstat
- project_code: code of the healthdata.be Business Project, e.g. HDBP0001 for Belgian Cystic Fibrosis Registry (BCFR)
Now, run the batch creation by clicking on the corresponding button.
Return to the EAM Users overview page to verify the bulk uploaded list of General Practitioners.
Following this step, the Access Manager needs to link these Users with EAM accounts, having the access grants in them.
Creating EAM accounts in batch awaiting approval using CSV Upload
Click on Manage to the top left of the screen, so that EAM appears. When hovering over this, the items EAM Users and EAM Accounts become visible. Click on EAM Accounts and Bulk upload successively.

The Accounts Batch Creation page appears.
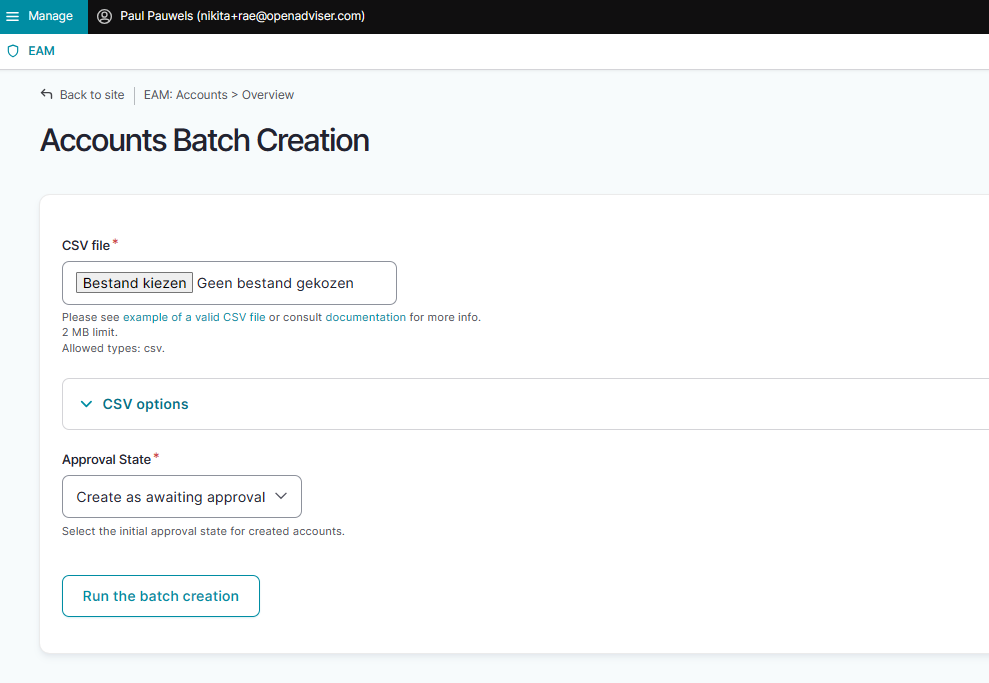
Select a valid .csv file on your system to upload or use the following example file:
Use the schema file to validate the csv:
ATTENTION:
Access Managers need to know the personal details of the users they are adding: first_name, last_name, email, ssin.
User roles and corresponding values
To complete the value for the “role” field for healthstat.be, 4 different variables are possible:
- DATA_PROVIDER_HOSPITAL = Data Provider/Hospital
- DATA_PROVIDER_INDIVIDUAL = Data Provider/Individual
- SPONSOR_SPONSOR = Sponsor/Sponsor
- SPONSOR_INDIVIDUAL = Sponsor/Individual
Make sure to use "healthstat" as value for the "app" field, since roles "Data Provider" and "Sponsor" combined with data levels "Hospital" and "Individual" are typical for the Healthstat.be data reporting and visualization application.
Additional csv bulk upload tips
- When the "role" field has value "1" or "2", the "authorgroup" field should be left empty. Pay attention to this when changing "role" field from value "3" to "1" or "2".
- When adding a user to role "3", the author group needs to be defined and needs to exist, or the line will be skipped. To guarantee a successful bulk upload of an extensive csv file, you want to place the accounts with role 3 at the end of the list to be uploaded. The accounts with role "1" and "2" are imported first, and thus prefilling the author group list with First_name and Last_name prior to importing the accounts with role "3".

- First_name and Last_name need to be capitalized.
- When adding more than one project code, use pipes to separate the codes.
- If the user does not exist, the line will be skipped.
- Avoid using Excel as this can lead to unwanted formatting of the csv file.
- Make sure that you have placed the quotes correctly. If the values have no comma, you can also leave out quotes.
Abbreviations used in csv bulk upload files
- ssin: Social Security Identification Number - Numéro d’identification de la sécurité sociale (NISS) - IdentificatieNummer Sociale Zekerheid (INSZ)
- org_nihdi: National Institute for Health and Disability Insurance number of your organization (RIZIV/INAMI number)
- nihdi: your personal National Institute for Health and Disability Insurance number (RIZIV/INAMI number)
- app: application such as HD4DP, Healthstat
- project_code: code of the healthdata.be Business Project, e.g. HDBP0001 for Belgian Cystic Fibrosis Registry (BCFR)
Then, make a selection in the Approval State menu shown below.

- Create as awaiting approval: With this option the accounts will receive the status Approval and will be set ready for the Access Manager to be Approved.
- Create as pre-approved: With this option the accounts will automatically receive the status Approved and will be uploaded directly without further input from the Access Manager (e.g. confidence in content quality is very high)
Finally, run the batch creation by clicking on the corresponding button.
Approving EAM account with access grants for projects in healthstat.be
When you as Access Manager have chosen to create the EAM accounts as awaiting approval, you need to complete the action with the step described in the following.
Go to the EAM menu as usual.
Select EAM Accounts and then Approval.
When clicking on Approval you open the page with the EAM accounts that are waiting to be approved:
There are two ways to approve these account requests:
- By checking the selection box of the relevant account request and selecting the Approve action. Click on the Apply to selected item button to perform the action.
- By clicking on the Edit button in the Operations column for the relevant account ...
... and subsequently on the Approve button in the Account: Manage grants screen.
The Account state changes to Approved.
After this, a fulfilment process will start to run in the background, finally resulting in an account state change to Published.
Performing a push action
If this change does not take place within a reasonable amount of time - usually between 15 minutes and up to three hours - the account could be updated by means of a "push".
Therefore, return to the accounts overview screen.
First, check the Approved account that needs to be pushed (1). Then, open the Action drop-down menu and select the Update account (push) option (2). Finally, validate this action by clicking on the Apply to selected items button (3).
In case the push action does not trigger the expected result, you need to contact our Support service.
Glossaire EAM
Glossaire EAMLe nouveau système Entity Access Management (EAM) de HD repose sur une architecture conçue pour redonner le contrôle des utilisateurs aux gestionnaires d'accès, en assurant une gestion de bout en bout du cycle de vie d'un utilisateur dans le système.

La nouvelle architecture et les processus qui en découlent impliquent de nouveaux concepts. Nous les avons répertoriés ci-dessous, complétés par des concepts familiers.
Access Manager
Un Gestionnaire d'accès est un Utilisateur authentifié (Authenticated User) ayant des droits supplémentaires de Gestionnaire d'accès dans le système EAM. Ces droits sont accordés par healthdata.be au premier gestionnaire d'accès d'une organisation donnée. Tout gestionnaire d'accès supplémentaire doit être désigné par le fournisseur de données et les droits doivent être accordés par le gestionnaire d'accès existant de cette organisation.
Un gestionnaire d'accès valide et gère les comptes d'utilisateurs dans le système de gestion des accès des entités, approuve et gère les accès de ces utilisateurs EAM aux différentes applications pour tous les projets disponibles, et a le pouvoir de créer des utilisateurs EAM et des comptes EAM au moyen d'un téléchargement en masse de fichiers csv.

Account
Un compte dans EAM est une combinaison d'une adresse e-mail et d'une disposition complétée par un ensemble de droits (autorisations d'accès) donnant accès à un certain registre. Un compte relie donc l'utilisateur EAM au registre souhaité dans le cadre d'une application.
Un utilisateur peut avoir plus d'un compte, chacun avec une adresse e-mail différente, par exemple lorsqu'il travaille dans différents organisations de santé (HCO), et chacun avec une autre disposition.
Account state
L'aperçu ci-dessous montre les différents statuts d'un compte EAM tout au long du flux de travail.
La colonne Label mentionne le nom du bouton d'action disponible pour l'utilisateur authentifié et/ou le gestionnaire d'accès dans les écrans GUI concernés (seules les actions Create New Draft et Request Approval sont disponibles pour un utilisateur authentifié).

Admin
L'Admin ou administrateur fait partie du personnel de healthdata.be et dispose de toutes les autorisations et fonctionnalités au sein du système EAM. Ce type d'utilisateur doit être utilisé avec parcimonie et uniquement à des fins hautement techniques ou en cas d'urgence.
Authenticated User
Un utilisateur authentifié est une personne qui est connectée au système EAM de HD via itsme ou eID et qui a un profil d'utilisateur basé sur le prénom, le nom et le code NISS partagé lors de la connexion via le Federal Authentication Service (FAS). Un utilisateur authentifié peut accéder à l'application EAM, créer des comptes et demander des autorisations d'accès pour des projets dans des applications telles que HD4DP2 et healthstat.be. Il a également accès à ses propres informations de compte au cas où des changements seraient nécessaires.
Author group
Un groupe d'auteurs est un groupe d'utilisateurs disposant des mêmes droits d'édition et de révision d'un enregistrement dans une application donnée de l'organisation. La création d'un groupe d'auteurs est basée sur le prénom et le nom de l'utilisateur qui demande l'accès. Il est ensuite géré dans le système Entity Access Management (EAM) de HD.
Pour l'application HD4DP2, le champ Author group est automatiquement rempli pour les rôles d'utilisateur 1 (Study Lead) et 2 (Study Associate). Le groupe d'auteurs pour le rôle 3 (Study Support) doit être sélectionné dans la liste déroulante correspondante.
FAS
Le Federal Authentication Service (FAS) est un système qui authentifie les personnes pour leur permettre d'accéder à des applications gouvernementales sécurisées en ligne. Il garantit l'authenticité des utilisateurs avant de leur permettre d'utiliser les services protégés de l'administration en Belgique.
Grants (Access grants)
Les autorisations définissent l'accès d'un utilisateur à un registre dans une certaine application avec un rôle spécifique. Elles sont ajoutées à un compte EAM provisionné et doivent être approuvées par le gestionnaire d'accès de l'organisation concernée. Par exemple :

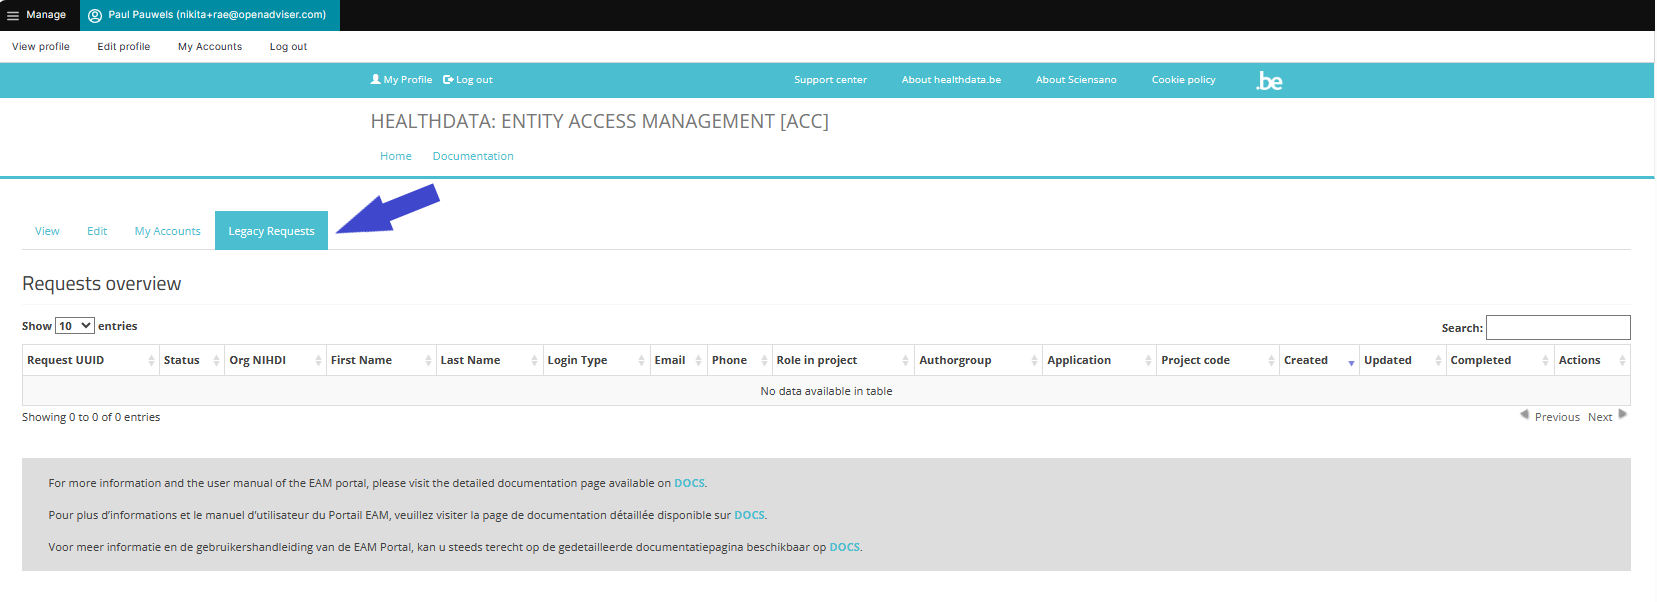
Legacy requests
L'onglet Legacy requests permet de récupérer les informations affichées sous l'onglet Requests overview dans l'ancienne version de EAM (2.7). L'objectif de cet aperçu est d'assurer le suivi des demandes en suspens après la migration vers EAM 3.0.
Manager (HD Manager)
Le manager est un type d'utilisateur dans EAM dont le rôle est endossé par le personnel du Service Desk de healthdata.be. Par rapport à un manager d'accès, le profil de manager a des droits plus étendus pour des actions avancées, sans les fonctionnalités d'urgence d'un administrateur.
Messages (log)
Les messages sont créés chaque fois que des actions sont effectuées au niveau du compte EAM, par exemple la réinitialisation du mot de passe, la demande d'approbation du compte, l'approbation des autorisations d'accès, etc. Un message est la représentation de ce que nous envoyons ou recevons du Service bus. Les messages sont enregistrés dans EAM à des fins d'archivage.
Organization
Nom complet : Organisation de santé (HCO). Une liste de toutes les organisations, comprenant le nom, le numéro INAMI et la liste respective des gestionnaires d'accès, est gérée par le gestionnaire de HD. Une organisation qui n'est plus active recevra le statut Disabled, sans être supprimée du système EAM.
Provision
Il s'agit du déploiement d'une certaine application dans une certaine organisation, accompagnée de paramètres spécifiques fournissant des informations supplémentaires sur le déploiement.
Service Bus
Il s'agit d'une couche de communication entre notre portail EAM et les installations du côté du DP. Alors que l'ancien système EAM gérait principalement les demandes d'accès, il se concentre désormais sur la gestion complète des utilisateurs, y compris les demandes d'accès, la création de comptes, le feedback loop, etc. dans le but d'accélérer l'intégration des utilisateurs, d'améliorer l'expérience des utilisateurs et de réduire les interventions manuelles par le service de support / DevOps.

User (EAM user)
L'utilisateur est l'entité principale du système EAM. Une fois que le profil de l'utilisateur, contenant des informations de base telles que le nom d'utilisateur, l'adresse e-mail principale, le prénom, le nom de famille, le code NISS et le numéro INAMI, a été validé, l'utilisateur a accès à EAM et est prêt à interagir. EAM offre la possibilité d'ajouter plus d'un code INAMI. Chaque utilisateur peut être lié à plusieurs comptes.
User matrix
En général, une matrice d'utilisateur est une manière structurée d'organiser les informations sur les utilisateurs et leur rayon d'action. Nous avons utilisé la matrice d'utilisateur comme point de départ de notre documentation sur le nouveau système de gestion de l'accès des entités : un tableau croisé des différentes fonctionnalités des types d'utilisateurs Authenticated User et Access Manager. A partir de là, vous pouvez accéder aux informations exactes.
User roles
Les rôles d'utilisateurs déterminent vos droits d'accès aux applications HD telles que HD4DP2 ou healthstat.be pour le projet souhaité. La hiérarchie des rôles ne correspond pas nécessairement à la structure du personnel de votre organisation. Pour en savoir plus sur les rôles d'utilisateurs dans HD4DP2, cliquez ici. Les rôles d'utilisateurs dans healhtstat.be sont documentés ici.
User types
Les types d'utilisateurs déterminent le niveau des droits de gestion dont vous disposez dans le système EAM :
- Authenticated user
- Validated user (voir ci-dessous)
- Access manager
- (HD) Manager
- Administrator
Différents des rôles d'utilisateurs qui sont typiques des applications de HD.
Validated user
Type d'utilisateur. Après la migration de votre organisation de soins de santé vers le système EAM actuel, le gestionnaire d'accès peut apercevoir le type d'utilisateur Validated dans la colonne Role(s) de la page de vue d'ensemble des utilisateurs EAM.
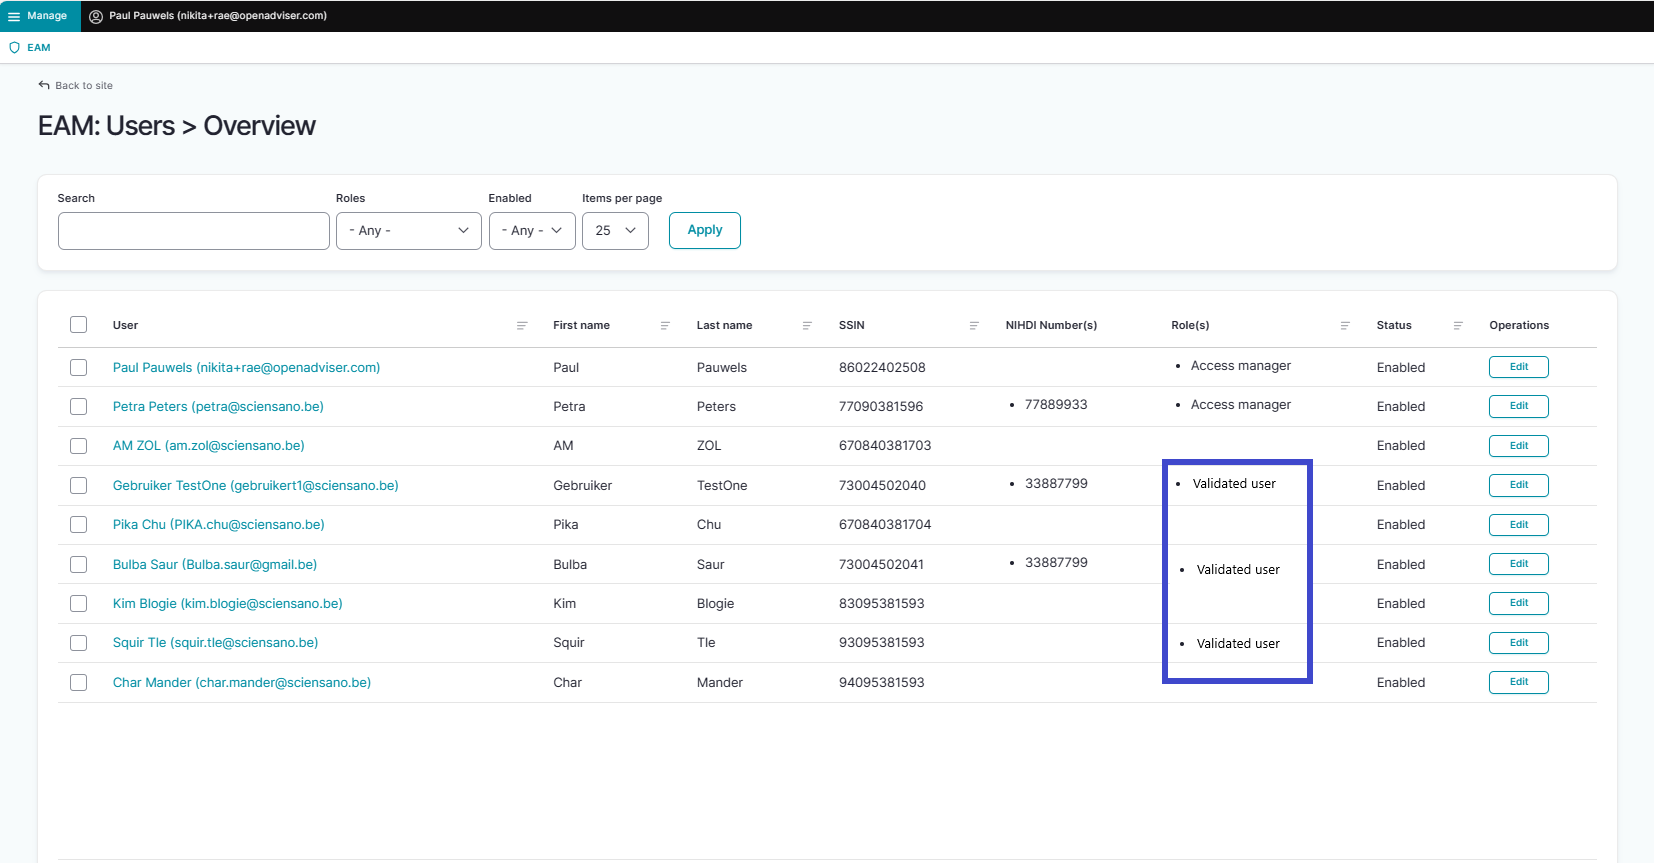
Le rôle Validated user est un vestige de la version 2.7 de EAM, où elle indiquait que le profil d'un utilisateur avait été complété et validé par le gestionnaire d'accès. Ce type d'utilisateur migré correspond au type d'utilisateur authentifié dans le système EAM actuel. En tant que tel, le Validated user ne joue pas un rôle actif dans le système actuel et n'influence pas sa fonctionnalité.
Cette documentation est encore en construction. Nous essayons de présenter les informations aussi correctes, complètes et claires que possible. Cependant, si vous voyez un élément dans la documentation qui est incorrect, ne correspond pas à votre expérience ou nécessite des éclaircissements supplémentaires, veuillez créer ticket support via notre portail Jira Service Management ou nous envoyer un e-mail à support.hd@hda.fgov.be pour signaler ce problème dans la documentation. N'oubliez pas d'inclure l'URL de la page. Nous ajusterons la documentation. Merci!Actions supplémentaires
Actions supplémentairesMaintenant que tous les médecins généralistes et leurs comptes EAM ayant des droits d'accès à un projet dans healthstat.be ont été approuvés, le gestionnaire d'accès peut assurer le suivi de la gestion des utilisateurs EAM et des comptes EAM au moyen des fonctionnalités disponibles en cas de besoin.
Ces actions commencent à partir de la page d'accueil de EAM :
Les pages suivantes présentent les actions complémentaires les plus courantes :
Désactivation d'un compte EAM (EN uniquement)
Désactivation d'un compte EAM (EN uniquement)Disabling an EAM account
Click on Manage on the top left of the screen in order to reveal the EAM menu. Select EAM Accounts.

Scroll down the displayed list of accounts and tick the selection box of the account(s) you want to disable. Go to the bottom of the page and click on the Action toggle button to select Disable account. Then, click on the Apply to selected items button.

Confirm with the Execute action button

This action triggers an email notification for the Authenticated User to inform about the account being disabled. The user is no longer able to login with the credentials at hand, and needs to contact the Access Manager to have the account enabled again.
Activation d'un compte EAM (EN uniquement)
Activation d'un compte EAM (EN uniquement)Enabling an EAM account
Click on Manage on the top left of the screen in order to reveal the EAM menu. Select EAM Accounts.

Scroll down the displayed list of accounts and tick the selection box of the account(s) you want to enable. Go to the bottom of the page and click on the Action toggle button to select Enable Account.

To complete the action, you need to click on the Execute action button.

This action triggers an email being submitted to the Authenticated User with new credentials. All previously approved accesses will be restored.
Vue d'ensemble de tous les médecins généralistes et de leurs comptes EAM avec autorisations (EN uniquement)
Vue d'ensemble de tous les médecins généralistes et de leurs comptes EAM avec autorisations (EN uniquement)Viewing all users within the organization HDGP3333 for healthstat.be using the EAM interface?
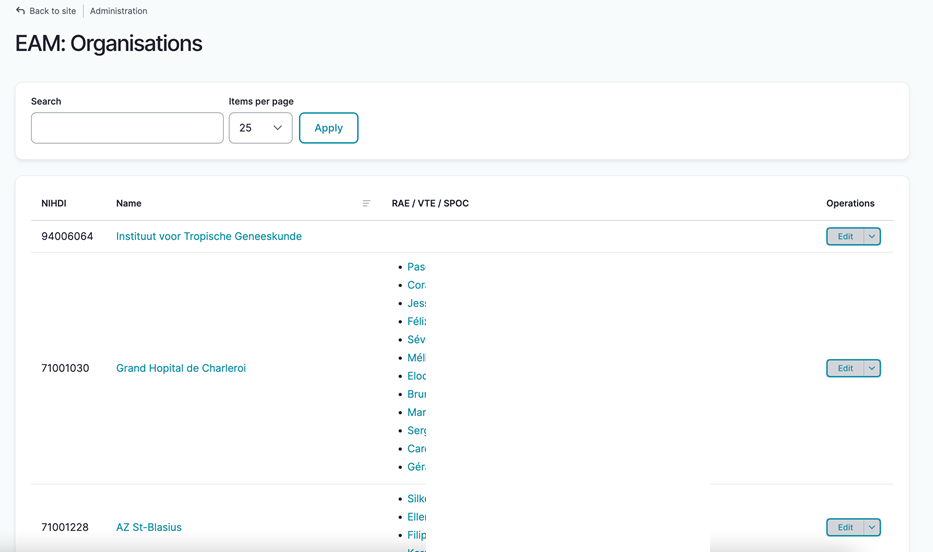
Click on Manage to the top left of the screen, so that EAM appears. When hovering over this menu item, the subitems EAM Users and EAM Accounts become visible. Select EAM Accounts.

The page shown gives an overview of all accounts of all users within the organization(s) for the different applications, including the grants.

Filtering accounts for healthstat.be
Use "CTRL+F" and enter "Healthstat" in order to find the accounts for projects in the application healthstat.be.