Technical manual of the application HD4DP v1
Technical manual of the application HD4DP v1 Bart.Servaes Mon, 12/02/2024 - 11:44HD4DP v1 csv upload
HD4DP v1 csv uploadThe documentation below includes generic sample screens designed solely to illustrate what the process entails, irrespective of the registry involved.
The upload center is introduced to make the upload of multiple registrations more performant and user friendly.

The link to the upload center can be reached by the main menu:

If uploads are processed, an overview with the name of the uploaded file, the status and a visual representation of the status, the number of records that were processed, the way of uploading, the user and the upload date is saved in the main screen of the upload center. This allows a quick and visual impression of the data uploaded in bulk:

In the right upper corner two buttons are shown.
- Configuration: the default settings for a register can be set by any user that is authorized to participate in a register.

Following options are available:
- Conflict mode: what needs to be done in case of conflict
- Conflict master: is the data from the new registration of from the record in the database saved in case of conflict
- Ignore duplicate records
- Autosubmit: send the data automatically for processing in HD4RES
- Validation: what need to be done after validation the registration:
- None: only the registrations without errors will be saved
- Save on validations: Save the registrations when there are validation errors upon uploading
- Validate all: Only perform commit if non of its records have (errors or) validation errors

4 steps need to be executed for a new upload. When the titel bar of a separate step turns green, orange or red and the icon of the step in the overview, the step has respectively ended with success, with warnings or errors.

Step 1 - Select file
The first step is to select the CSV file with the data to be uploaded. The default settings for a register can be found in the Configurations on the main screen of the upload center.
Be sure to deselect the "Use default configurations" when changing the default settings:

For the BCR register, the possibility exists to upload two files and link them during the process:
- Both documents will be validated separately. By using the link "Click here to see the linked upload" the user can switch between the linked documents. Refresh of push F5 on you to see the status of the upload.

After uploading succesfully, the title bar of this step will turn green.
Step 2 - Validity Check
Validation checks are executed for every record.

Step 3 - Upload
The file is being uploaded and the result is shown in this step per line of data added:

Step 4 - Finalize
The result is shown visually for all registrations and for all registrations in a CSV file in reports after finalization:

Succes report is a CSV file with all registrations who were processed succesfully.
In case of errors, a link to a detailed error report is shown too:

Please find below the movie that guides you through the functionalities of the Upload Center:
Create a csv for HD4DP v1
Create a csv for HD4DP v1A RShiny application has been developed to help the data provider with transforming the raw export from the Smartgene software to the required format for upload in HD4DP and on the SFTP server. The program and the documentation are accessible on the Sciensano-ARL Sharepoint (https://collaboration.sciensano.be/sites/E1989/). For additional guidance and bug-reports on this RShiny application: HIV_STIsurveillance@sciensano.be.
CSV upload of nucleotide sequences
CSV upload of nucleotide sequencesData submission procedure using CSV Upload
1. Preparing the csv file
- The CSV file should contain following fields “filename;recordname;genetic_sequence”
- Description of the values for the fields "filename" and "recordname" are :
Filename: This field is used as the first key for linkage between the data sent through HD4DP1 (patient & sample data) and SFTP (nucleotide sequences data). This field must contain the same value for both uploaded records to allow the 1 to many link. Please use this convention: ARL_yyyymmddHHMMSS (name of ARL and date-time stamp of the file, e.g. HSP_20240827092014). The name of the csv file with nucleotide sequences sent through SFTP must have this value in order to be linked with the record transferred via the HD4DP1 (patient & sample data).
Recordname: This field is used as the second key for linkage between the data sent through HD4DP1 (patient & sample data) and SFTP (nucleotide sequences data). This field must contain the same unique value for both uploaded records to allow the 1 to 1 link. Please use this convention: ARL_yyyymmddHHMMSS_xxxxx (name of ARL, date-time stamp of the file and a unique 5-digit number, e.g. HSP_20240827092014_00001). as described
- The values of the field “genetic_sequence” contain the nucleotide sequences of the HIV genes.
Example of the CSV file for sequence :
Disclaimer: The example files above are only provided as a guideline and do not contain real life data.
2. Uploading the CSV file
Step 1: Open the sftp tool like WinSCP
Step 2: Get the credentials (Host name, Port number, User name and Password) from the IT department of the Data Provider, to log on to the sftp server located on the Data Provider side. In case the credentials are unavailable we advise you to request your credentials through our service portal at the Jira Service management (JSM) Portal via the Request something tab and subsequently the Request for Information box.
Step 3: Fill in the credentials into the Login screen and click on Login to be able to access the different upload folders:
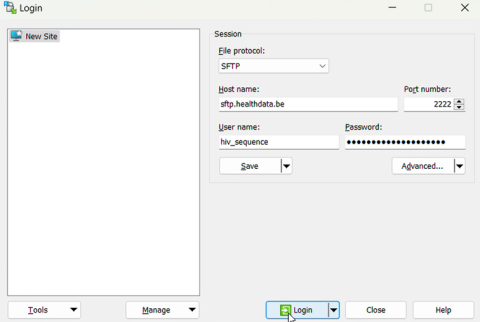
Note: a warning might be given, just click on Update

Below documentation contains generic example screens with the sole purpose to demonstrate how the process looks like. In the subsequent screens the desired HIV_sequence register needs to be selected.
Step 4: Select the desired HIV_sequence folder and open the upload folder by double-clicking on it:

Step 5: Now go to the folder on the left-hand side panel where the csv file to be uploaded is located:

Step 6: Drag the csv file to be uploaded from the left-hand side panel into the folder on the right-hand side panel:

Step 7: Refresh the right hand pane. The ownership of the file has been transfered from the ‘hiv_sequence’ user (1092) to our technical user (1001), thereby preventing the data providers from further accessing the uploaded files in any way.

The files are deleted by the load process when it picks them up once daily.
3. Validate csv upload
No validation of the files occurs