User manual of the application HD4DP v1
User manual of the application HD4DP v1 manager Thu, 05/23/2024 - 14:50Access the application HD4DP v1
Access the application HD4DP v1To access the HD4DP v1 application, you need an account, a username and a password. If you do not have an account, you can request one by following the steps below. If you have an account, follow the instructions under “Sign In” at the end of this page.
- Open the link for the HDPD v1 application. You will see the screen below.
Please contact your IT department to obtain the link of the HD4DPv1 application on the server of your organization. In case you could not be further helped, you can contact healthdata.be at support.hd@hda.fgov.be to get the link. The link is specific in every organization based on the server on which the HD4DP application is running.

- Click on the Request account link on the login page.
- Fill out the request form:
- Enter a username, first name, last name and e-mail address
- Select the organization and data collection(s)
- Fill in the Requester e-mail field if a person requests an account for a third person
- Submit the request using the Request button

- Confirmation e-mails are sent to the person for whom the account was requested as well as the requester, if the field "Requester e-mail" was filled.
- The approval or rejection for the user account is confirmed by mail. Depending on your organization, this could take a few hours.
- This action will be done by an HD4DP v1 administrator in your organization
- The confirmation mail will include all the necessary information to log in
Sign in
Logging in to the HD4DP v1 application is done in 3 steps:
- Enter your username and password in the appropriate fields
- Select the correct organization
- Click on "Log in"

Request access to a data collection
Request access to a data collectionOn this page we describe how a user, who is logged into the HD4DP v1 application, can request access to a desired data collection.
- Go to the Settings tab in the right upper corner of the screen.
- Look for the User profile section and click on the Edit Profile button.

- In the section Request data collection access you click on the drop-down list.

- Select the desired data collection.
- Click on the Send request button to submit.
- A mail is sent to the responsible HD4DP administrator to handle your request.
Navigate to a register
Navigate to a register- Click on the Registrations tab.
- Select the register to create or modify registrations. Click on the top left corner and a drop down menu will be shown. The list of available registers is provided: Data Collections (in this article, we randomly selected the project BNMDR).
- Select the correct version of the registry. In case of different versions/periods select the one with the green bullet.

Create and submit registrations
Create and submit registrationsThe Registrations tab shows the user the available registries. A user can start collecting data from this view.
Creating and submitting a registration consists of 4 steps:
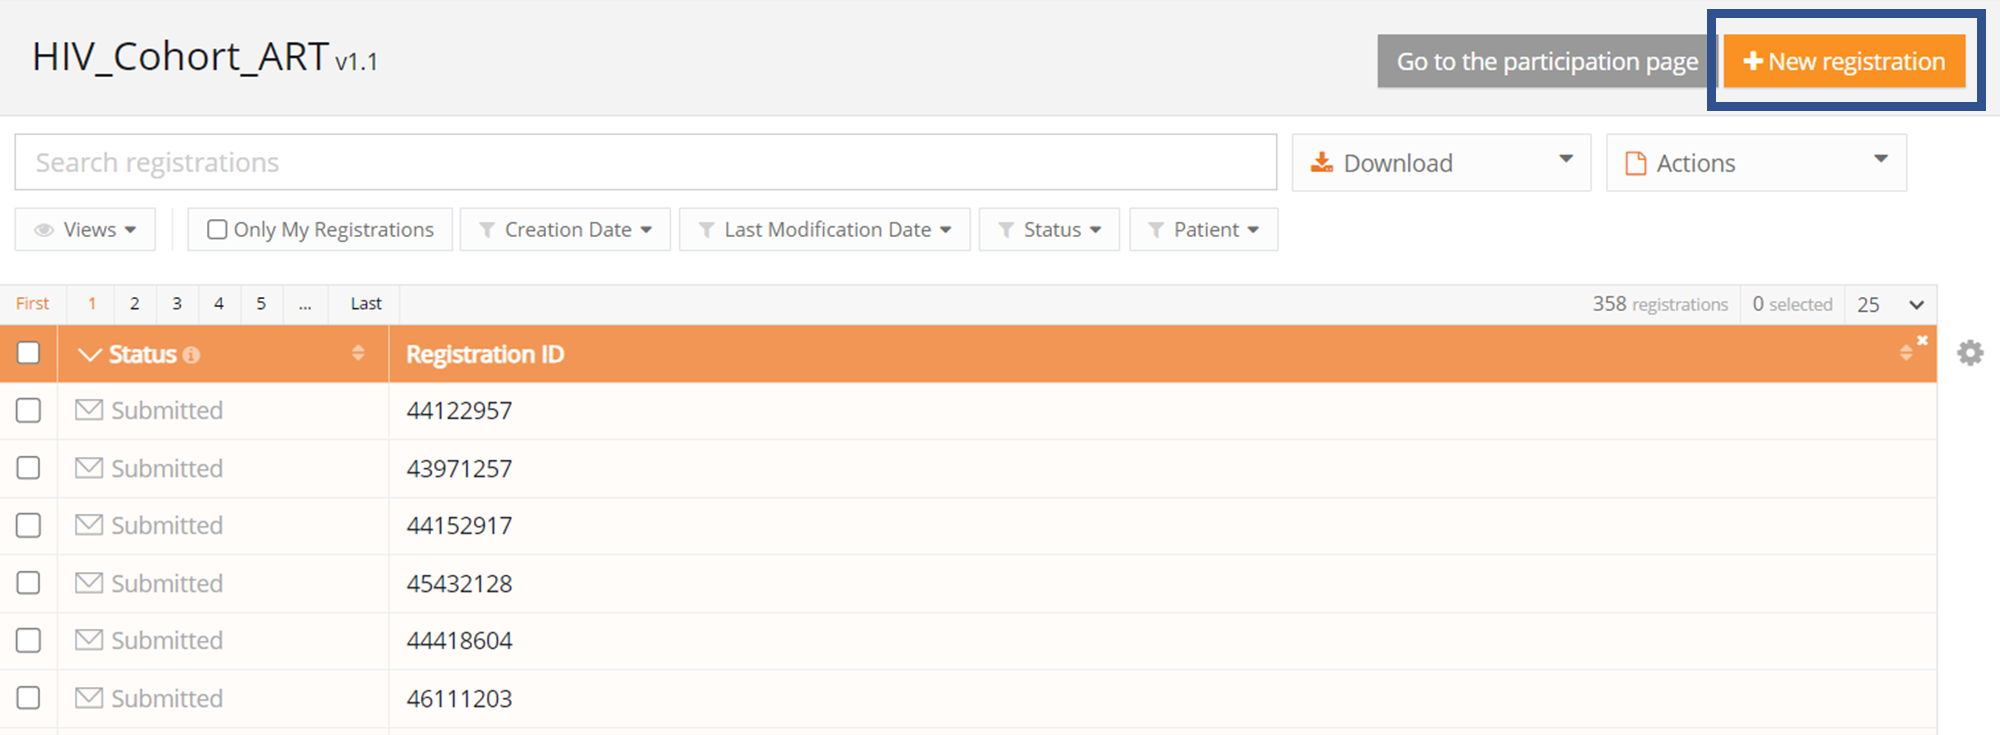
- Select the registry for which you want to create a registration.
(The documentation below includes generic sample screens designed solely to illustrate what the process entails, irrespective of the registry involved.)

- Click on "New registration" button.
- Fill in the registration form and save or submit the registration with the buttons below.

- Save the registration temporarily if needed. The status of the record will be "Open" for saved registrations.

- Submit the registration if no validation errors present. The status of the registration will change to "Sending".

- When the record has been processed, the status will change to "Submitted".

As soon as a registration is sent, the "status confirmation" column will show "Pending".
- It shows "OK" once the registration has arrived, and "NOK" if the registration did not arrive within 48 hours. If the status is "NOK", the software will automatically try to resend the registration up to 10 days after the initial submission.
- For the statuses "Sending","Corrections needed" and "Approved" the status confirmation will be empty because the registration has not yet been submitted.
- A registration can be "Reopened" if needed as long as the status of the registration is "Submitted".
Change or complete registrations
Change or complete registrationsA user can modify and complete a registration in four steps:
- Select the register from which you wish to modify one or more registration(s).
(The documentation below includes generic sample screens designed solely to illustrate what the process entails, irrespective of the registry involved.)

- Click on the registration to be changed, and complete the form. The status of the record is then:
- Open for registrations saved manually or by uploading a csv file
- Corrections needed for registrations with errors

- Save registration temporarily if necessary. Record status becomes Open for stored registrations.

- Send the registration if there are no more validation errors.
- Registration status changes to Sending

- When the record is processed, the status changes to Submitted.

Once a registration is sent, the message Pending appears in the status confirmation column.
- When the registration is received, the message OK appears; if the registration is not received within 48 hours, the message NOK appears. With the status "NOK", the software will automatically try to send the registration up to 10 days after the initial submission.
- For the statuses Sending, Corrections needed and Approved, the status confirmation is empty because the registration has not yet been sent.
- A registration can be Reopened if necessary, as long as the status of the registration is "Submitted".
Delete registrations
Delete registrationsOnly registrations with status Open or Corrections needed can be deleted.
The following steps are required to delete the registration:
- Select the record and version for which you wish to delete a registration
(The documentation below includes generic sample screens designed solely to illustrate what the process entails, irrespective of the registry involved.)

- Select the registration(s) you wish to delete
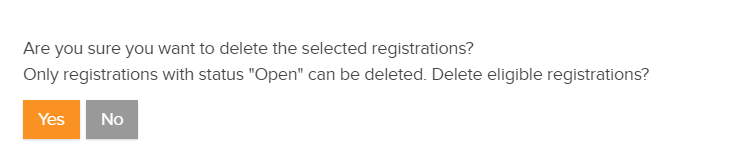
- Select the Actions button and select the Delete registrations option

- Select Yes to confirm
The progress bar
The progress barThe progress bar shows the progress of the registration and can be found in:
- the view list of a register;
- the detailed view of a record.
View list example

Detailed view example

The progress bar can be divided into three sections, listing the number of errors, remarks and correct fields in a registration.
Each section has its own color and meaning.
- Red: mandatory fields and fields containing an error. These need to be solved before the registration can be submitted.
- Blue: Empty optional fields. The registration can be submitted with empty optional fields.
- Green: correctly filled fields.
Hover over the progress bar to display the number of fields per section.

Validation errors and validation warnings
Validation errors and validation warningsData that are filled in manually or that are present in the uploaded file are subject to errors.
These errors will be shown as validation errors, (absence of) required fields, validation warnings under the validation part which in the right panel of the screen. An explanation of the error is given.
Clicking on the validation error or warning will navigate to the field concerned.

These records need to be corrected first and then submitted for registration.
Registration statuses overview
Registration statuses overviewThis article explains the different registration statuses in HD4DP v1 as of v1.8.
Where to find the status of a registration?
Statuses are shown in 'Status' column which is per default the first column in the overview:

What is a Status Confirmation?
The status confirmation gives information about the arriving of the data in HD4DP. The status confirmation, which is in fact a substatus of a registration is shown in the column 'Status confirmation'.
To view the 'Status Confirmation', modify the list view add the column 'Status confirmation':

As soon as a registration is sent and has status 'Submitted', the confirmation column will show the following substatus:
- Pending
- OK: the registration has arrived
- NOK: the registration did not arrive within 48 hours
The different registration statuses
- Open*: a registration is created and stored. It has not been submitted
- Sending: the registration is being sent to HD4RES
- Submitted: the registration has been sent to HD4RES. This does not necessarily mean that the registration has arrived in HD4RES
- Registrations in status 'Corrections needed'*: the researcher verified the registration and added some comments. Review the comments and correct where necessary
- Approved: the researcher verified and approved the registration
- Registrations with status 'Follow-up needed'*: a follow-up registration is needed for this registration. Fill in the newly available fields
- Error: your account is not authorized to create and submit registration for this register. Please contact support.
* action is required from the user
The below scheme summarizes the different registration statuses in HD4DP and Processing Data and their relation to each other:

Registrations in status 'Corrections needed'
Registrations in status 'Corrections needed'Registrations with status 'Corrections needed' need to be revised. The researcher has comments that require an update or revision.
In order to look for registrations which need corrections, select in the registration tab the tab ‘Status’ and ‘correction needed’.

- Select the record with status 'Corrections needed'

- Verify and react to the comments made by the researcher by selecting the ‘comments’ tab

- Reply to the comments and modify the registration and save the comment

- Click 'Re-submit' to send the corrections to the researcher. Alle validation errors need to be solved before the 'Re-submit' button becomes available
Registrations with status 'Follow-up needed'
Registrations with status 'Follow-up needed'Some registrations need follow-up e.g. to monitor multiple consultations of a patient. Therefore additional information will be asked at predefined milestones, which are defined in the set-up phase of the registry.
Follow-up registrations can be triggered by:
- Timing e.g. x time after the initial registration
- Answers in the initial registration e.g. only if the patient has taken medication X
- A combination of both e.g. if the patient has taken medication X, ask follow-up information 3 months later
In order to look for registrations which need follow-up, select in the registration tab the tab ‘Status’ and ‘follow-up needed’.

If the Status column shows 'Follow-up needed' and the 'Follow up' column is active, the user can add the extra information needed in the details of the registration.

Note: the process of validation and resending the registration(s) back for the follow-up data takes minimum 4 hours.
Select 'Follow up' in the settings of the view:

The Follow-up column is now shown in the view:

When follow-up is needed, the column 'Follow up' in the list view indicates if follow-up is needed by indicating:
- Planned: follow-up will be needed in the future, indicated by the date indication
- 'Status Column' shows 'Submitted', no action is needed at this moment
- Active: the questions for this follow up are now visible and can be filled
- 'Status Column' shows 'Follow-up needed', action is needed
- Submitted: the follow-up column will change to submitted after the additional information is given
- 'Status Column' shows 'Submitted', no more action is needed
Depending on how many times follow-up is needed, a row is added to the column. The milestones are indicated by t1, t2 etc.

Submit registrations in bulk
Submit registrations in bulk- The registrations that need to be submitted, have to be checked to proceed the registration in bulk
- Click on the button 'Actions' and select 'Submit registrations'. The number of selected records is displayed between brackets
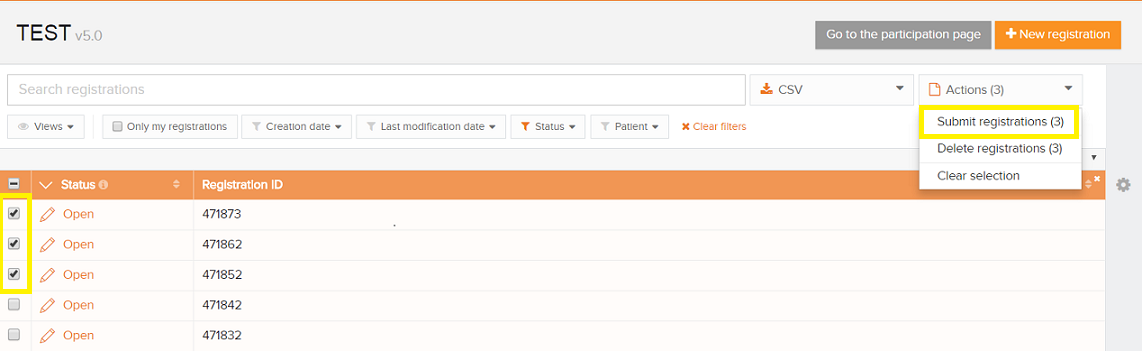
- Confirm the submission on the window that appears

- A summary of the registrations that are submitted and failed is shown. The records that contain errors will not be submitted

Finalize the data collection
Finalize the data collectionThe researcher needs to be notified if the registration is ready.
There are 2 ways to finalize the registration:
1. By using the link in the Registration tab:

2. By using the button in the Participation tab:

- Confirm finalization of the data collection:

Sometimes additional data is requested by the researcher. This must be completed first before using the finalize button or link.
After you select the Finalize data collection button, the researcher will be notified.